
Results 21 to 30 of 35
 109Likes
Thread: Triple Lined Wedge
 LinkBack URL
 About LinkBacks
-
02-16-2019, 07:00 PM #21www.edge-dynamics.com


- Join Date
- Feb 2013
- Location
- London
- Posts
- 3,066
Thanked: 512 Nice , I've done aluminium and brass but never lead and brass. It looks great.
 Originally Posted by outback

-
The Following User Says Thank You to JOB15 For This Useful Post:
outback (02-17-2019)
-
02-16-2019, 07:03 PM #22www.edge-dynamics.com
- Join Date
- Feb 2013
- Location
- London
- Posts
- 3,066
Thanked: 512
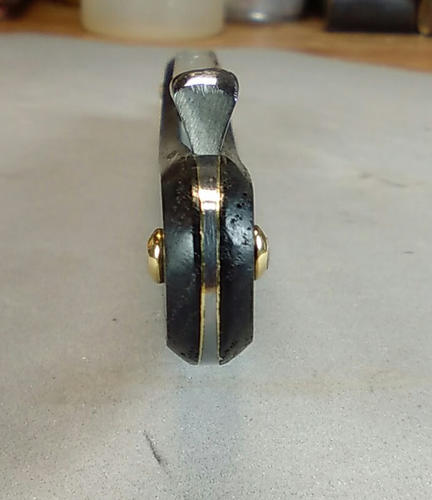
Thanks Extreme pinning is also a thing. Originally Posted by Euclid440
The wood was about 8mm to start , the brass was 0.4 ..The thinner the lining material the better I think..
-
The Following User Says Thank You to JOB15 For This Useful Post:
Euclid440 (02-16-2019)
-
02-16-2019, 07:55 PM #23Senior Member

- Join Date
- Jun 2015
- Location
- South Carolina
- Posts
- 1,838
Thanked: 516
Yes yes, but you make it sound so easy! Lol Originally Posted by JOB15
It is also very easy to accidentally go to far or lopsided with the taper even with normal wedges, now add to that "both" sides of that "wood, brass, wood" center... Each side having to be the same thickness...
This seems to me the hardest part.
Looking forward to seeing more!
 You must unlearn what you have learned.
Yoda
-
02-16-2019, 08:09 PM #24Senior Member
- Join Date
- Dec 2016
- Posts
- 283
Thanked: 61
The rosewood looks great! I'm curious, what rosewood is it specifically and what did you do for the finish?
JOB15 likes this.
-
02-16-2019, 08:42 PM #25Senior Member

- Join Date
- Feb 2018
- Location
- Manotick, Ontario, Canada
- Posts
- 2,792
Thanked: 557
Was the wood you used stabilized?
JOB15 likes this.David
Shared sorrow is lessened, shared joy is increased
― Spider Robinson, Callahan's Crosstime Saloon
-
02-16-2019, 08:51 PM #26www.edge-dynamics.com
- Join Date
- Feb 2013
- Location
- London
- Posts
- 3,066
Thanked: 512
I will write up some details tomorrow..
-
02-16-2019, 08:57 PM #27Senior Member
- Join Date
- Jun 2015
- Location
- South Carolina
- Posts
- 1,838
Thanked: 516
No need to stabilize rosewood, I'm pretty sure even the softer, porous outer wood is fine with various finishes including oils. Also it's a dense wood at the core, and can go with simply a high grit sandpaper finish.
I'm also wondering though, if it is indeed stabilized, didn't know it ever to be so..You must unlearn what you have learned.
Yoda
-
02-17-2019, 12:00 AM #28www.edge-dynamics.com
- Join Date
- Feb 2013
- Location
- London
- Posts
- 3,066
Thanked: 512
I just sat here for 1 hour typing a how to, when I clicked post it told me I wasn't logged in . Long story short , "Copy" long texts before posting..
wow
-
02-17-2019, 02:32 PM #29www.edge-dynamics.com
- Join Date
- Feb 2013
- Location
- London
- Posts
- 3,066
Thanked: 512
Making a wedge is a total pain in the backside, hence many opt for a spacer.
Personally I want everything to be jaw droppingly beautiful from the wedge to the natural edge on the blade. Form and function just like sharp & smooth, I want both.
It does however make more sense to make a spacer because of the problems that come with wedges. Example: You can take a piece of wood and angle one side , 50% of your wedge made. Then you start to angle the opposite side . With a lot less work on the second side and without creating the same angle as the first side your wedge can look complete. To the naked eye it can look like a perfect wedge yet when you add scales the difference in angles will lead to pivot hole that don't match up 100% = a blade that wont centre = headache .
Then consider only a near wedge blade can accommodate a beefy type wedge in most cases. Angles of the wedge causing stress on the scale material = pulling on the wedge and or its lining . No amount of glue and pinning can handle certain constant pulling.
When the wedge is in place and must be equalled to the scales which requires sanding, which creates heat, heat = melted glue / metal and wood expanding , contracting at different rates. (hand sanding, less friction/heat, time consuming but better wedge survival rate)
Most important when creating wedges are flat surfaces . Take a chopping board, sand paper , tape it down, use balls of masking tape to secure the wedge and start sanding. Lighter pressure = flatter even surfaces.
Cut all your wood and metal pieces, drill all your holes, larger than needed will help.
Re sand all your parts , drilling will create burs and raised parts.
Glue them all together or one piece every day. Your choice.
If every part is flat and pressure is applied at every corner and edge whilst the glue sets, you should be good.
Forget about JB Weld or Gorilla glue, go with Devcon I suggest.
The inner part of the scales at the wedge end has to be completely flat to every edge and corner. Use a sharpie and a light touch sanding for results.
I couldn't write another step by step how to after the one I did last night that got lost.
So instead I wrote this , just a ramble with some tips in there.
You guys all have skills. Trail n error + effort will get you there.
I hope this helps in some way.
My next wedge I will make a video. As you can tell im not all that at the written word
Cheers
Joseph
-
-
02-17-2019, 02:52 PM #30www.edge-dynamics.com
- Join Date
- Feb 2013
- Location
- London
- Posts
- 3,066
Thanked: 512
P.S
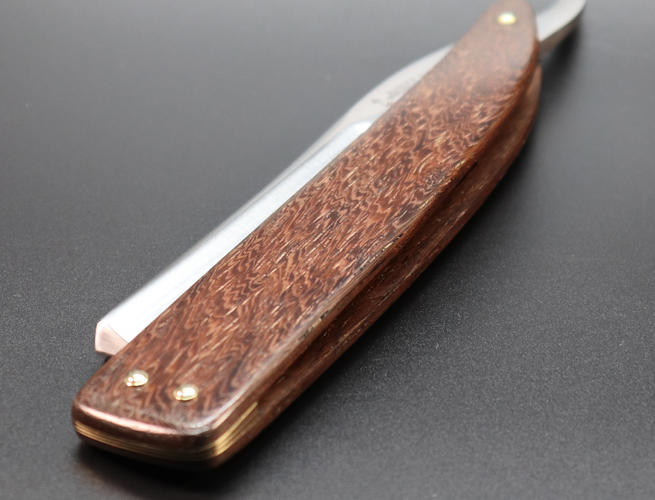
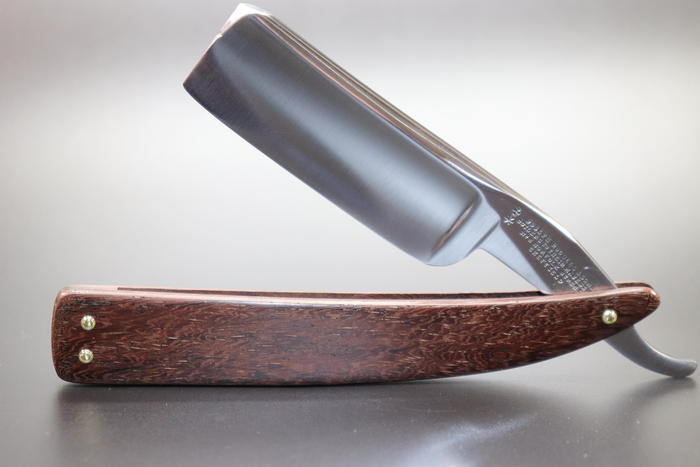
I forgot to mention the scales are Rosewood, Mexican maybe?
Sad part is that I used another set of scales worth to make the wedge. Silly boy.
It is not stabilised just sanded up to 3k and then on the buffing machine with a high polish compound.
Again ill say its a stunning grain pattern..( the white looking flecks are cherry wood filler)
2 Layers of tape gave a great bevel angle and a thin even bevel. Better than I could have hoped for..
Finished the blade with a Satin finish.
Last edited by JOB15; 02-17-2019 at 02:55 PM.


 Reply With Quote