
Results 1 to 10 of 19
 4Likes
 LinkBack URL
 About LinkBacks
-
05-02-2011, 02:42 AM #1
 Evolution of a W Greaves&Sons Sheaf Works
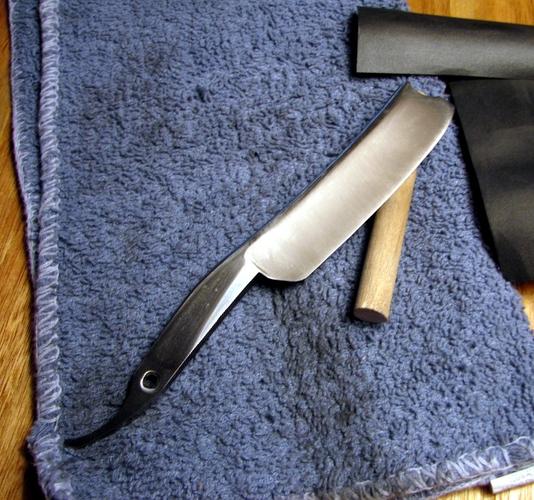
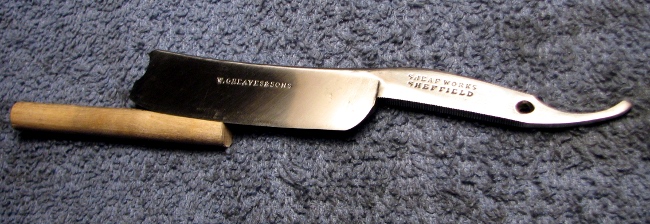
It has been a while since I stopped to do any work for myself so I finished up some wood working tonight and decided to dig through my to do project box. I piked up this Greaves razor several months ago. It is a 6/8 wedge with some moderate rust on the blade. The scales are actually in good shape but the entire thing needs depined to properly restore. I do not want to take the W.Greaves&Sons stamp off blade but it needs some extensive work to properly clean the blade. So Gingerly removed the scales and started working.
First it got a scraping to take off the flake rust
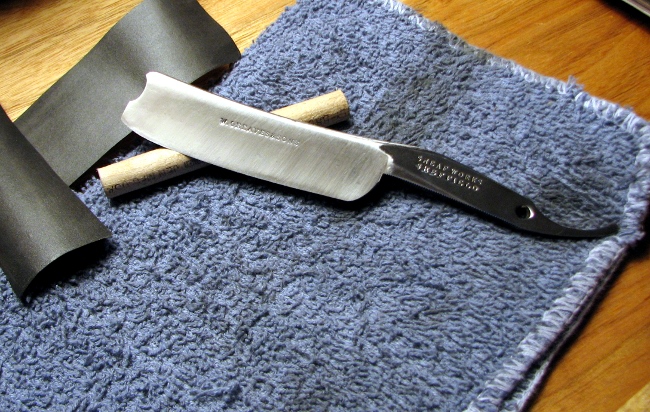
A pass on the 180 greaseless compounds to knock off the worst of the rust.
Then the 400 grit to clean it up a little
Then the 600 compound to start cleaning everything up.
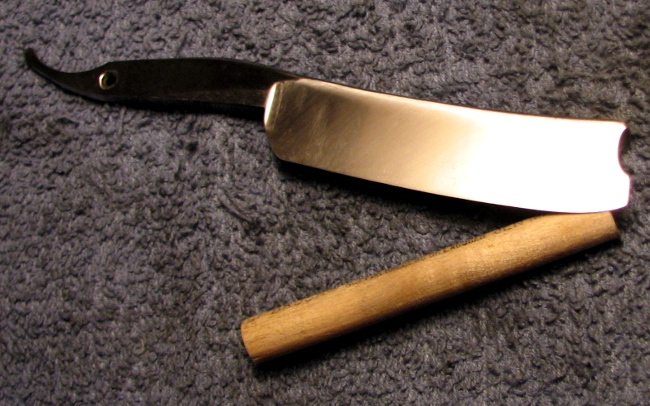
Now for the long and tedious part. Hand sanding. It will get a progression of paper starting at 600 grit and going up no less than 8000 grit possibly higher before I start the buffing compound work.
Stay tuned. More to comeniftyshaving likes this.
-
05-02-2011, 12:15 PM #2Lookin like a crim


- Join Date
- Apr 2009
- Location
- Coffs Harbour Australia, Home of the Big Banana
- Posts
- 2,706
Thanked: 1072
Looking good. Cant wait to see your progress.
Grant"I aint like that no more...my wife, she cured me of drinking and wickedness"
Clint Eastwood as William Munny in Unforgiven
-
05-02-2011, 12:45 PM #3OlllllllO

- Join Date
- Jul 2010
- Location
- Germany
- Posts
- 4,192
Thanked: 4477
well done, nice looking blade.
Please give us an update.
-
05-02-2011, 02:48 PM #4Senior Member

- Join Date
- Mar 2011
- Location
- Jeffersonville, IN
- Posts
- 467
Thanked: 164
I am in the process of restoring an old Wostenholm pipe and am interested in your progression. Was going to try to do it all on the buffing wheels, but might have to break down and hand sand it as well.
-
05-02-2011, 04:06 PM #5Senior Member

- Join Date
- Apr 2011
- Location
- Montvale, NJ
- Posts
- 260
Thanked: 51
blade looks like its coming along nicely. good luck with the project!
-
05-02-2011, 04:50 PM #6
It is all a matter of what you want. You can run all buffing and get perfectly acceptable results, but I am after more than perfectly acceptable. I find that I get better final results when I hand sand after the wheels. I wrap the sand paper around a dowel rod, sit at a table and slowly sand for a few hours. It flattens out and smoothes the steel better which will get you a more mirror like finish verses a nicely polished finish. For that matter, I could pin and hone it after the 600 and it would shave perfectly acceptable. The greesless compounds are the paint sprayer of the process. It does a lot very quickly but the quality is in the details and there is no substitute for hand work. It makes the difference between good and wow.
-
-
05-02-2011, 06:43 PM #7Senior Member
- Join Date
- Mar 2011
- Location
- Jeffersonville, IN
- Posts
- 467
Thanked: 164
Man, that looks good. Guess it is off to the store to get some new sand paper. Thanks for the info.
-
05-02-2011, 07:11 PM #8Razor Vulture


- Join Date
- Oct 2010
- Location
- Lone Star State
- Posts
- 26,105
Thanked: 8612
Thats going to be nice! I looove those sheafworks!
"Don't be stubborn. You are missing out."
I rest my case.
-
05-02-2011, 11:47 PM #9
Well, another 3 hours with some 600 grit paper and I have an acceptably level and smooth surface to work on. All of the grinding marks are gone from the compounds. The bevel is sanded down an the spine cleaned up. There is still some pitting in one spot on the spine but it would require a lot of metal removal to get it all out. The real key is to get the rust out of the pits so you have clean metal. Now onto the 800 grit for an hour or two.
-
05-03-2011, 01:54 AM #10
Another hour and a half with some 800 grit and the foundation for the polish sanding is in place.
-
The Following User Says Thank You to cannonfodder For This Useful Post:
eTom (05-03-2011)


 Reply With Quote