Results 11 to 20 of 41
Thread: chanisaw bar razor
-
12-07-2011, 11:36 PM #11Lookin like a crim


- Join Date
- Apr 2009
- Location
- Coffs Harbour Australia, Home of the Big Banana
- Posts
- 2,706
Thanked: 1072
Very cool and very clever.
"I aint like that no more...my wife, she cured me of drinking and wickedness"
Clint Eastwood as William Munny in Unforgiven
-
The Following User Says Thank You to baldy For This Useful Post:
birdman74 (12-11-2011)
-
12-07-2011, 11:43 PM #12Senior Member

- Join Date
- Mar 2011
- Location
- Corcoran, Minnesota
- Posts
- 665
Thanked: 170
Did you temper it after you hardened? If not, it will be super hard and brittle. You can put it in your oven at around 390 F for 1/2 an hour or so, and that will bring the hardness down to the mid 50's. Heck of a lot easier to hone, and it won't shatter if you drop it.
-
12-07-2011, 11:58 PM #13
-
The Following User Says Thank You to MileMarker60 For This Useful Post:
birdman74 (12-11-2011)
-
12-08-2011, 06:42 AM #14

Yes I did try to temper it in the oven like skipnord said, but again not sure if I did it right because I'm having big trouble honing it.
Like to get my hands on some pro tools and do it properly, because this way it takes me too long to make a razor from sketch, but hey it is still fun learning.Last edited by birdman74; 12-08-2011 at 08:21 AM.
-
12-08-2011, 10:15 AM #15

Great looking razors. Really like the looks of the first one with the home made micarta scales. Is #2 sharp? Like the stamp on #2, bird tracks?
Jeff
-
The Following User Says Thank You to TURNMASTER For This Useful Post:
birdman74 (12-11-2011)
-
12-08-2011, 11:07 AM #16

#2 is not shave ready sharp, still having trouble honing it, but again that is mainly because I'm not so good at it.
Yes, those are bird tracks, done with soldering iron, and the scales are finished with figerglass resin.
That was the easier way to put some logo on it, have to try and put it on the tang as Wintchase mentioned.
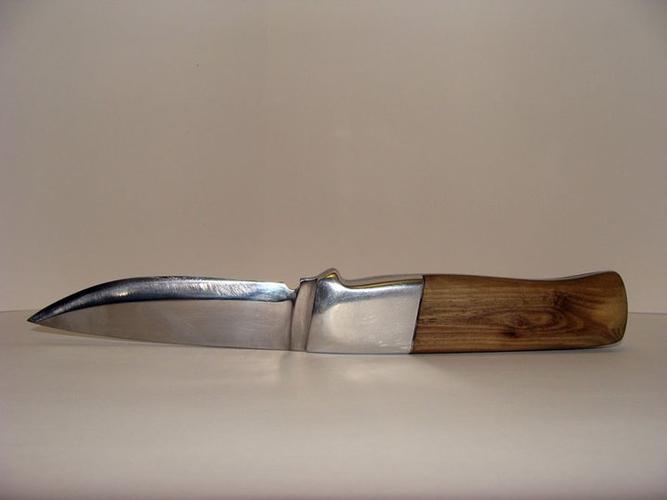
I'm realy glad you fokes like my stuff, so here is one more, this time a knife.
Cut from the same chanisow bar.
I know that the blade coud be better, but it's preaty funcional as kamp knife and sharp enough for that purpose.
That shiny par of the handle is polished aluminium if anyone wondered.
Swear this one is the last to show, others are not so good looking.

-
12-08-2011, 04:37 PM #17Poor Fit

- Join Date
- May 2010
- Posts
- 4,562
Thanked: 1263
All very nice. Some fine work there

-
The Following User Says Thank You to Catrentshaving For This Useful Post:
birdman74 (12-11-2011)
-
12-08-2011, 07:15 PM #18

we learn by doing looks good to me
-
12-09-2011, 09:04 AM #19

Awesome work. Well done on all three blades.
-
The Following User Says Thank You to Str8Raz0r For This Useful Post:
birdman74 (12-11-2011)
-
12-09-2011, 09:22 AM #20May your bone always be well buried


- Join Date
- Jun 2010
- Location
- Brisbane/Redcliffe, Australia
- Posts
- 6,380
Thanked: 983
Nice razors you made there mate. Knife is nice too, but you need to tighten your tolerances up a bit. You have a bit of the tang sitting proud of the aluminium bolster, a gap between the scale material and bolster, and those scratches on the blade need to go. More sanding working through the grits with a 45 degree change in direction when moving to the next grit higher, removing ALL the marks from the previous sanding before moving to the next grit.
How have you got the wood scales fixed? I assume you used the hidden pin method, Yes? Or have you just got them glued in with epoxy resin? I mean all this to be constructive and should no way be construed as criticism in a bad or derogatory way.
Mick
-
The Following User Says Thank You to MickR For This Useful Post:
birdman74 (12-11-2011)


 21Likes
 LinkBack URL
 About LinkBacks


 Reply With Quote
