
Results 1 to 10 of 15
 7Likes
Thread: My first restorations.
 LinkBack URL
 About LinkBacks
-
01-24-2012, 04:10 AM #1Member

- Join Date
- Jan 2012
- Posts
- 42
Thanked: 1 My first restorations.
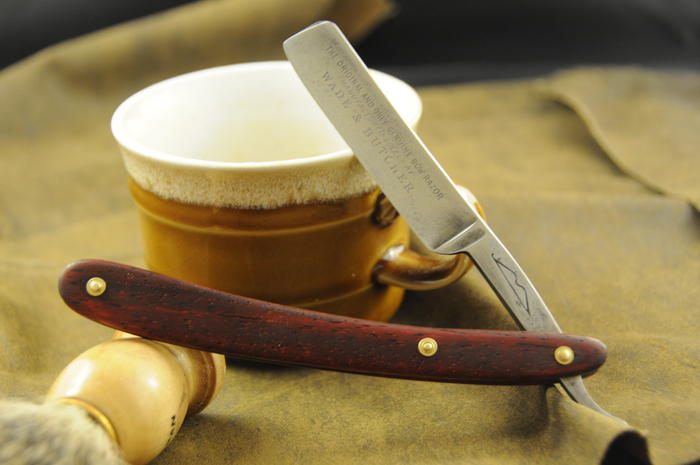
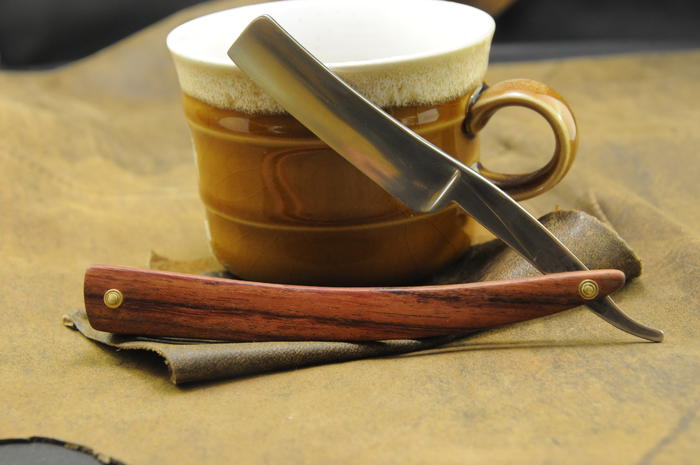
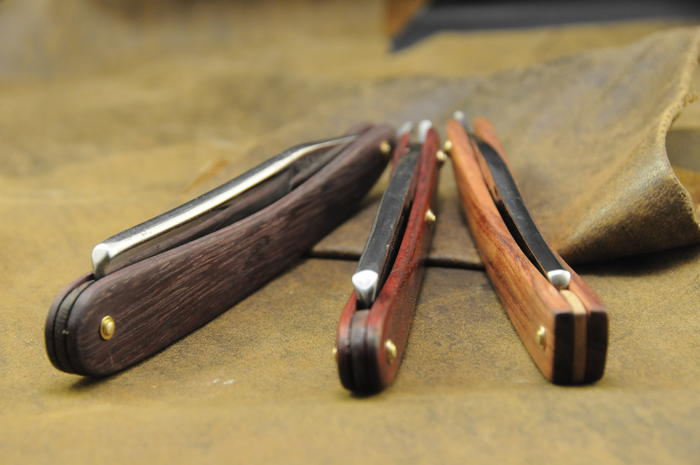
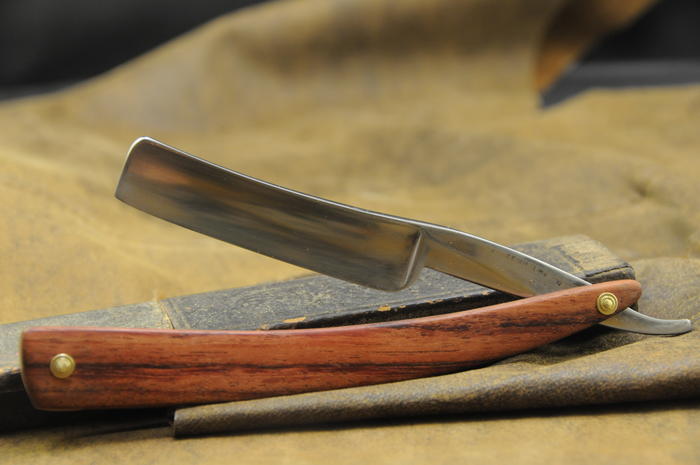
Here are my first three restorations. Good practice and a lot of fun to do but I need to work on cleaning up the blades better and fitting wedges. Those darn things can be tricky. Hope you enjoy


-
01-24-2012, 04:18 AM #2Senior Member


- Join Date
- Dec 2010
- Location
- South Florida
- Posts
- 13,530
Thanked: 3530
They are great. Three old razors go back on the line.
A fine job on your restores.
-
01-24-2012, 05:22 AM #3Senior Member

- Join Date
- Feb 2010
- Location
- California
- Posts
- 4,833
Thanked: 1841
You should be very proud of that trio! It is always good to see beautiful old blades get a new lease on life.
Well done.Bob
"God is a Havana smoker. I have seen his gray clouds" Gainsburg
-
01-24-2012, 10:37 AM #4Member

- Join Date
- Apr 2011
- Location
- Brisbane, Australia
- Posts
- 1,434
Thanked: 642
Well done. Fine work on all three restores.
You're right those wedges can be tricky. Have a look on the Wiki and check out the Icedog wedge tutorial, good stuff.
Stu
-
01-24-2012, 02:36 PM #5Senior Member

- Join Date
- Jul 2011
- Posts
- 768
Thanked: 99
First, let me say that I really like what you've done with the scales. Shape and finish look great. Pinning looks good too. They really came out great.
Some things to think about for next time:
1. You wedges need to be thinner and wedge-ier. I have the same problem, but if you thin one side, your scales will have the outward bow that gives even thin material strength. Check out the Icedog tutorial.
2. Your wedges and corresponding scale areas must be 100% flat for the scales and wedges to mate up correctly. I see on some of your wedges and scales rounded inside/outside corners and gaps at the ends. Part of it is because your scales are thick wood that doesn't bend correctly due to thickness, but a lot is due to the wedges (in this case really more spacers) not being flat front to back. Run them over sandpaper taped to a surface plate/granite tile, or I use a file. It really really helps. Seriously.
Here's a visual to help you. I'll rip it apart (figuratively) to show you what I mean.
See the top down shot? The sides and the scales are both a perfect flat fit. Now look at the end on shot. The scales are a perfect fit, but I accidentally let the edges roll a bit and didn't keep them perfectly sharp, making it look like there are gaps in the edges. You should have seen the gaps before I ran it over a file. Horrible! I posted pics and someone set me straight. I have never looked back since.
All said, I love the scales. Get the wedge problems fixed on your next ones and they will be even better.
Also, you can use wedges or spacers. Traditionally wedges were used, but if you want to use spacers use them, but make sure you pick one or the other and don't kinda sorta split the difference.
Looks great. Keep up the good work!
-
01-24-2012, 02:37 PM #6Senior Member
- Join Date
- Jul 2011
- Posts
- 768
Thanked: 99
Oh, and what's the wood and what are the finishes?
-
01-24-2012, 04:32 PM #7Senior Member


- Join Date
- May 2011
- Location
- Merthyr Tydfil South Wales UK.
- Posts
- 5,601
Thanked: 1413
Very good start for your first three restores, you may not realise it now, small but important lessons will be learnt with each restore you do, great start well done.
Regards Jamie.Last edited by celticcrusader; 01-24-2012 at 08:34 PM.
Wherever youre going never take an idiot with you, you can always find one when you get there.
-
01-24-2012, 08:26 PM #8Member
- Join Date
- Jan 2012
- Posts
- 42
Thanked: 1
Medicevens thanks a lot for the advice! It has been a huge learning experience each step of the way and I will definitly work on my wedges/spacers. Also, thank you to everyone on this site, I have been combing through the forums and it is the only way I have gotten this far. It has been a huge help in figuring out what I'm doing. Can't wait to get started on the next one!
In the picture with all three in a row the woods are: Purplewood with a mystery wood spacer (I had some random pieces floating around), The next razor has the same mystery wood with matching spacer, and the last is bubinga with an ambrosia maple spacer. All three were sanded untill 2000 grit and finished in beeswax.
-
01-25-2012, 01:57 AM #9..mama I know we broke the rules...

- Join Date
- Feb 2010
- Location
- Toronto, Ontario, Canada
- Posts
- 2,895
- Blog Entries
- 8
Thanked: 993
Ahhhh...learning to fit wedges was the worst part for me.. ... I still don't find it enjoyable, but I'm a bit better at it now.
I think you've done a fine job. The more you do, the better you'll get.
-
01-25-2012, 02:06 AM #10Senior Member

- Join Date
- Sep 2011
- Location
- Tillsonburg, Ont
- Posts
- 1,511
Thanked: 423
That is a handsome lot of razors there!
Nice work. One is a W&B Bow ... what are the other two?

Mike


 Reply With Quote