
Results 1 to 10 of 13
 27Likes
Thread: Fix a Crack?
 LinkBack URL
 About LinkBacks
-
12-25-2013, 09:29 PM #1The First Cut is the Deepest!


- Join Date
- Feb 2010
- Location
- Upper Middle Slobovia NY
- Posts
- 2,736
Thanked: 480 Fix a Crack?
 Had gotten a rough shape on a razor I am tinkering with as a gift. I myself like things around 7/8 but my Viking buddy has been moaning about wanting a more "manly" razor. Inspired by Charlie's awesome one piece razors, I set about on this piece of 0-1 steel. Currently at 10/8 but I expect it to be 9/8 by the time I am done
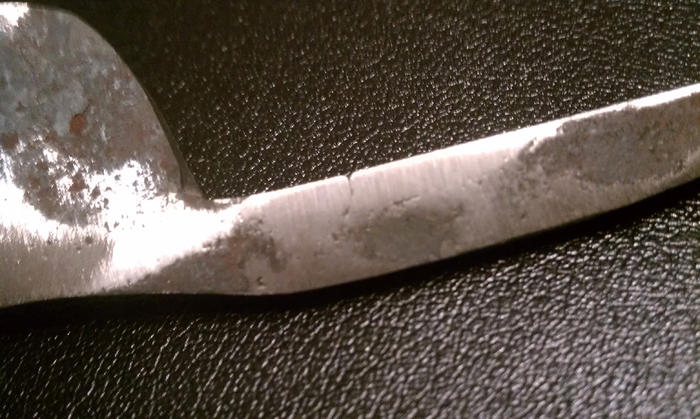
Cleaned it up a little to see how it was progressing, and spotted a crack in the tang about 3/4 in inch from the heel.
Before I set any more effort than I already have into this, can the crack be repaired? I don't have the skill to forge weld (I don't think my little forge gets hot enough anyway) but perhaps stick weld?
I figure if it can be done, best before doing any heat treating right?
Up until this point I have only used scrap steels. This is my first try from purchased metal, and my first crack, and its bothering me that this happened. my silly little loop is fine, I would have thought that would have been a more likely place to go! Attachment 150447Last edited by Magpie; 12-25-2013 at 09:35 PM.
thegoodboy likes this.
-
12-25-2013, 10:01 PM #2
Repair, no, not really unless you want to stick weld.
A closeup would be nice. This may be a flaw from drawing out the tang, where some bit of steel got folded inwards instead of drawn out. Depending on whether this is superficial or not, it might just be irrelevant from a structural pov.
Btw, I don't know what kind of look you are going for (are you going to leave the hammer marks?) but I am a bit worried about how deep the pits of crud appear to be on the surface of your blade. It looks a bit as if a) you hammered with the edge of your hammer and made deep dents and b) you hammered slag / debris from your fire into the surface of the blade. You're going to have to grind away quite a lot of steel if you want a clean surface.
If you see crud on your workpiece after heating, use a wirebrush to clean the piece and your anvil as well between heats.Til shade is gone, til water is gone, Into the shadow with teeth bared, screaming defiance with the last breath.
To spit in Sightblinders eye on the Last Day
-
12-25-2013, 10:36 PM #3The First Cut is the Deepest!
- Join Date
- Feb 2010
- Location
- Upper Middle Slobovia NY
- Posts
- 2,736
Thanked: 480
Thanks Bruno, I have not actually finished the forging yet. Its still roughed out, and there is lots of meat yet to play with. =)
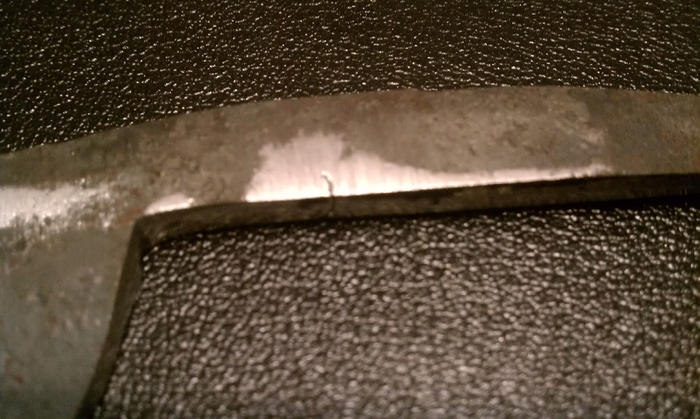
I'm stuck using my camera phone, close ups are hard to get. I will see if I can manage one though. Thanks for replying. I'm al alone for the holiday, and I didnt think anybody would be bothering to check in any time soon.

Last edited by Magpie; 12-25-2013 at 10:54 PM. Reason: photos added
-
12-25-2013, 11:16 PM #4Senior Member


- Join Date
- Nov 2012
- Location
- Across the street from Mickey Mouse in Calif.
- Posts
- 5,320
Thanked: 1184
After thinking about it I see a nice thumb notch ground into it about the depth of the crack/fold . Problem solved, style added. :<0)
Good judgment comes from experience, and experience....well that comes from poor judgment.
-
12-25-2013, 11:34 PM #5
+1 on the thumb notch...
-
12-26-2013, 12:40 AM #6Senior Member


- Join Date
- Dec 2006
- Location
- Burkburnett TX
- Posts
- 3,100
Thanked: 2392
I agree with 10PUPS, that is not a mistake it is a feature, a thumb notch waiting happen. Originally Posted by 10Pups

I don't make mistakes I make smaller razors
Charlie
-
The Following User Says Thank You to spazola For This Useful Post:
walleyeman (12-26-2013)
-
12-26-2013, 04:16 AM #750 year str. shaver

- Join Date
- Aug 2008
- Location
- Pothole County, PA
- Posts
- 2,258
- Blog Entries
- 2
Thanked: 522
Lightly and gently gouge the crack with a carbide rotary bit. Then TIG the crack [ not stick weld, TIG ] for a half second at a time, allow to cool in front of a fan and continue half seconds zaps until you have the crack filled. Should only take two or three zaps. Grind the repair and polish. Properly done it will be invisible.
Alternative to TIG is Muffler Paste or Bondo from the automotive supply shop but you won't be able to polish that stuff. Finish will be dull grey at best.Chevhead likes this.JERRY
OOOPS! Pass the styptic please.
-
12-26-2013, 09:26 AM #8
I'm all for adapting the design when unexpected things happen, but a thumbnotch might not be viable if the flaw runs too deep. You need enough meat left for structural integrity, and don't forget that after heat treatment you need to remove some as well. A razor that is connected to the tang by only 1/16 of steel is not that good an idea
I think based on the closeups that welding is the better solution here.
Til shade is gone, til water is gone, Into the shadow with teeth bared, screaming defiance with the last breath.
To spit in Sightblinders eye on the Last Day
-
12-26-2013, 09:33 AM #9
Btw, that tang looks like a good amount of drawing out still needs to be done. This will make the crack worse if you don't fix it first.
Til shade is gone, til water is gone, Into the shadow with teeth bared, screaming defiance with the last breath.
To spit in Sightblinders eye on the Last Day
-
12-27-2013, 01:57 AM #10Senior Member

- Join Date
- Mar 2013
- Location
- Alberta, Canada
- Posts
- 252
Thanked: 154
Grind out to expose the extent of the crack, tig weld to fill (stick if you have too), grind off the excess from welding, then normalize/anneal a couple cycles prior to working it further. Once cycled, you can forge, then finish working it, HT as usual.
Chevhead likes this.My friends call me Bear.


 Reply With Quote


