
Results 41 to 50 of 52
 45Likes
Thread: Coil spring steel crumbling
 LinkBack URL
 About LinkBacks
-
03-22-2014, 02:41 PM #41Senior Member

- Join Date
- Mar 2011
- Location
- Corcoran, Minnesota
- Posts
- 665
Thanked: 170
This is really an interesting and informative thread. For anyone interested in pursuing the science, I recommend "Steel Metallurgy for the Non-metalurgist", by John D. Verhoeven. He is a college prof of metallurgy, and was assisted in writing it by Howard Clark, one of, if not the, best swordmakers this side of Japan. The book is available on line, and there is a free download version that is also available. Happy hunting.
ScottGoodman likes this.
-
03-24-2014, 03:42 PM #42Senior Member
- Join Date
- Nov 2013
- Location
- Houston, TX
- Posts
- 147
Thanked: 45
Completely agree. I think that there's been a huge rash of hype about different HT methods and super steels and various other what have you especially in the knife world and that's discouraging for a lot of folks. When we get down to it, we can heat treat pretty reliably with very little. Many a journeyman ABS test has been passed with a blade that's just been treated with a torch and a trough of water. We want to get really crazy with equipment and we lose sight of the goal, which is making useful cutting tools well. Originally Posted by Mike Blue

I had a friend over to my shop this weekend who had never made a knife before. I walked him though every part of the process (just stock removal for his first) and by the end of the day we had heat treated his first knife (a drop-point hunter). Being able to see and do the process under my guidance demystified it for him and allowed him to think that this is something he could conceivably get into. I know when I started making knives, I was discouraged by the massive cost of everything I "had to have" and of the knowledge I lacked. Thanks to a few books (Verhoeven's Metallurgy for the non-metallurgist and articles in Blade) and largely the posts on this forum by Mike, Bruno, and others and on knife forums by Kevin Cashen, the HT process has been quick to pick up.
Here's my friend's hunter with forge scale on it:
 Let me know if you need any help with shaving, honing, etc.
-
The Following User Says Thank You to PapaTony For This Useful Post:
Bruno (03-24-2014)
-
03-25-2014, 12:41 AM #43aka shooter74743


- Join Date
- Sep 2009
- Location
- SE Oklahoma/NE Texas
- Posts
- 7,285
- Blog Entries
- 4
Thanked: 1936
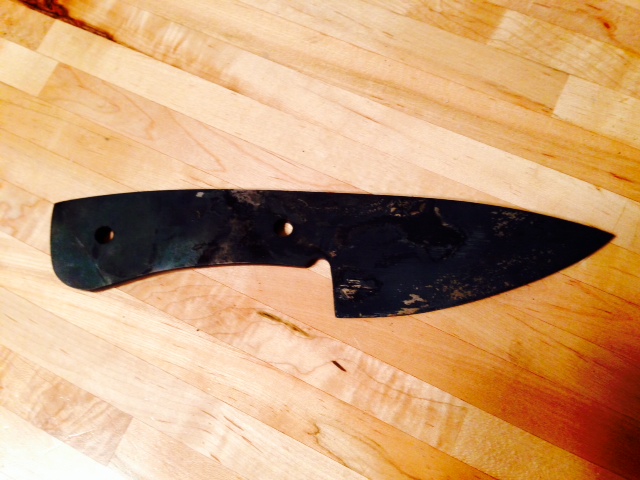
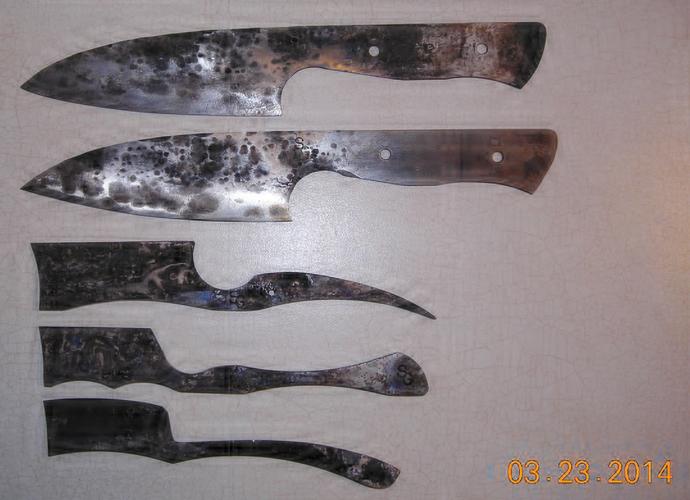
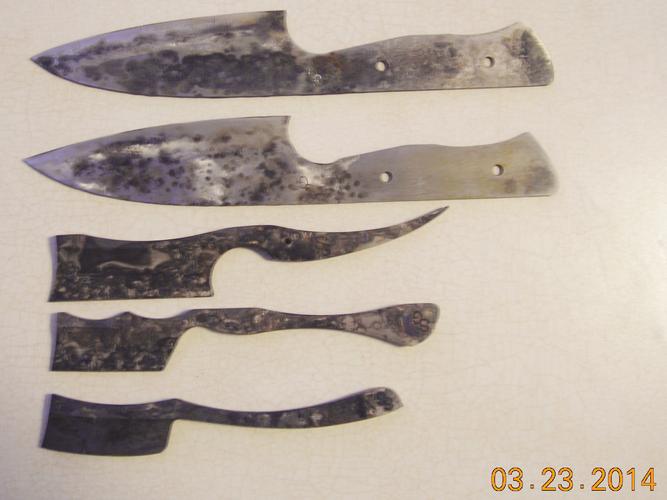
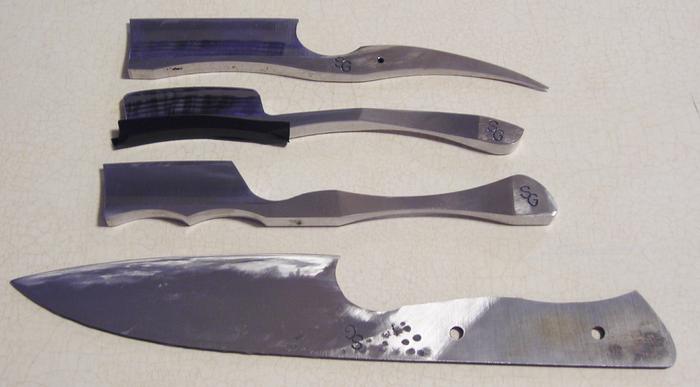
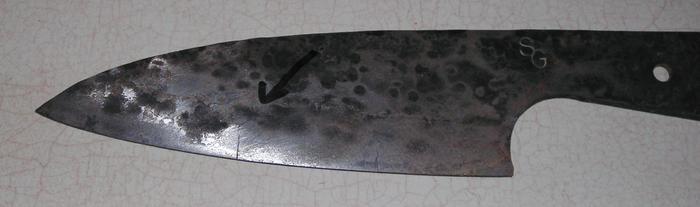
Here are the pics I promised, sorry it took so long. Appear to be thru hardened & no hamon by my observation. Heated to critical, allowed to air cool to apply clay (stuff I got was not workable at all, must have frozen or something), heated to critical and soaked for 3 min on kitchen blades and 5 min on razors. Tempered at 400F for 1 hour.
 Southeastern Oklahoma/Northeastern Texas helper. Please don't hesitate to contact me.
Thank you and God Bless, Scott
-
03-25-2014, 12:43 AM #44aka shooter74743
- Join Date
- Sep 2009
- Location
- SE Oklahoma/NE Texas
- Posts
- 7,285
- Blog Entries
- 4
Thanked: 1936
The one that cracked didn't get much more work on the grinder than pictured. I did temper it, so may do some break testing on it.
Southeastern Oklahoma/Northeastern Texas helper. Please don't hesitate to contact me.
Thank you and God Bless, Scott
-
03-25-2014, 02:11 PM #45Senior Member
- Join Date
- Nov 2013
- Location
- Houston, TX
- Posts
- 147
Thanked: 45
Man, that sucks about the cracks, but you needed a new flat-point shop knife, right?
 I've got several floating around my shop that I've tempered and roughed out an edge on that really come in handy when stripping wire, cutting neoprene, sharpening pencils, etc. They're also constant reminders that we should never get too cocky. Even Mastro Livi had that huge bucket of cracked blanks!
Everything else turned out nicely. Why no hamon?ScottGoodman likes this.Let me know if you need any help with shaving, honing, etc.
-
03-25-2014, 02:22 PM #46
My guess would be that either the clay coating was too thin, or it came off too quickly during the quench.
Til shade is gone, til water is gone, Into the shadow with teeth bared, screaming defiance with the last breath.
To spit in Sightblinders eye on the Last Day
-
03-25-2014, 03:34 PM #47aka shooter74743
- Join Date
- Sep 2009
- Location
- SE Oklahoma/NE Texas
- Posts
- 7,285
- Blog Entries
- 4
Thanked: 1936
Dang, you are good Bruno! I had a feeling about it as soon as I squeezed it out of the tube. When over at Charlies he uses furnace cement, so I went and picked up some. I think mine had froze or something, it didn't even want to stick to the steel really when it was warm to the touch. I'll find some more, I don't give up that easy...besides I've still got about 8' of 1095 knife stock and 2' of 1/4" x 1" stock for more razors. Time is what I don't get much of as life and work gets in the way. I'm no fool to think that I could live off my knife and razor proceeds. At least it's a hobby that will pay for itself. Originally Posted by Bruno
Southeastern Oklahoma/Northeastern Texas helper. Please don't hesitate to contact me.
Thank you and God Bless, Scott
-
03-25-2014, 08:51 PM #48
Hey Scott, I use pottery clay. In fact, I use leftovers from a nearby potter.
Pottery clay turned rock hard in the oven so it's ideal for water quenching.
Additionally, if you coat the blade, you may want to leave it rough. Only 80 or 120 grit finish instead of 240. Rougher surfaces will stick to the clay much better.
But you do want to make sure the edge itself is smooth and blunt. Because when you do differential quenching, you get a lot of tension when the spine contracts again while the edge has already 'frozen'. This is why katana have the curved shape. They go into the quench straight. So if there is a deep scratch, it will get ripped wide by the contractions of the spine.ScottGoodman likes this.Til shade is gone, til water is gone, Into the shadow with teeth bared, screaming defiance with the last breath.
To spit in Sightblinders eye on the Last Day
-
The Following 2 Users Say Thank You to Bruno For This Useful Post:
PapaTony (03-25-2014), ScottGoodman (03-26-2014)
-
03-25-2014, 08:57 PM #49Senior Member
- Join Date
- Nov 2013
- Location
- Houston, TX
- Posts
- 147
Thanked: 45
So, did you etch it and not see a hamon? Also, did you bake the fireplace mortar onto the blades? From the pics, it looks like you had more than enough on there to do the job. A dude on youtube named artistblade has a really good hamon method in which he mixes some water with the clay/mortar/what-have-you and applies it in layers, torching it after each layer to bake it on .
Most of the hamons that I've seen and done have been revealed through etching and magnified with polish.ScottGoodman likes this.Let me know if you need any help with shaving, honing, etc.
-
03-25-2014, 09:22 PM #50
Actually, you'll see the hamon pretty well when sanding with somethign very coarse like 80 or 120. The hardness difference means that one part will be scratch much deeper than the other part. This will make the hamon visible.
I apply the clay , then bake it in the forge fire lightly, and fill in the cracks. I repeat this until the clay is rock solid. That way, it will survive long enough to have held off the temperature drop of the quench.ScottGoodman likes this.Til shade is gone, til water is gone, Into the shadow with teeth bared, screaming defiance with the last breath.
To spit in Sightblinders eye on the Last Day


 Reply With Quote
