
Results 11 to 20 of 20
 46Likes
 LinkBack URL
 About LinkBacks
-
04-27-2014, 02:03 AM #1150 year str. shaver


- Join Date
- Aug 2008
- Location
- Pothole County, PA
- Posts
- 2,258
- Blog Entries
- 2
Thanked: 522
This is a very nice presentation. When can we expect the 2014 razor catalog? Can't wait.......
 PapaTony likes this.JERRY
OOOPS! Pass the styptic please.
-
04-27-2014, 03:55 PM #12Senior Member
- Join Date
- Mar 2011
- Location
- Corcoran, Minnesota
- Posts
- 665
Thanked: 170
Thanks so much for posting this. I think I can learn all lot from someone's well thought out early attempts. You have a strong knife grinding background, and you are really thinking about the differences and similarities between grinding knives and razors. Those are the kind of thoughts that are invaluable to the rest of us who are just beginning the same journey. And, you have produced a damn fine razor. Keep us informed.
-
04-27-2014, 04:14 PM #13Senior Member
- Join Date
- Oct 2011
- Posts
- 155
Thanked: 14
Really nice, where can we sign up for a pre order?
Do you prefer cash or bank transfer[emoji1]PapaTony likes this.
-
04-28-2014, 04:06 AM #14Senior Member

- Join Date
- Feb 2007
- Location
- Northern Michigan
- Posts
- 236
Thanked: 407
Tony,
Great job! Try hot oil for the temper, instead of the toaster oven. I think you will like it. Just be careful not to flash the oil! :O
Tim Z.PapaTony likes this.
-
The Following User Says Thank You to Tim Zowada For This Useful Post:
PapaTony (04-29-2014)
-
04-29-2014, 02:17 PM #15Senior Member
- Join Date
- Nov 2013
- Location
- Houston, TX
- Posts
- 147
Thanked: 45
Thanks Tim. That means a lot coming from you as your articles have taught me so much about knifemaking. I'll try the hot oil for the temper and try not to flash it Originally Posted by Tim Zowada


TonyLet me know if you need any help with shaving, honing, etc.
-
04-29-2014, 02:54 PM #16Senior Member
- Join Date
- Nov 2013
- Location
- Houston, TX
- Posts
- 147
Thanked: 45
Thanks for all of the interest and kind words everyone. To get such a positive response from such a discerning audience is truly flattering.
Now, what y'all are here for, the finish.
First, I like making one-piece wooden scales. Something about the feel of the wood and the simplicity of it makes me happy. But, for this project, I decided to go with, what I consider to be, a more formal set.
I started with laying out the scale shape on a piece of brown paper.
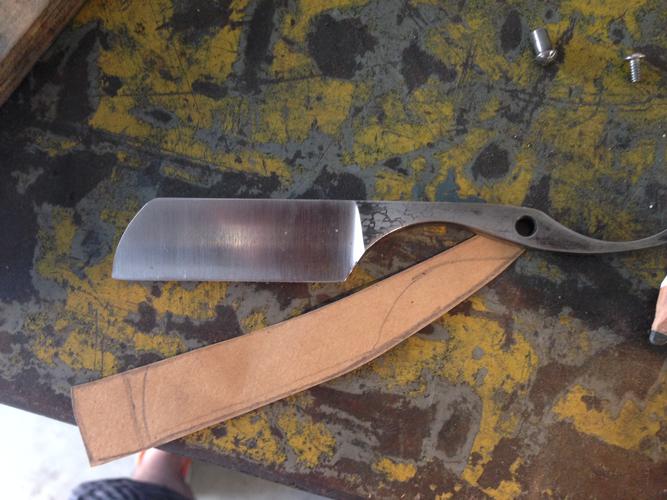
I ripped my material and squared it on the disc sander.
![Name: photo 1[1].jpg
Views: 267
Size: 24.3 KB](https://sharprazorpalace.com/attachments/forge/164425d1398782112-how-knifemaker-makes-razor-7-8-french-point-wip-how-photo-1-1-.jpg)
Traced it, cut it out, put tiny dots of 5 minute epoxy on the middle to glue it together and then squared that up and drilled it.
![Name: photo 2[1].jpg
Views: 256
Size: 33.8 KB](https://sharprazorpalace.com/attachments/forge/164426d1398782165-how-knifemaker-makes-razor-7-8-french-point-wip-how-photo-2-1-.jpg)
From there, I made a wedge and glued it in. For the record, the wedge in this one is pink ivory. I didn't end up using this construction because, when I finished it, it looked like an exact copy of Tim's carbon series scales. Needless to say, that won't fly They also didn't look right on this razor.
![Name: photo 3[1].jpg
Views: 263
Size: 50.7 KB](https://sharprazorpalace.com/attachments/forge/164438d1398783321-how-knifemaker-makes-razor-7-8-french-point-wip-how-photo-3-1-.jpg)
Once it was dry, I cleaned everything up a bit on the disc sander. Then, I flattened and rounded a piece of scrounged copper, drilled a wedge-pin hole, and epoxied/drove the copper in.
![Name: photo 4[1].jpg
Views: 260
Size: 35.1 KB](https://sharprazorpalace.com/attachments/forge/164432d1398782529-how-knifemaker-makes-razor-7-8-french-point-wip-how-photo-4-1-.jpg)
I shaped everything on the 8 inch wheel and slack belt on the KMG. I started with 80 grit, then moved to 120, then 220. After that, I hand sanded with 320. Then I oiled it and sanded with 400, building a slurry and really getting it smooth. Then, I cleaned it off and re-oiled it, let it sit for 15 minutes and buffed it off on a clean wheel.
![Name: photo 5[1].jpg
Views: 251
Size: 31.4 KB](https://sharprazorpalace.com/attachments/forge/164433d1398782810-how-knifemaker-makes-razor-7-8-french-point-wip-how-photo-5-1-.jpg)
After that, I did the final fitting of the scales. For the razor itself, It got taken down to 600 on the face and 0000 steel wool on the rest. Then, I used some dark red rouge on the buffer to give it a nice satin finish all over. So, here it is, all together:
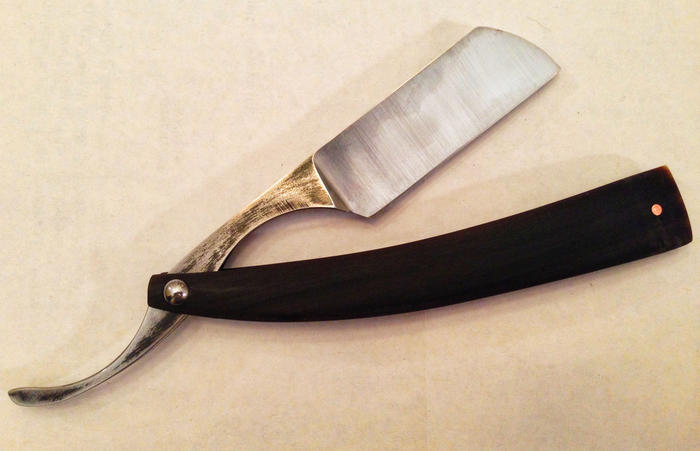
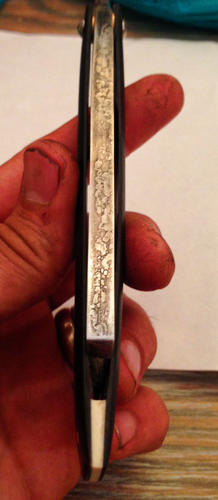
The spine:
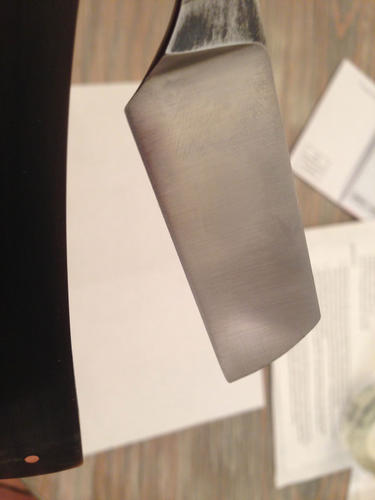
The bevel:
I set the bevel on it, but have yet to take it through my whole progression and shave with it so that's the reason my mark is not yet on it
I was also working on this, so that's why I didn't have enough time to hone.
What would this thread be without at least one knife?!
Thanks all for looking,
TonyLast edited by PapaTony; 04-29-2014 at 02:55 PM. Reason: different picture
Let me know if you need any help with shaving, honing, etc.
-
04-30-2014, 03:35 AM #17Bladesmith by Knight

- Join Date
- Jun 2007
- Location
- Murrumba Downs, Queensland, Australia.
- Posts
- 571
Thanked: 203
Awesome work again! Well Done Tony.
Like the razor, {and the step by step} but can't help loving the knife.
Keep 'em coming.
AdamPapaTony likes this.Respectfully,
Adam.
-
04-30-2014, 08:56 PM #18Senior Member
- Join Date
- Nov 2013
- Location
- Houston, TX
- Posts
- 147
Thanked: 45
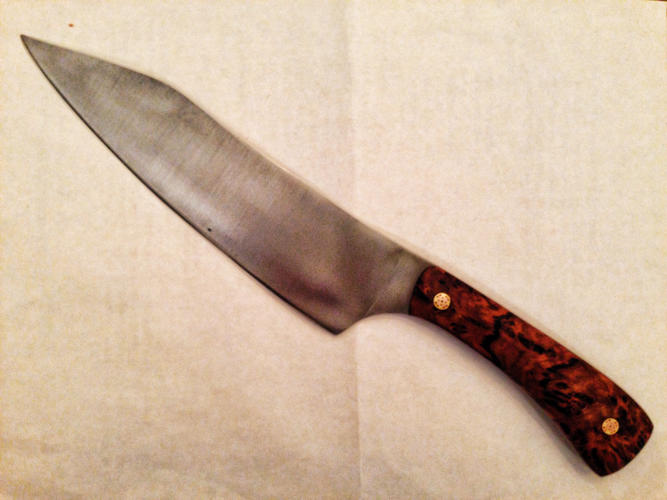
Glad you like everything Adam. Yeah, that knife turned out really well. Because I know you care: the steel is 52100 blade steel, differentially hardened (hence the shadows) in Thuya burl scales. I sharpened it on a DMT, then a Norton 1K then went to a JNat with some slurry and worked on it 'til all the slurry was gone. The knife is scary, scary sharp. Originally Posted by Adam G.
I'm going to try a razor with 52100 soon, but will likely have to do a bit of grain refining during HT
Adam G. likes this.Let me know if you need any help with shaving, honing, etc.
-
The Following User Says Thank You to PapaTony For This Useful Post:
Adam G. (05-01-2014)
-
04-30-2014, 11:10 PM #19Senior Member


- Join Date
- Feb 2010
- Location
- California
- Posts
- 4,833
Thanked: 1841
Thanks for sharing all of this Tony. I really like the final outcome on your razor. It has a great flow of steel and scales and looks like it will be sweet to shave with. The knife is a beauty.
Bob
"God is a Havana smoker. I have seen his gray clouds" Gainsburg
-
05-06-2014, 02:47 PM #20Senior Member
- Join Date
- Nov 2013
- Location
- Houston, TX
- Posts
- 147
Thanked: 45
As an update, I completely honed it and shave tested it. I really took my time with the hone, working with the DMT to make sure that the bevel was perfectly even before ever moving on to the 1K. I honed all the way up to my Shapton 8K, then took it to my JNat with slurry, finishing on just the jnat and water. I CrOx'ed it on balsa, then on linen, and final finished on deer hide.
I got a beautiful shave from it, perhaps the best I've had. The blade is big enough to feel good in the hand and balanced for a good stroke. I tempered a bit cooler this time for a bit harder blade and I really, really like it. It's not quite as buttery as the others I've made, but makes up for it with a wonderfully acute edge. All in all, I think it's the perfect balance.
Thanks again everyone for all of the praise and feedback.
TonyLet me know if you need any help with shaving, honing, etc.


 Reply With Quote