Results 21 to 30 of 86
-
06-07-2014, 09:03 PM #21Senior Member

- Join Date
- Jun 2014
- Location
- Eastern Washington State USA
- Posts
- 406
Thanked: 59
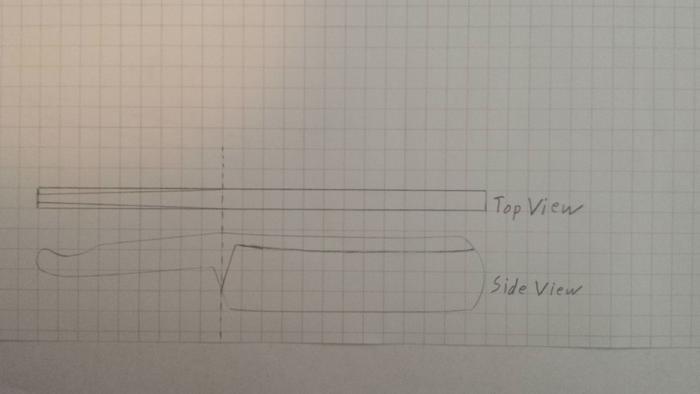
Okay, now I have another question. I'm not sure that I understand where to start the tang taper and how much to taper it. Below is a sketch that shows what I am thinking, but is this correct?

I have scribed my center grind lines and am ready to proceed, but I wanted to wait until I was sure that I understood the taper.

-
06-07-2014, 09:10 PM #22Senior Member

- Join Date
- May 2014
- Location
- South East Idaho
- Posts
- 103
Thanked: 24
Looks like a good start
-
06-08-2014, 02:24 AM #23Senior Member

- Join Date
- Mar 2011
- Location
- Corcoran, Minnesota
- Posts
- 665
Thanked: 170
You can control the air flow from your shop vac by partially blocking the air inlet. That's how I control the air from my squirrel cage blower to my coal forge. It can be as simple as a piece of stiff cardboard. Good luck with your project.
-
The Following User Says Thank You to skipnord For This Useful Post:
DVW (06-08-2014)
-
06-08-2014, 05:08 AM #24Senior Member


- Join Date
- Nov 2012
- Location
- Across the street from Mickey Mouse in Calif.
- Posts
- 5,320
Thanked: 1185
You don't have any razors to measure ? ? ?
7/8 Goldedge Duck spine .235 --- behind stab, .210--half way to pivot .182 near pivot --.172 tip of tail .090
7/6 W&B spine .210 -- behind stab., --.210, half way to pivot .180 --near pivot .155 tip of tail .060
So it looks like 2 angles. After the pivot you can take off more or less. This is were you add your own style I guess.
I am copying an older razor and the 2 tapers are not as pronounced if at all. Other razors may be different but that is what I got for you with freshly calibrated calipers :<0)Last edited by 10Pups; 06-08-2014 at 05:29 AM.
Good judgment comes from experience, and experience....well that comes from poor judgment.
-
06-08-2014, 05:40 AM #25Senior Member

- Join Date
- Jun 2014
- Location
- Eastern Washington State USA
- Posts
- 406
Thanked: 59
-
06-08-2014, 05:49 AM #26Senior Member

- Join Date
- Jun 2014
- Location
- Eastern Washington State USA
- Posts
- 406
Thanked: 59
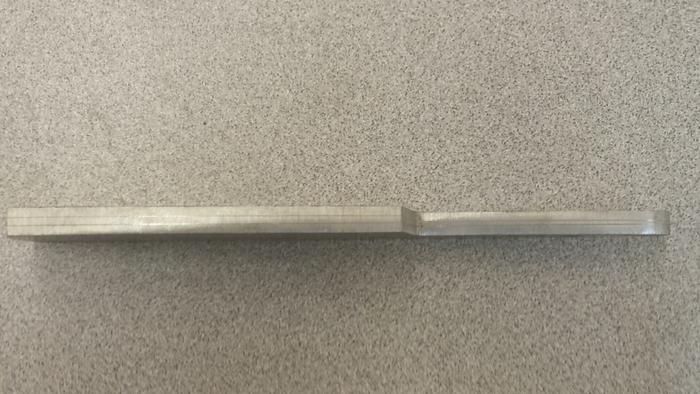
Thank you. I guess I wasn't just asking for the measurements to copy, but for the theory or reason behind the taper. I know it's to keep it from touching the hone, but I was looking for a bit more detail. So if I understand correctly, where I drew the start of the taper is correct. From there to the pivot hole, the taper should be less than half the thickness of the spine. After the pivot hole I can do whatever I want.
-
06-08-2014, 11:26 PM #27
-
The Following User Says Thank You to Bruno For This Useful Post:
DVW (06-09-2014)
-
06-09-2014, 02:47 AM #28Senior Member

- Join Date
- Jun 2014
- Location
- Eastern Washington State USA
- Posts
- 406
Thanked: 59
Thanks, that's very helpful. I will start grinding then as soon as I get my "honey-do" list worked down a bit.
-
06-09-2014, 03:26 AM #29Senior Member


- Join Date
- Nov 2012
- Location
- Across the street from Mickey Mouse in Calif.
- Posts
- 5,320
Thanked: 1185
I am just guessing from my experience of making scales and watching how they work. Glen got me to thinking more about that in one of his posts about wedges. On the other end is the tang and I believe an angle/wedge design there helps keep the scales off the blade and tang. I also believe it helps with the pin to keep the scales tight. If it were all just flat the first sign of wear and the pivot would be loose. A little bit of spring pressure from the scales prevents that. When honing you don't go past the shoulder anyway. Bruno knows a lot more about blade geometry than I do and as I said I am just looking at how things work from what I have seen and I'm guestimating. You got me to thinking is why I ran out and measured :<0) I am putting some finishing touches on my first RSO tonight and will post it for comments and suggestions later. Good luck with yours, I will be going along for the ride.
Good judgment comes from experience, and experience....well that comes from poor judgment.
-
06-09-2014, 03:31 AM #30Senior Member

- Join Date
- Jun 2014
- Location
- Eastern Washington State USA
- Posts
- 406
Thanked: 59


 71Likes
 LinkBack URL
 About LinkBacks


 Reply With Quote


