
Results 1 to 10 of 30
 44Likes
Thread: Razor build + questions
 LinkBack URL
 About LinkBacks
-
09-07-2014, 04:38 AM #1Junior Member


- Join Date
- Jul 2014
- Location
- Pasadena, MD
- Posts
- 27
Thanked: 1 Razor build + questions
So here's how it's been for old Cornicus lately.
Work. 3 hours of reading about razors. Sleep.
Repeat.
But.. Today (or yesterday), the stars aligned, and I had a completely free Saturday. I went antiquing, picked up a 1.5" leather belt for making a few hanging strops, and all was well. It was a pretty day out too, so I sat outside and sketched a few knives and a few razors to think about making.
I came across a design from the depths of my "meat-chopper" lusting mind, and decided that it was time to attempt my first hollow ground straight razor..
So here goes.
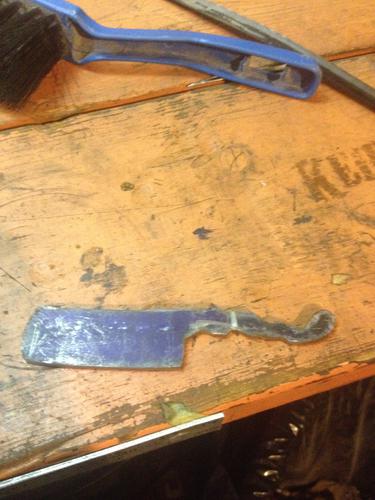
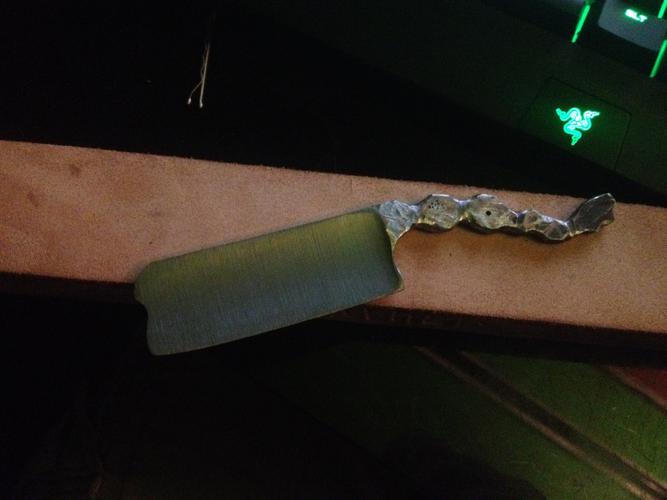
I started out with some CRA 1095 from Admiral Steel (at the time, 6' for $45. BINGO!). Cut it out - thank the Lord for air tools - and began the grinding process. 80 grit was a little too fine, and I could barely get a pass in without the steel singing my fingertips. So I switched to 36 grit. What a nasty nasty cutter you are. About two or three hours later, grinding is done, I start to file the tang in the shape that I want. I'm thinking something.. Skeletal. I love the look of vertebrae, especially in something as grim as a big ol' honking razor.. So I gave it a shot.
Tomorrow (or today rather), I will attempt heat treatment, hoping to the Big Man that the 3/128" edge thickness doesn't warp. Thinking about sanding the blade to 800 grit before HT, then wire wheeling after to blast away the residual scale and crud, then just leave the blackened tang and temper colors alone. If I wanted a refined, dainty little razor - it wouldn't be an 8/8. 8/8's are for manly men!
Here's the process from start to where I am now.
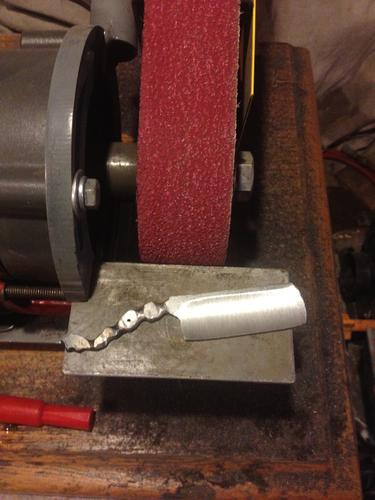
By the way, the grinder is a Kalamazoo 2x48. Haters of the 2x48 can hate, but for the money, you can't beat it. Baldor motor, 5" contact wheel, horizontal and vertical.. Groovy.
Question time -
Is 3/16 stock too thin for an 8/8? I read about the 4:1 ratio, but also read that it can be worked around, just honing is a little more difficult..
Significant risk of heat warpage with a 1/64"-3/128" edge thickness?
Should I do a standard knife tempering process for 1095? IE: harden as always, then 400F for 1 hour?
Thanks!
-Josh
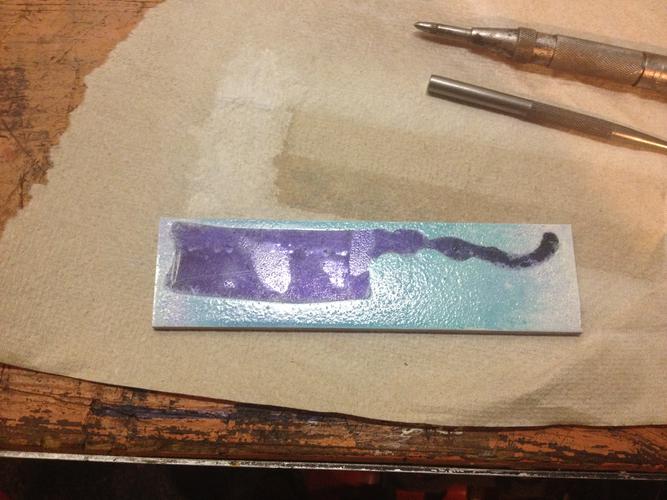
PS: for anyone wondering what ungodly process I did to my steel in the first pic, here goes..
Dykem layout dye -> spray adhesive and paper template -> white spray paint -> peel off paper -> coat of heat-resistant clear coat. It holds up well to heat, dipping in water, grinder chipping, and solvents. Also stays highly visible.
PPS: ..I don't know how I managed.. But I sliced my finger something terrible while sanding the barber's notch.. I feel like it's the old girlfriend telling me to stop fiddling with my razors and get to bed..Last edited by Cornicus; 09-07-2014 at 04:47 AM.
-
09-07-2014, 06:40 AM #2Senior Member


- Join Date
- Dec 2006
- Location
- Burkburnett TX
- Posts
- 3,100
Thanked: 2392
It looks like you are off to a good start with your razor makng. Originally Posted by Cornicus

Charlie
-
The Following User Says Thank You to spazola For This Useful Post:
Cornicus (09-07-2014)
-
09-07-2014, 07:05 AM #3Junior Member
- Join Date
- Jul 2014
- Location
- Pasadena, MD
- Posts
- 27
Thanked: 1
Woah! A reply from the master himself! Just wanted to say that your videos are what made me get off my rump - and also what got me started in SR shaving to begin with. Big thanks for that, sir.
I will heed your advice. I saw your video on cycling and how much finer the grain gets, but here's my dilemma. My HT method doesn't involve an oven or anything precise. I use my makeshift forge, a magnet, and canola oil. It gets stuff hard, but can be kind of hit or miss. I don't want to mess up a good cycle with a bad one, or even worse, warping the razor.. Guess it's worth the risk though - the results are impressive.
Made some adjustments in the design, and ground away a little off the edge. The thickness is just shy of 3/16, and the overall width is just too gosh darn big. Might still take off some more in the morning, but it's a little late to be running my machines.
I think I'm going to just HT it, try to set a bevel - if it's sloppy, then I'll grind away what needs to be ground, and work from there. Little trial and error. No point in taking an 8/8 down to a 5/8 if I can make it work, you know? The proper blade width would take it to right at the end of the barber's notch.. Dunno how I feel about that. Wish I had changed some things when it was still on paper, but you know what they say; hindsight is 20/20.
Either way, I should have her scaled up and shaving by this coming weekend. Unless SWMBO has something planned for me.. Or disaster strikes.. Regardless, more pics to follow.Last edited by Cornicus; 09-07-2014 at 07:21 AM.
Geezer likes this.
-
09-07-2014, 10:58 AM #4
Note that if you want a nice and narrow bevel, you'll have to do some grinding post HT as well. And as Charlie said, don't go above 4:1 (or below 1:4
 ) because you'll just make your life more difficult than it needs to be. Also, how thick is the tail? I ask because it looks fairly thick though I can't really tell how thick.. Remember that the tail has to be able to swivel between the scales.
Btw, you mention that the width should be to just below the notch for the proper ratio. If you do that, you can make the blade just a tad shorter and create a new notch closer to the spine if you have reservations about the current location of the notch.Til shade is gone, til water is gone, Into the shadow with teeth bared, screaming defiance with the last breath.
To spit in Sightblinders eye on the Last Day
-
09-07-2014, 02:19 PM #5Junior Member
- Join Date
- Jul 2014
- Location
- Pasadena, MD
- Posts
- 27
Thanked: 1
Well... Disaster struck.. I did 3 HT cycles.
The razor warped like crazy. However, I think with a little finessing I might be able to straighten it back out. I might not keep it as a shaver, but it'll look good as a little reminder to not grind too thin..
I think next time, I'm going to use some 1/4" 1084 or 1095, keep it thicker, then just mind my heat when doing the finishing grind.
EDIT: Went to tap the blade back, and it buckled and cracked something terrible.. Lesson learned I guess, thanks to everyone who helped me out. I know EXACTLY what to do to avoid this issue again, also, I will send my blade out to have it professionally heat treated. A fire is just too primitive for something as delicate as a razor for someone with my lack of experience.Last edited by Cornicus; 09-07-2014 at 03:34 PM.
-
09-07-2014, 04:46 PM #6Senior Member
- Join Date
- Dec 2006
- Location
- Burkburnett TX
- Posts
- 3,100
Thanked: 2392
I have made my share of razor shaped pringles, I can empathize with you.
It sounds like you are on the right track to me.
I am not a master, I am just a dude who makes razors.
Charlie
-
09-07-2014, 06:17 PM #7Shaveurai

- Join Date
- May 2009
- Location
- Rowley Regis, England
- Posts
- 487
Thanked: 126
Me too. And bananas Originally Posted by spazola
spazola likes this.
-
09-07-2014, 07:05 PM #8Junior Member
- Join Date
- Jul 2014
- Location
- Pasadena, MD
- Posts
- 27
Thanked: 1
Just decided I'd use the whole situation and make light of it. I pinned the blade to two unshaped pieces of scrap wood, and told my buddy I was sending him a razor.
If we can't laugh and learn from our mistakes, then we'll never be motivated to get any better. From this project, and the kind people who posted here, I've learned a great deal. Now it's time to pull up my big boy pants, and try again. I'm not new to this rodeo anymore.
-
09-08-2014, 05:11 AM #9
Did you water quench or oil quench?
Til shade is gone, til water is gone, Into the shadow with teeth bared, screaming defiance with the last breath.
To spit in Sightblinders eye on the Last Day
-
09-08-2014, 04:27 PM #10aka shooter74743


- Join Date
- Sep 2009
- Location
- SE Oklahoma/NE Texas
- Posts
- 7,285
- Blog Entries
- 4
Thanked: 1936
I know from experience that using a brine quench on 1095 you need to leave a bit more material on the blade and remove the material to a thinner blade after HT, I have ruined several feet of steel from grinding too thin and that's on knives much less a hollow ground 8/8 razor. We all remove steel after HT on a hollow ground razor, I don't know of a way around it.
Wullie likes this.Southeastern Oklahoma/Northeastern Texas helper. Please don't hesitate to contact me.
Thank you and God Bless, Scott


 Reply With Quote
