
Results 1 to 10 of 16
 2Likes
Thread: Forced patina
 LinkBack URL
 About LinkBacks
-
08-09-2010, 02:43 AM #1Comfortably Numb


- Join Date
- Jan 2009
- Location
- Charlotte, NC
- Posts
- 2,095
Thanked: 668 Forced patina
Ok guys, here is a little trick I've been working on for a possible future application (I'll show when the time is right
 ). I decided to practice with a blade of zero value to me just in case I needed to tweak things at all, so I used this chopped up Reynolds.
This is a basic forced patina using mustard and regular vinegar (I hope the pics show up ok, I only have my phone right now). New pics added
Note* This process works for carbon steel... stainless?? not so much.
Steps:
- Shined blade up with Maas to get a really good surface to work with
- Washed the entire surface with soap and water (and any additional degreaser you may need). Afterwards, I took care to NOT touch the steel with my bare hands in order to maintain an oil free surface.
- After thoroughly drying the steel, I used a bit of soft (almost melted) wax to cover only the edge. I wanted to see if it would effectively resist the patina for my future application. BTW, It did work... even if you can't see it in the pics.
- Next, I wet a paper towel with vinegar and wrapping it around the blade in a spiral.
- I used a toothpick to "paint" the stripes on the blade with regular yellow mustard.
- Waited about 40 mins or so and washed the blade off very well.
- Lightly oiled the steel after drying completely.
And here are the results... I don't know if you can tell (horrible pics ), but it's exactly what I was going for.
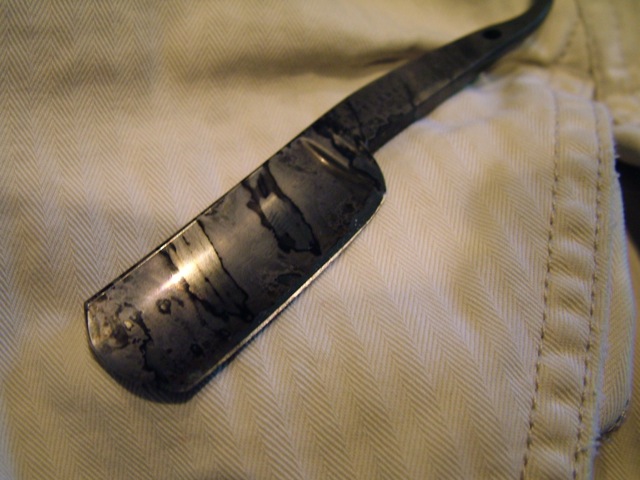
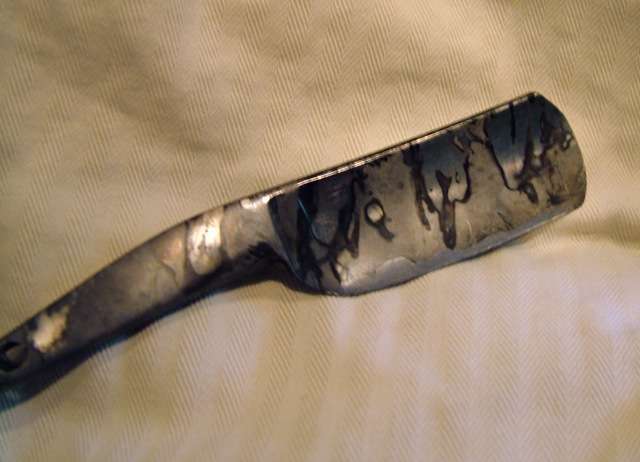
The dark black patina is where the outlines of the mustard stripes were, and the lighter grey areas are where the vinegar soaked paper towel was.
CAUTION - I have zero idea what this may do to an edge, so I wouldn't recommend trying this unless you DO know, or are willing to roll the dice.
Anyway, I hope you got a kick out of this. I had fun anyway!
DaveLast edited by Del1r1um; 08-09-2010 at 08:42 PM. Reason: better pics
-
08-09-2010, 12:09 PM #2Senior Member
- Join Date
- Jan 2008
- Posts
- 701
Thanked: 182
brake out the nail polish and make a small band near the edge and covering it and you will not have to worry aobut the etch eating the edge away
its how the dammy guys do it (Tim Zs bevels are not as they look in the pics you see )
-
08-09-2010, 03:28 PM #3Comfortably Numb
- Join Date
- Jan 2009
- Location
- Charlotte, NC
- Posts
- 2,095
Thanked: 668
Thanks Butch, that's a great idea. Do they scrape it off, use a chemical, or just let it wear away as it gets honed/used? Originally Posted by L R Harner

-
08-09-2010, 06:48 PM #4Senior Member
- Join Date
- Jan 2008
- Posts
- 701
Thanked: 182
acetone will clean off the polish and help set the darkness of the etch
Twhite likes this.
-
08-09-2010, 08:47 PM #5This is not my actual head.


- Join Date
- Nov 2009
- Location
- Middle of nowhere, Minnesota
- Posts
- 4,624
- Blog Entries
- 2
Thanked: 1371
Dave,
Try this with hot vinegar and hot mustard (high temperature, not spicy... ) When I was experimenting with vinegar patina the color would wipe off the blade with simichrome. Charlie (Spazola) told me to use hot vinegar. That works mucho better. It's faster too.
Strange women lying in ponds distributing swords is no basis for a system of government.
-
08-09-2010, 08:49 PM #6Comfortably Numb
- Join Date
- Jan 2009
- Location
- Charlotte, NC
- Posts
- 2,095
Thanked: 668
Thanks for the tip... I may give it a try.
-
08-10-2010, 01:15 AM #7Member
- Join Date
- May 2010
- Posts
- 84
Thanked: 16
An interesting look. Now, come up with a 5 minutet chemical way to remove patina, scratches, divots, etc., and leave a polished finish. Please! (Given the number of things I don't know, probably there is such a chemical process. I'm sure someone will tell me in short order, if there is such a thing.)
-
08-12-2010, 07:23 AM #8aka shooter74743


- Join Date
- Sep 2009
- Location
- SE Oklahoma/NE Texas
- Posts
- 7,285
- Blog Entries
- 4
Thanked: 1936
Originally Posted by fdennis
You are killing me!!!
ScottSoutheastern Oklahoma/Northeastern Texas helper. Please don't hesitate to contact me.
Thank you and God Bless, Scott
-
08-12-2010, 03:10 PM #9Senior Member


- Join Date
- Dec 2006
- Location
- Burkburnett TX
- Posts
- 3,100
Thanked: 2392
Making patinas and patterns if pretty fun especially on beater blades that are never going to look good. I have had good luck with mustard.
Charliecarlmaloschneider likes this.
-
The Following User Says Thank You to spazola For This Useful Post:
Del1r1um (08-16-2010)
-
08-13-2010, 11:03 AM #10aka shooter74743
- Join Date
- Sep 2009
- Location
- SE Oklahoma/NE Texas
- Posts
- 7,285
- Blog Entries
- 4
Thanked: 1936
That blade looks great! Think the patina will set in and stay?
Southeastern Oklahoma/Northeastern Texas helper. Please don't hesitate to contact me.
Thank you and God Bless, Scott


 Reply With Quote