
Results 1 to 10 of 30
 8Likes
Thread: 2 New Starts
 LinkBack URL
 About LinkBacks
-
10-27-2011, 09:13 PM #1Senior Member


- Join Date
- Feb 2011
- Location
- Eastern Washington, USA
- Posts
- 284
Thanked: 54 2 New Starts
I have started 2 new razors (may do a 3rd along with them).
Will be O1 (I picked up 18" of .25 x 1")
Target hardness is to be between 57 and 59 Rc.
One will be a fixed one I may send out to have scales made.
I am thinking of building both to be 7/8 with 2 1/4" long blades.
Both to be near wedge and of basic design.
Most work will be done at work on my breaks or after work.
Thinking that I will leave thickness at around .025 to .030 before HT.
Most of the finishing will be done at home, I still need a belt grinder at home.
Will try to remember to get pics as is practical of tools used and blades in consecutive steps.
Jeff
-
10-27-2011, 09:18 PM #2Senior Member

- Join Date
- Jul 2009
- Location
- Portland, Oregon, United States
- Posts
- 518
Thanked: 125
Sounds like you have your work cut out for you. Good luck. Can't wait to see what you come up with.
Michael
-
10-27-2011, 09:31 PM #3Senior Member

- Join Date
- Jun 2011
- Location
- Valdosta, Georgia
- Posts
- 454
Thanked: 92
looking forward to seeing these.
-
10-28-2011, 02:55 AM #4Senior Member


- Join Date
- Apr 2010
- Location
- Yakima, Wa
- Posts
- 1,955
Thanked: 494
You know Jeff, if you trip to Yak I would be glad to guide you in scaling a razor. I have all the tooling needed and depending on material, have plenty available. Besides, then I get to shave with one!
-
10-28-2011, 07:12 AM #5Senior Member
- Join Date
- Feb 2011
- Location
- Eastern Washington, USA
- Posts
- 284
Thanked: 54
Fair enough, I just may have to take you up on that. Just so happens that you are one of three who I was thinking about for that particular end of the project. Its going to be a little while yet. Turns out that 2 seem to be turning into 4 REAL QUICK. I mean hey I have the material. AND, now I am taking a 2nd look at what I want for widths. Thinking 2 at 7/8 and 2 at 6/8.
Jeff
-
10-29-2011, 09:38 AM #6Member

- Join Date
- Apr 2011
- Location
- Brisbane, Australia
- Posts
- 1,434
Thanked: 642
Looking forward to seeing some more of your work.
-
11-08-2011, 07:19 PM #7Senior Member
- Join Date
- Feb 2011
- Location
- Eastern Washington, USA
- Posts
- 284
Thanked: 54
OK so I have made a little bit of progress. Basic shapes are there. I am not sure If I like the notched razor yet. Both have different widths of tang, but only slightly. The tang on both will get thinned. I will not do that until I have the rough grinding done though so I can see how they handle.
I am going to hold off on the swing blade razors for now.
I threw in a couple just finished projects. The sheath I did last week and it is my first. The bigger knife I got the handle sanded Sunday, now it also needs a sheath.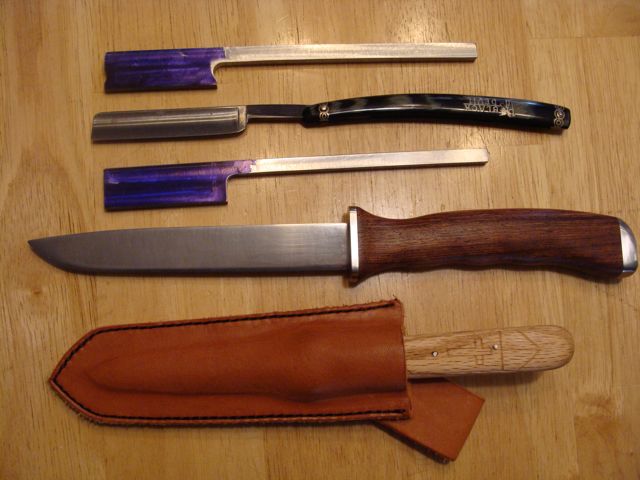
JeffLast edited by TURNMASTER; 11-08-2011 at 07:24 PM.
hornm and deighaingeal like this.
-
11-21-2011, 01:44 AM #8Senior Member
- Join Date
- Feb 2011
- Location
- Eastern Washington, USA
- Posts
- 284
Thanked: 54
In process, I was wanting to work more from home. So being unhappy with my bench grinder (i should have taken a pic) I put the wheel on my Shopsmith. Has 3 speeds, 800, 1500 or so and 3000. looks a little hokie but works well. You can see the Shopsmith in front of the bug. The garage has gotten a bit crowded since it has snowed. We keep the bug inside during the winter. Now I have to move 2 cars and a quad just to get into the "shop area". The table and grinding wheel idea works out surprisingly well. I am going to have to make a couple of new arbors just for wheels and a safety plate to fill in where the saw plate goes. That is of course if I continue to use this method.
Jeff
-
11-28-2011, 09:08 PM #9Senior Member
- Join Date
- Jul 2009
- Location
- Portland, Oregon, United States
- Posts
- 518
Thanked: 125
Hey...at least you are making progress.
Horn
-
11-28-2011, 10:04 PM #10Senior Member


- Join Date
- Dec 2006
- Location
- Burkburnett TX
- Posts
- 3,100
Thanked: 2392
Everything is looking good. I really like your grinding setup,
Charlie


 Reply With Quote