
Results 1 to 7 of 7
 2Likes
Thread: Plans for my first
 LinkBack URL
 About LinkBacks
-
11-29-2012, 12:05 AM #1Junior Member

- Join Date
- Nov 2012
- Posts
- 4
Thanked: 0 Plans for my first
I've spent a while looking through all of the great archive material and finally joined to interact.
I am hoping to try and make a straight razor over the holidays. I have a piece of 1/8" O1 and want to make a 4/8 razor. 1/8 is too thin for 5/8 right? I've had experience with O1 before, but have not made a razor before. I also have not used a straight razor mostly because I'm a student and would rather invest time than money. Yes I've read posts suggesting using one before making one, but I won't be disappointed if mine sucks- I have plenty of O1 and a keen interest to learn. I'm looking to make a basic half round razor, with a 1/2 hollow grind similar to this.
I have access to a great woodworking and metal working shop (most of my experience is in woodworking), so for the most part, tools are not as much of an issue.
So here is my plan, I'd love feedback if anyone has time! I like thinking about things in steps, so pardon the numbering..
1. Rough out the blade shape on a bandsaw and with files.
2. Grind the blade on an 8" wheel but not all the way so that the steel won't warp then hardening
3. Drill the hole for a brass pin at the pivot
4. Harden and temper
5. Do another round of grinding to final shape
6. Finish the razor including the blade by hand with paper?
7. Make scales, sharpen and hone blade.
The only thing I am not fully comfortable with is the grinding and sanding (yes I realize that's most of the process).
Anyway feedback would be appreciated. I'll post update pictures as I go (I won't start until late december).
-
11-29-2012, 03:16 AM #2Senior Member


- Join Date
- Dec 2006
- Location
- Burkburnett TX
- Posts
- 3,100
Thanked: 2392
I would still advocate getting a used razor and restore and learn to use it first. That being said, you have all the steps listed I would shoot for 4/8s or a little less.
Happy grinding.
Charlie
-
The Following User Says Thank You to spazola For This Useful Post:
aciccone (11-29-2012)
-
11-29-2012, 07:53 AM #3
That's about it, but I would have 2 additions to your plan:
buy an old, busted 4/8 on ebay so that you have something in your hand to compare with and analyse.
Total cost: 10$ or something in that range.
After grinding, have it honed by someone here. Or if money is a concern and you want to hone it yourself, borrow one from a member who lives near you. You will need to have a way to determine whether it is sharp or not. And without experience, you will not know whether it is sharp as in 'cuts paper', or sharp as in 'shaveready'. the 2 are not the same.spazola likes this.Til shade is gone, til water is gone, Into the shadow with teeth bared, screaming defiance with the last breath.
To spit in Sightblinders eye on the Last Day
-
The Following User Says Thank You to Bruno For This Useful Post:
aciccone (11-29-2012)
-
11-29-2012, 12:06 PM #4Junior Member
- Join Date
- Nov 2012
- Posts
- 4
Thanked: 0
Alright well I'll try and do that then. I guess if I get a used one I can also practice on it as well.
-
12-28-2012, 09:06 PM #5Junior Member
- Join Date
- Nov 2012
- Posts
- 4
Thanked: 0
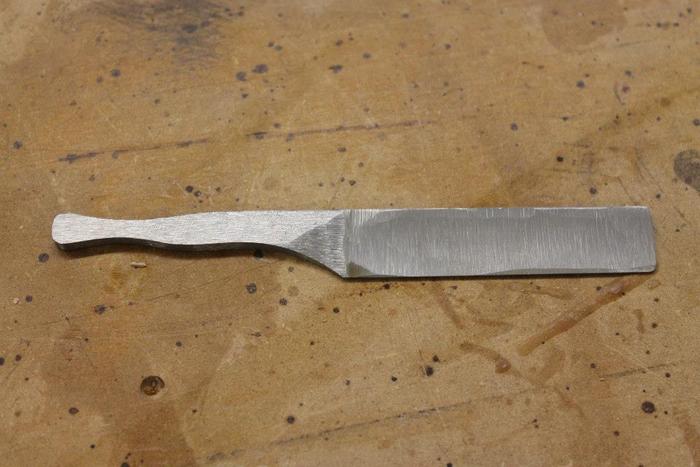
Alright so I did it.
This is after cutting, sanding the contours and grinding.
Then I made the scales from ebony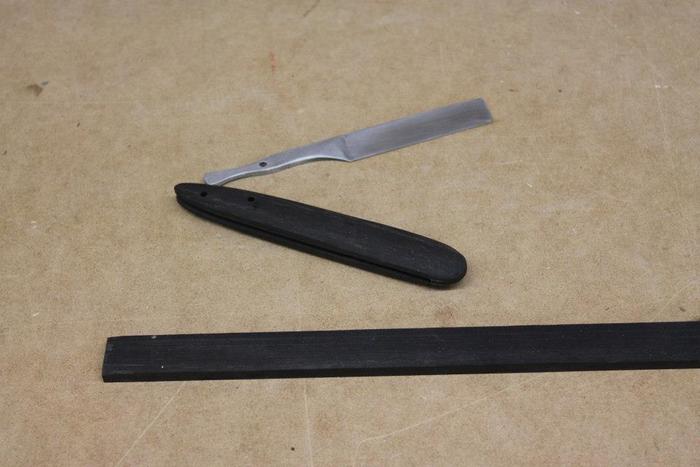
And finally it is all done: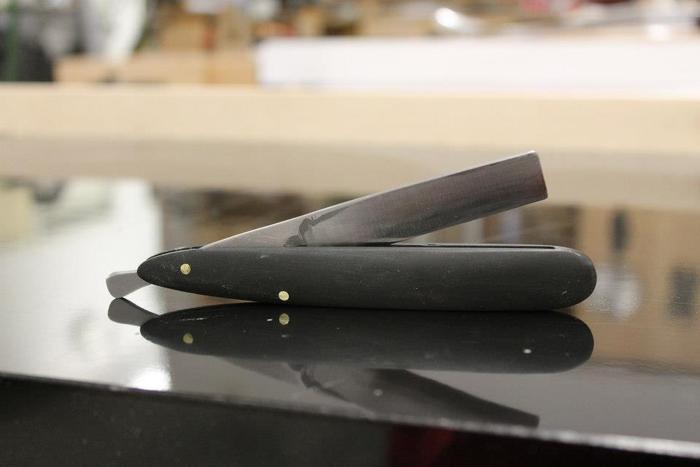
So it ended up taking a total of 5.5h. From cutting the blank to stropping the edge. It could look at lot nicer. I could have spent more time producing a mirror finish but I'd rather get it done and get shaving. I can do that later if I like.
I did order a razor online but it has taken more than three weeks with no arrival so I made this one anyway.
Feedback is appreciated if you're giving! I'm always looking to learn.
Also, there are a few more pics in this album.
It's just my general building album, but it's public!Last edited by aciccone; 12-28-2012 at 09:37 PM. Reason: Add pictures
Minnebrew likes this.
-
12-28-2012, 09:16 PM #6I need to return some video tapes

- Join Date
- May 2012
- Location
- Saint Paul, MN
- Posts
- 152
Thanked: 15
Looks pretty cool! Is it sharpened already? Great job! What did you end up using? Everything above or anything else? 5.5 hours is pretty good! Has it been heat treated?
-
12-28-2012, 09:40 PM #7Junior Member
- Join Date
- Nov 2012
- Posts
- 4
Thanked: 0
Thanks. Yes it is sharpened. It cuts hair on my arm well without soap or water. But I still need to learn how to shave my face with one. If your question is about materials, I used O1 steel, ebony for the scales, and brass rivets. Originally Posted by Minnebrew

Yes it was heat treated and tempered twice. Done with an oxy acetylene torch.


 Reply With Quote
