
Results 21 to 29 of 29
 3Likes
Thread: usb microscope
 LinkBack URL
 About LinkBacks
-
02-11-2013, 08:20 AM #21Member

- Join Date
- Jan 2013
- Posts
- 90
Thanked: 5
 Originally Posted by onimaru55

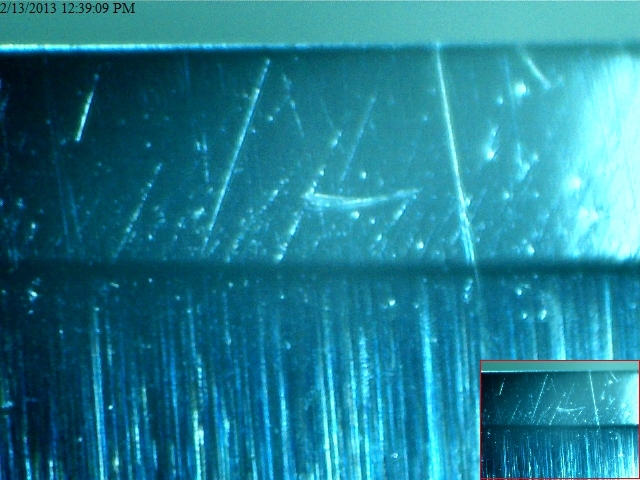
I did inspect at each stage. the jasper cuts slow, so it's possible that I didn't get to the bottom of the 8000 scratches before going to chrome oxide. next honing I'll substitute .5 micron diamond for the jasper, then chrome oxide. these are down near the limit of my scope to see- the chrome oxide just makes it shinier as far as the scope can resolve. I think that the scratches below about 1 micron are sub-pixel wide so I can't see them.
previous pitting is a definite possibility with a vintage blade.
-
02-11-2013, 08:30 AM #22The Great & Powerful Oz


- Join Date
- May 2008
- Location
- Bodalla, NSW
- Posts
- 15,638
Thanked: 3751
When I used DMT's I found many vintage razors just couldn't hold together at the edge without chipping. Let us know how the .5 micron works.
The white gleam of swords, not the black ink of books, clears doubts and uncertainties and bleak outlooks.
-
02-12-2013, 05:12 AM #23Member
- Join Date
- Jan 2013
- Posts
- 90
Thanked: 5
pics up at bridgerberdel.tumblr.com Originally Posted by Euclid440
-
02-13-2013, 05:46 PM #24Member
- Join Date
- Jan 2013
- Posts
- 90
Thanked: 5
more pics up on tumblr:
as found
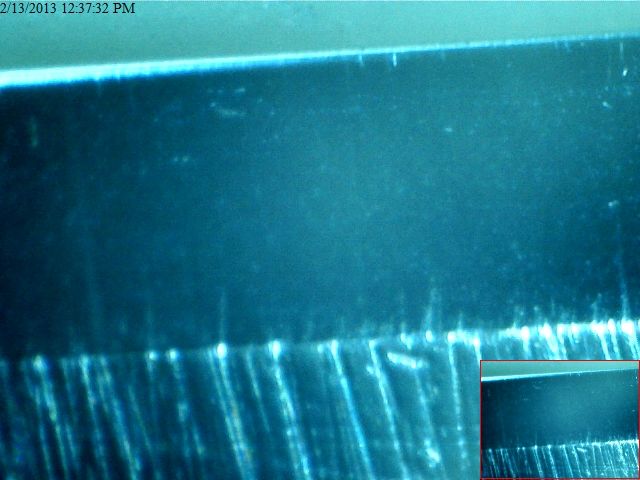
pitting near the edge. having a readily identifiable feature like this allowed me to measure how much material is removed by the stone. in this case, 300 strokes on a king 1000 grit waterstone followed by 300 strokes on a solid surface (lg himacs in this case) lap with 8000 grit diamond powder in mineral oil removed about .005" from the edge.
-
02-13-2013, 06:10 PM #25Member
- Join Date
- Jan 2013
- Posts
- 90
Thanked: 5
I keep forgetting to take the lens cap off. it's transparent, and so is the nose part of the scope it fits into, so if you aren't paying attention and leave the cap on it just seems like you're having a hard time focusing. Originally Posted by Euclid440
-
02-13-2013, 08:01 PM #26Senior Member


- Join Date
- Apr 2012
- Location
- Diamond Bar, CA
- Posts
- 6,553
Thanked: 3215
My experience with diamond, hones, pastes & sprays is they are great for sharpening/ refreshing, but not for polishing an edge. Diamond leaves too toothy a stria and edge.
Your Jasper may be too big a jump or not prepared properly to polish the 8K diamond edge. Here is a good thread on Jasper and the effects of proper prep. Hard High grit stone finishes are reflective of the grit of the lapping stone/grit used to lap/prep. Your Jasper is not removing the 8K stria.
I think you need a friable progression in liew of diamond or finish stone in the 10-12k range to polish the 8k edge. 300 laps are far too many on 1K. If you need that much edge correction, breadknife & reset the bevel with 45 degree strokes to knock off the corners then reset bevel on the 1K.
Thanks for the set up photos. Are you using additional light source or just the scope?
-
02-13-2013, 08:57 PM #27Senior Member
- Join Date
- Apr 2012
- Location
- Diamond Bar, CA
- Posts
- 6,553
Thanked: 3215
Here are some photos at 400X with a veho vms 004 of a NOS Genco stropped on .010 CBN and a CV Heljestrand after shaving with it for a week and stropped on.010 CBN.
Stria on the bevel is from dust on the strop. Does not affect the shave.
-
02-13-2013, 10:29 PM #28Senior Member
- Join Date
- Apr 2012
- Location
- Diamond Bar, CA
- Posts
- 6,553
Thanked: 3215
I found these instructions on the Amazon Review site. Perhaps they will help someone, did me. Note the 400 x instructions.
Most Helpful Customer Reviews
401 of 403 people found the following review helpful
4.0 out of 5 stars Unhelpful user's manual, microscope provides two fixed levels of magnification, appx 20x and appx 400x November 9, 2009
By Paul Clifford
Amazon Verified PurchaseI just bought this microscope and after some initial disappointment, because I didn't really know how to use it and the documentation that comes with it is almost useless, I am now quite pleased with it. There is some confusion in reviews here over what this microscope can do -- is it really a 400x power microscope? The advertising describes it as "Magnification: 20x - 400x (Plus digital zoom in 640x480 mode)" Does that mean it can continuously zoom from 20X to 400x? The manual that comes with it does not really tell you how to use it. So I did a little experimentation, and found that it really has two fixed magnifications, appx. 20x and appx. 400x.
There is a cylindrical drum you can twist for focusing the microscope. As you turn it an internal lens moves up and down the barrel, changing the distance to the specimen. On the drum, there's a scale, with markings from 20 to 400 on it, that is quite misleading -- it suggests that you can optically zoom continuously from 20x to through 400x. But that is not the case. Instead, there are two fixed magnification levels, one nominally 20x and one about 400x, corresponding to two different focus locations, and they do not correspond to the locations on the scale you would expect!
Using it at 20x power:
If you place a specimen, like a piece of paper, directly under the microscope and place the clear plastic end of the microscope directly on the paper, the 20x focus occurs when you turn the drum beyond the top of the scale, past the 400, then a little past the 20 mark as the scale starts repeating. At this focal point the internal lens is moved up the tube, far from the specimen. The field of view is 13.5 mm. You can then move the microscope farther from the paper, readjusting the focus as necessary. You can even move the microscope quite far from the specimen, and still be able to focus it with 20x magnification. When it is focused at infinity, (at the extreme end of the scale, about 60 over the top), the field of view is 11.2 degrees, or about 3" wide when the subject is 12" from the end of the microscope.
Using it at 400x power:
To get the the 400x magnification, again place the clear plastic end of the microscope directly on the specimen, say a dollar bill. The 400x focus location occurs when the drum is rotated beyond the bottom of the scale, to the 400 below the 20 mark. At this point, the internal lens is moved down the tube, to nearly as close to the specimen as it can get (about 22mm). The field of view is only about 0.8 mm, or 2 degrees. Most users would never notice that the microscope can focus at the 400x magnification: to attain it you must move the focus lens to nearly the full bottom of its travel; it is easy to go through the focal region too quickly to see it; and the documentation makes no mention of it. People may think the higher magnification is obtained by zooming in digitally on your computer screen, without realizing that the microscope focuses with high magnification itself. You'll need to turn on the LED illumination for the 400x scale to get an image. (There are eight white LEDs that provide good even illumination, not four as advertised.)
Zooming:
As well as these two focus regimes, there is a software zoom option. If you choose a capture size of 640x480 you can go to the preferences menu and choose zoom to zoom in digitally. The field of view zooms from 13.5mm down to 4.2 mm.
Measuring actual magnification:
The 20x and 400x are only approximage values, but you can measure the actual magnification by viewing a millimeter ruler or finer reticule if you have one. If the image capture size is set to 1280x960, I find that the width of the field of view is 13.5 mm at the "20x" focus, and about 0.8 mm at the "400x" focus. (about a 17x difference) The resolution, that is, the size of a single pixel in the field of view, is 13.5mm/1280= 10.5 microns for the "20x" focus, and 0.8mm/1280=0.6 micron for the "400x" focus. (Of course, the optics aren't perfect, and it appears to me that at the "400x" focus the optical resolution is about 3 pixels, that is, the smallest features you can see are about 2 micron in size. The magnification you see on your computer screen depends on the screen pixel size, also called the pixel pitch. Mine is 0.282 mm (or 90 pixels per inch, most LCD screens are 90-100 pixels/in.). For my screen, the two actual magnifications are then, 1280*0.282mm/13.5mm = 26.7x and 1280*.282mm/0.8mm = 451x. This is for viewing on the computer screen at "actual size", not zooming in.
Measuring object sizes:
The software allows you to measure objects with rulers you can draw over a picture, but you need to enter the actual magnification to calibrate the software ruler. They suggest you take that reading from the scale on the microscope, but there's so much up and down play in the focus drum that you can't rely on its readings for the true magnification. It's best to calibrate the field of view by taking a picture of a millimeter ruler. Then you know what true size the full width of the captured image corresponds to. That works well for the appx. 20x focus point. Unfortunately, the magnification box allows entry of only integers up to 220, so you can't enter an actual magnification, like 451, to get accurate numbers.
Even so, you can measure object sizes and do the math yourself. In particular, you can use the software ruler to measure sizes in pixels with a magnification factor of one, and get an accurate pixel measurement.
Saving images:
The software lets you save the images in uncompressed *.bmp or compressed *.jpg file formats. You can choose the level of compression for the *.jpg files; remarkably, the 3.7 MB files (1280x960x3bytes) can be compressed to about 100KB without much loss of resolution.
Image resolution:
Despite the ad hype, the sensor is not a 2 megapixel (Mp) sensor -- the spec sheet in the instruction manual says it is 1.3 (Mp). The maximum resolution is attained when you choose an image size of 1280x960 = 1.23 Mp. Although there is an option for capturing images at 1600x1200, those images are interpolated, and don't result in any greater actual resolution.
With these considerations in mind, you'll find that this microscope is a great value for the money, and you can take some really good photomicrographs with it.
-
02-14-2013, 05:34 AM #29Junior Member
- Join Date
- Dec 2012
- Posts
- 6
Thanked: 0
Thank you for the post. Your 200x gives a nice image. I am using a spencer stereoscope that only goes to 30 power, but the image has good resolution. It's interesting how the pits run like sand on the beach when they're stropped with a little paste.
I am beginning to collect vintage razors, and some of them have pits like yours on the threshold where the bevel begins. They hone out fine but its interesting the effect of the various sharpening techniques are.


 Reply With Quote