Page 2 of 3 FirstFirst 123 LastLast
Results 11 to 20 of 21
Like Tree17Likes

Thread: "The Survivor" Suggestions Please

  1. #11
    The Great & Powerful Oz onimaru55's Avatar
    Join Date
    May 2008
    Location
    Bodalla, NSW
    Posts
    15,623
    Thanked: 3749

    Default

    I'd go pretty hard on the heel & stabiliser to bring back some semblance of a smile.
    As below:
    Attached Images Attached Images  
    Euclid440 and 57vert like this.
    The white gleam of swords, not the black ink of books, clears doubts and uncertainties and bleak outlooks.

  2. #12
    Senior Member blabbermouth
    Join Date
    Apr 2012
    Location
    Diamond Bar, CA
    Posts
    6,553
    Thanked: 3215

    Default

    If you do end up removing a lot of the stabilizer, I use a Dremel with a fine sanding drum at slow speed, and pay attention to the direction of rotation, for just the thick part of the stabilizer.

    BTW if you use a Dremel, do get a variable speed and a flex shaft… will change your life… much more control. If you are buying new, get the lithium battery powered and eliminate another cord on the bench that can knock a razor off the bench. The batteries hold a charge well and charge quickly.

    Hang the rotary tool from a bungee cord from a hook in the ceiling, fashion a hook to store the flex shaft out of the way when not in use, a coat hanger works or couple of nails in the wall. If you buy a flex shaft, make sure it will fit you rotary, there are course and fine thread end caps. One size does not fit all.

    The trick to staying out of trouble with a Dremel is, knowing when to stop.

    I use it for heavy work and do detail and edge work by hand with a diamond file.

    When you get that little voice in your head that, “this may not be a good idea”, you are probably right, do it by hand…
    57vert likes this.

  3. The Following User Says Thank You to Euclid440 For This Useful Post:

    57vert (01-02-2015)

  4. #13
    Senior Member 57vert's Avatar
    Join Date
    Sep 2014
    Location
    Connecticut
    Posts
    173
    Thanked: 43

    Default

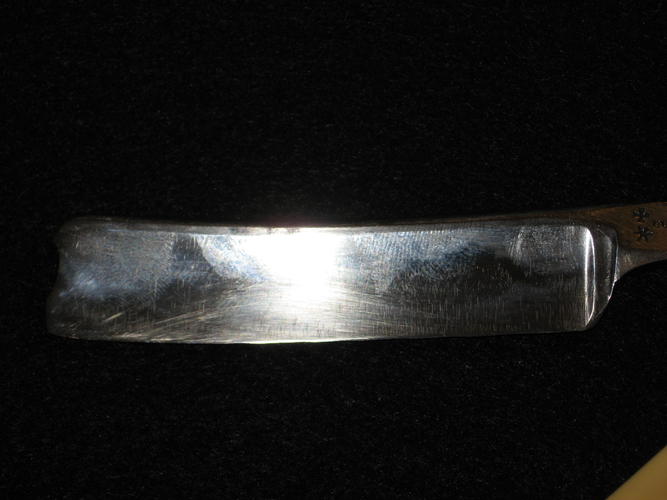
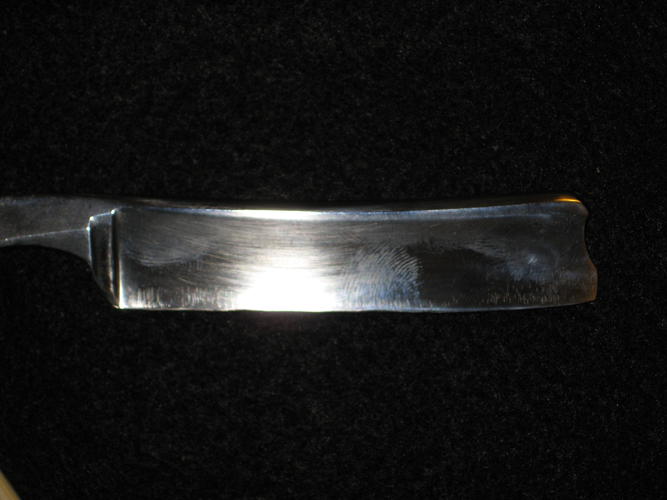
    Progress Update: Raised the stabilizer a bit. But from my test bevel, not enough. Went to my Naniwa Pro 1K, but there is still a wave in the edge with bad steel and it is taking forever to try and get rid of so I'm going to go back down to my DMT 325 and possibly go with a bigger smile. But as I worked the blade on the stones, this is what the blade (or maybe my technique) was dictating for the shape of the edge. And thanks onimaru55 for the photoshopped pic, gives me a much better idea of what I should be doing.
    Name:  IMG_5365.jpg
Views: 90
Size:  58.2 KB

  5. #14
    Senior Member 57vert's Avatar
    Join Date
    Sep 2014
    Location
    Connecticut
    Posts
    173
    Thanked: 43

    Default

    Name:  P1020533.jpg
Views: 90
Size:  58.3 KB
    So guys, here it is, I'm finished for now. I've read about even bevels, the bevel is very even along the length of the blade. Is this an indication that the profile of the edge is "correct"? I would have preferred to put a bigger smile on it, as was suggested, but I was afraid it would mess up the bevel. Would a bigger smile have messed up the bevel particularly considering this is a near wedge or 1/4 hollow? Please give me your harshest evaluations. I'm looking to learn.

  6. #15
    Senior Member 57vert's Avatar
    Join Date
    Sep 2014
    Location
    Connecticut
    Posts
    173
    Thanked: 43

    Default

    Quote Originally Posted by onimaru55 View Post
    I'd go pretty hard on the heel & stabiliser to bring back some semblance of a smile.
    As below:
    How did you know onimaru55 how much of the stabilizer to remove? Your photo would have been pretty much spot on perfect. I took slightly less off and the edge at the heel reflects I should have taken a bit more off.

  7. #16
    Senior Member blabbermouth
    Join Date
    Apr 2012
    Location
    Diamond Bar, CA
    Posts
    6,553
    Thanked: 3215

    Default

    Looks good, but you might thin the stabilizer tapered towards the edge, hand diamond file or very light touch with a slow spinning fine grit drum on a Dremel with the blade flat on the bench.

    Remove just enough, so it does not hit the stabilizer and the heel gets honed all the way to the edge. Ink the stabilizer to test.

    You want to be able to shave off the heel and tip.
    onimaru55 and 57vert like this.

  8. The Following User Says Thank You to Euclid440 For This Useful Post:

    57vert (01-03-2015)

  9. #17
    The Great & Powerful Oz onimaru55's Avatar
    Join Date
    May 2008
    Location
    Bodalla, NSW
    Posts
    15,623
    Thanked: 3749

    Default

    Quote Originally Posted by 57vert View Post
    How did you know onimaru55 how much of the stabilizer to remove? Your photo would have been pretty much spot on perfect. I took slightly less off and the edge at the heel reflects I should have taken a bit more off.
    Years of training grasshopper . lol.

    Nahh really it's just years of frustrating honing on less than ideal geometries & seeing enough smiling blades. I just now know what a razor is suppose to look like . Tho f you asked me to measure or give figures I'd be dead in the water which is why I could probably never make one.
    What you did btw looks pretty ok & it's good to err on less steel removal than too much.
    57vert likes this.
    The white gleam of swords, not the black ink of books, clears doubts and uncertainties and bleak outlooks.

  10. The Following User Says Thank You to onimaru55 For This Useful Post:

    57vert (01-03-2015)

  11. #18
    Senior Member 57vert's Avatar
    Join Date
    Sep 2014
    Location
    Connecticut
    Posts
    173
    Thanked: 43

    Default

    Quote Originally Posted by Euclid440 View Post
    Looks good, but you might thin the stabilizer tapered towards the edge, hand diamond file or very light touch with a slow spinning fine grit drum on a Dremel with the blade flat on the bench.

    Remove just enough, so it does not hit the stabilizer and the heel gets honed all the way to the edge. Ink the stabilizer to test.

    You want to be able to shave off the heel and tip.
    And would it be better to thin the stabilizer or move the stabilizer up more?

  12. #19
    Senior Member blabbermouth 10Pups's Avatar
    Join Date
    Nov 2012
    Location
    Across the street from Mickey Mouse in Calif.
    Posts
    5,320
    Thanked: 1184

    Default

    Lots of geometry here eh ? :<0)
    You did good. The bevel doesn't look the same on both sides but that could be the hone wear or camera angle or both.
    On the show side it is wide at the toe but tapers back even enough. You may be done as far as the stabilizer goes.

    This razor maybe a little different because of the hollow but to explain :::

    Name:  100_8850.jpg
Views: 62
Size:  40.3 KB

    The stabilizer on this one ends before it reaches the edge.(red arrow) That is what you would do if you wanted to raise it.
    Rounding the heel more is what you did and this moves the edge more forward and off the stabilizer. It can still get in the way and you will notice that if it shows hone marks when you hone. The added height or (thickness) will keep the edge off the hone near the heel until you hone the stabilizer down enough. Takes forever and looks like poo.
    On this razor you can see how the edge ends right at the stabilizer. (yellow arrow) You may notice it is a little higher there. This is not due to a frown or caused by the stabilizer. This blade is a weee bit warped. On the other side it has small bevel at the heel and toe and is tall in the center. But that is a whole nuther set of geometry problems. :<0)

    The more you mess with these things the clearer it becomes. If you feel likes it's time to stop ,, stop.
    If you get it to shave and you like the look of it, you have succeeded.
    Kristian likes this.
    Good judgment comes from experience, and experience....well that comes from poor judgment.

  13. The Following User Says Thank You to 10Pups For This Useful Post:

    57vert (02-01-2015)

  14. #20
    The Great & Powerful Oz onimaru55's Avatar
    Join Date
    May 2008
    Location
    Bodalla, NSW
    Posts
    15,623
    Thanked: 3749

    Default

    Quote Originally Posted by 57vert View Post
    And would it be better to thin the stabilizer or move the stabilizer up more?
    Just going on that pic, it looks like you could hone that as is.
    The white gleam of swords, not the black ink of books, clears doubts and uncertainties and bleak outlooks.

Page 2 of 3 FirstFirst 123 LastLast

Posting Permissions

  • You may not post new threads
  • You may not post replies
  • You may not post attachments
  • You may not edit your posts
  •