
Results 1 to 10 of 57
 84Likes
 LinkBack URL
 About LinkBacks
Hybrid View
-
04-16-2016, 05:41 PM #1Senior Member


- Join Date
- May 2013
- Location
- London, UK
- Posts
- 453
Thanked: 54
Thanks Glen, as soon as I get the pictures looking pretty then I would be happy to trial a shave off the 1k then work my way up!
Any ideas on the loss of bevel towards the toe on the away strokes?
-
04-16-2016, 07:34 PM #2KN4HJP

- Join Date
- Feb 2015
- Location
- Chesapeake, Virginia
- Posts
- 932
Thanked: 261
Most likely a result of uneven blade grind - a fairly common issue, especially with older razors. Other than aesthetics, it doesn't hurt anything as long as there is visible bevel on each side and no dips in the edge. Originally Posted by Damo
 "Every normal man must be tempted at times to spit on his hands, hoist the black flag, and begin to slit throats." -H. L. Mencken
-
04-16-2016, 07:39 PM #3KN4HJP
- Join Date
- Feb 2015
- Location
- Chesapeake, Virginia
- Posts
- 932
Thanked: 261
Should add that this can also be caused by a warped blade, although that will show corresponding changes in bevel width on both sides. See this article from the SRP Library:
Bevel-setting in theory and practice - Straight Razor Place Library"Every normal man must be tempted at times to spit on his hands, hoist the black flag, and begin to slit throats." -H. L. Mencken
-
05-01-2016, 02:28 PM #4Senior Member
- Join Date
- May 2013
- Location
- London, UK
- Posts
- 453
Thanked: 54
Sunday afternoon treat to myself. Sat down with the football on the radio and tried again, including a shave test.
As per the last attempt:
1. Stones flattened
2. Razor taped with one layer and dulled on glass
3. Toe leading x strokes only no circling.
Pictures and shave test are after 1k then 3k without stropping.
The razor shaved smoothly. I used it to pass down my face on the cheeks only. I have a pretty sensitive neck and didn't trust it to go onto my neck. There was no pulling, no grabbing, it just took away the hair.
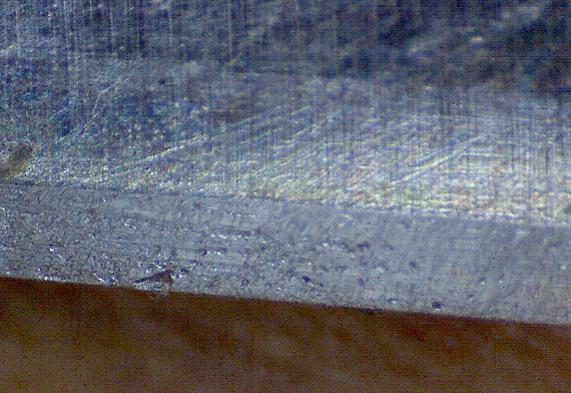
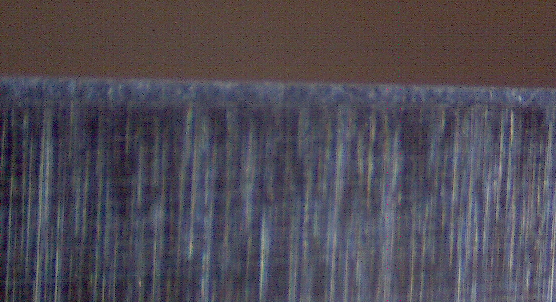
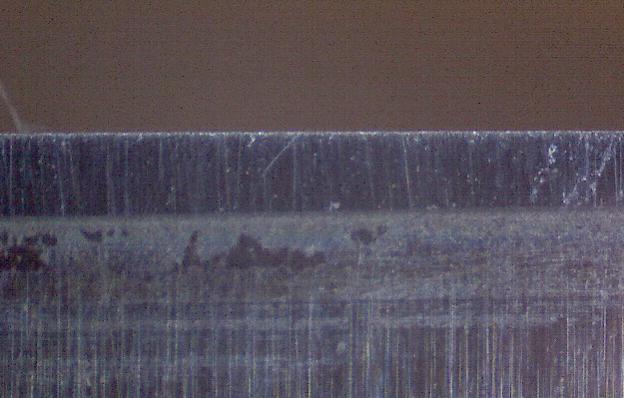
As per the last attempt, I was having trouble with the toe of the razor. despite it looking like the water was being pushed away from the edge uniformly, the magic marker took longer to disappear from the toe of the razor, that part of the razor took longer to pick up leg hair, and under the USB scope that part of the blade still is a markedly narrower bevel compared with the centre of the blade.
I will finish this razor to 8k then JNAT just to see what it feels like going all the way up the progression, but will dull it and drop back down to 1k after that to practice and learn based on comments! Photos are a random three from either side up and down the blade, I honest can't remember which is which. The one which is markedly narrower is the toe!!!
Thank you for your input.
-
05-01-2016, 03:26 PM #5Senior Member


- Join Date
- Apr 2012
- Location
- Diamond Bar, CA
- Posts
- 6,553
Thanked: 3215
So, all three photos are the bevel at 3k?
If so, you still have a lot of 1k stria, it does not look like you are honing to the edge, and the bevel is not fully set.
That bevel looks very damaged and may not hold an edge, at the least, you will have to get past the pitting on the bevel. Joint or lightly bread knife the edge, until you are well past the pitting and into good steel, it should only take a few swipes on a low grit stone or diamond plate, the edge is very thin.
Also take your photos so the edge is facing the same direction, it makes it much easier to determine what we are seeing. In the 2nd photo is the narrow, blurry band the bevel?
I suspect you are not using enough pressure on the 1k to grind the bevel flat and reach the edge. At 1k, the goal is to grind the bevels flat and into a single plane, it appears you have not accomplished that. Sometimes you have to use more pressure, especially when making corrections.
Using too much pressure can cause chipping, but that can be dealt with simply, by jointing the edge and resetting the bevel with less pressure. Try using 2 layers of tape to increase the angle and see if that reaches the edge, you can always drop back down to a single layer and reset the angle in a handful of laps later if you wish.
Watch your tape when using pressure on a low grit stone, it is easy to burn through the tape. Keep inking the bevel to see your progress, colored ink makes it easier to see, black ink can look like a shadow. Tape and ink are cheap…
That the ink was difficult to remove, is a good indicator that the bevels are not flat and in a single plane, and most probably the swarf remove the ink, not the hone. All your ink should come off the bevel completely in 2-3 laps, once the bevels are flat, though that does not mean that the bevels are meeting. Look straight down on the edge, if you see shiny reflections, the bevel is still not meeting, fully.
The bevels can be flat, at the proper angle and still not meeting fully. You have to achieve all three, to fully set the bevel.
Lastly, once you set a bevel, killing it and re-setting it does not really teach you a lot about honing, because 95 percent of honing is flattening the bevel, setting the angle and getting them to meet,(setting the bevel). Once you have accomplished the first two, getting them to meet again, after jointing is simply a matter of a few strokes, all the hard work and learning is already done.
-
05-01-2016, 04:08 PM #6Senior Member
- Join Date
- May 2013
- Location
- London, UK
- Posts
- 453
Thanked: 54
Thank you.
Yes all three are at 3K. Will ensure all photos are the correct way around next time.
Do you see pitting anywhere except in the first photo? That may be alcohol wipe to remove the magic marker pen.
In terms of ink removal, I get ink removed all along the cutting edge within a few laps with the exception of the toe, both on this razor and on the razor I was practicing on last week. The toe is problematic from a magic marker removal perspective. I use two hands to make sure the whole blade is on the stone, and lead with the toe for my strokes.
Thankfully tomorrow is a bank holiday in the UK, so will go back to the 1K stone and try again with more pressure.
Shame, because it felt relatively ok on the face this afternoon!
-
05-01-2016, 06:51 PM #7Senior Member
- Join Date
- Apr 2012
- Location
- Diamond Bar, CA
- Posts
- 6,553
Thanked: 3215
There is a large pit in the first photo and there is something on the right side of the last photo.
You will have to remove metal, down to the bottom of the pit in the first photo, (about a quarter of the bevel). It looks like it is already at the edge. Was this a Cell Rot razor?
WD40 also works well for ink removal.
Sometimes you can get lucky and get an edge on weak pitted steel, but they fail and start to chip after repeated stropping.
If the ink does not come off the entire bevel in 2-3 laps, it is not flat. That is the hardest thing for guys to get, the “whole” bevel has to be flat and in the same plane. That the width of the bevel is not the same, from heel to toe, does not matter as long as it is flat and the bevels meeting.
We often tell guys, to watch the pressure when honing, but in this case it is not a garden variety honing, it is a repair, because of the pitting on the bevel. You have to repair it before you can hone it. You have to get the bevel flat and pit free at the edge.
When doing repairs, you may have to go to lower grit stones, I have stones down to 400 grit, for these kinds of repairs. If you don’t have lower grit hones, you have to use more pressure or more laps. You will also have to do more work removing the deep low grit stria. If the edge is ragged, just joint it straight and reset it and move up the progression.
If you do not spend the time to properly and fully set the bevel, you will fight the progression up the stones and still may not have a strong, keen edge.


 Reply With Quote