
Results 21 to 30 of 34
 24Likes
 LinkBack URL
 About LinkBacks
-
02-15-2016, 04:18 PM #21Senior Member


- Join Date
- Apr 2015
- Location
- New Hampshire, USA
- Posts
- 296
Thanked: 83
Sorry - I had a typo and subsequent math error in this post! The objective lens isn't 40x it's 4x and the ocular at about 15 so these images are at 60x which is about what they look like - sorry about that. The magnification on the image in the bottom left corner of the image is now correct and I registered the software - which removes that annoying little tag. I do have a 60x objective lens which will get me 900 but it's useless with a razor. I use it for fish keeping trying to identify nasty protozoa - another expensive hobby. Here's a better shot with the correct information as well as the resolution - which is a good way of knowing what you're actually looking at.

AdamLast edited by aalbina; 02-15-2016 at 04:29 PM. Reason: Forgot to add the picture
-
02-15-2016, 04:48 PM #22Senior Member


- Join Date
- Apr 2012
- Location
- Diamond Bar, CA
- Posts
- 6,553
Thanked: 3215
Make sure to wipe the bevel with a clean paper towel or tissue. If this is a 12k bevel, there is a lot of deep stria on the bevel and a very jagged edge, most probably the bevel is not fully set.
Sharper photos with more magnification would help.
Look straight down on the bevel, if you see shiny reflections, the bevel is not fully set. Inking the bevel will tell you if you are honing to the edge, with all the changes you have made using tape and not, it would not be surprising if you are not reaching the edge now. Pick one method and stick with it.
Here is a good thread with great photos of what to look for. Second chance at Honing.
-
02-16-2016, 02:16 PM #23Senior Member
- Join Date
- Apr 2015
- Location
- New Hampshire, USA
- Posts
- 296
Thanked: 83
Will do - just have to find some time to sit down. Too much going on right now and plenty of other razors in the collection not to have a sense of urgency about getting this one done. My sons gave this one to me as a gift - so I do want to get it shaving well again. I am using a compound light microscope that I also use for biological work. Not the best choice for viewing solids as it is difficult to get light past the mass and into the objective to properly illuminate the subject. I can certainly get to a much higher magnification level - probably around 1200x but I'm pretty sure that's not going to be very helpful because it would be such a small area of viewing. I'll try different objectives and see what looks best. Sharpness is a matter of depth of field - if I focus on the edge - the bevel will be out of focus. Above - I tried to settle on a happy medium. Which would be most important?
I'll try and make this microscope work for me. It's perfect for the biological work I do and I'm certainly not going to spend any money on a usb microscope given that I have a lot more money tied up in this lab quality scope.
I have looked down the edge and I see no flat/shinny spots.
Adam
 Originally Posted by Euclid440

-
02-18-2016, 05:49 PM #24Senior Member

- Join Date
- Dec 2014
- Location
- Virginia, USA
- Posts
- 2,224
Thanked: 481
60 to 100 should be about all you need for this venture. I picked up a pocket microscope at 200x and frankly, it's a bit much. I find myself using the tried and true 60x more often than not.
The picture in post 21 makes it look like a prime candidate for some 4k action. Doesn't look like it needs to drop back to 1k. I don't know if you read the propaganda that came with your Norton 4K, but it was designed as a "cutting" hone - it removes a lot of material for what it is. The more I play with mine, the more I'm surprised at what it can do.
You said yours feels rougher than your 1K? I didn't see anyone a dress that. They come with a fairly rough surface and this needs to be worn off with the lapping stone/plate and smoothed out. A little bit of wet sanding after lapping ensures a smooth surface. I stopped at 1k. It kind of feels like ceramic when it's ready for work. Not glassy like the 8k of course, there's a bit more friction. But much smoother than a 1k hone.Last edited by Marshal; 02-18-2016 at 05:51 PM.
-
02-18-2016, 06:43 PM #25Senior Member
- Join Date
- Apr 2012
- Location
- Diamond Bar, CA
- Posts
- 6,553
Thanked: 3215
Yup agree, some 4k time to remove the deep 1k stria.
Really think too much is put into what a 4k should feel like or bevel should look like, it’s 4k. The goal of a 4k is to remove deep, 1k stria. The edge will not begin to get straight until 8k, so don’t sweat it.
Yes, they are aggressive and once the bevel are flat and in the correct plane, a 4k is a much better bevel setter and may make a stronger edge.
Though, jointing after the 1k, will get an edge straighter, faster.
-
02-24-2016, 02:26 PM #26Senior Member
- Join Date
- Apr 2015
- Location
- New Hampshire, USA
- Posts
- 296
Thanked: 83
Thanks Marshal - I started on the 4K this time. It has been lapped many - many times over the last year. I've read here where others feel like it's not smooth - but when I look at 1K stria and 4K stria in the scope, it's pretty easy to see the difference - just doesn't feel very smooth.
I'll post my progress today.
Adam
Originally Posted by Marshal
Marshal likes this.
-
02-24-2016, 05:55 PM #27Senior Member
- Join Date
- Apr 2015
- Location
- New Hampshire, USA
- Posts
- 296
Thanked: 83
Spent some more time on the stones with this Dovo. In between this Dovo work, I refreshed another razor that shaves great, reset the bevel on a friend of mines razor that he hasn't used in years - and worked up to shave ready, and repaired my sons sheffield wedge - that he dropped (spent a lot of time n the 4K on that one). I didn't have any trouble with any of those razors. Not sure why this particular Dovo has given me problems. After the sequences below - I shaved with the Dovo this morning and it was not only comfortable but provided a great shave. I think I could spend some more time on the 8K before moving to the 12K - still a little stria to remove.
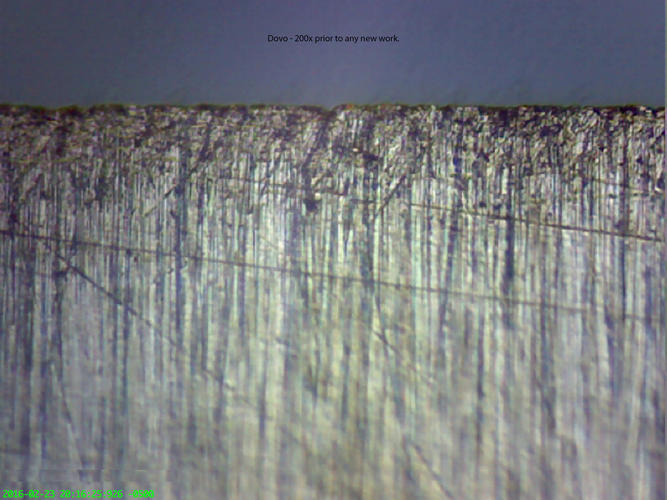
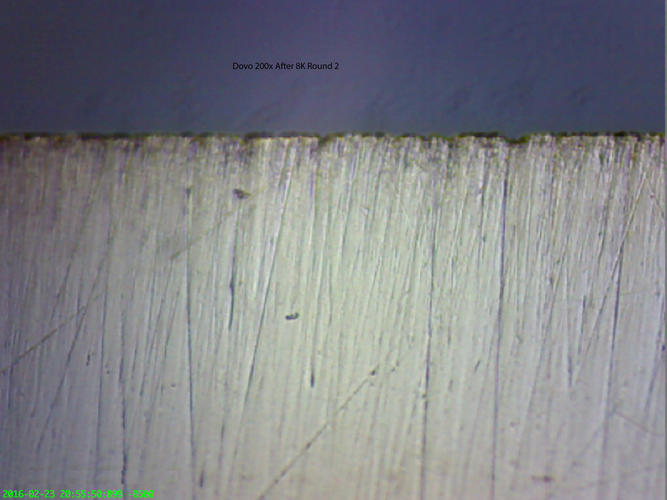
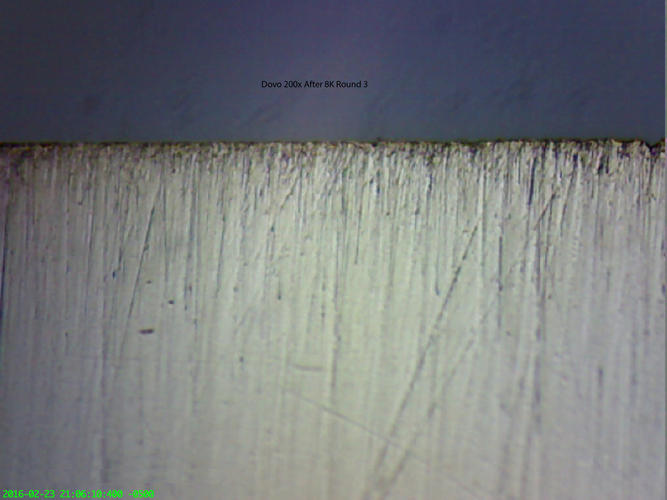
These pictures are taken with a Celestron drop in ocular camera connected through USB to my computer. I'm using a Celestron compound light microscope. I'm using a very bright LED light reflecting off of the base mirror to get as much light into the optics as I can. The lighting assembly just isn't bright enough. The camera is probably about 20x - which is what I read from some scientists using it although I can't be positive as I have no way to measure it. The objective lens I'm using is 10x so that should give us around 200x magnification. This is pretty high magnification which basically shows only a portion of the bevel. When I look at the blade with my LED lighted handheld at 60x - it looks awesome! So be aware that this 200x magnification is pretty extreme - but I really wanted to see what was going here since I've had so much trouble with this one.
I followed Euclid440's advice and stayed with the no tape method and the assumption that the bevel hasn't been fully set. I see no shinny spots but my eye is not well trained and I'm over 50 - so magnification is my friend. Naniwa 1K (not used in this session), Norton 4/8K combo, Naniwa 12K, CO pasted strop and SRD Bridle leather and linen strop.
So here we go - the before work picture:
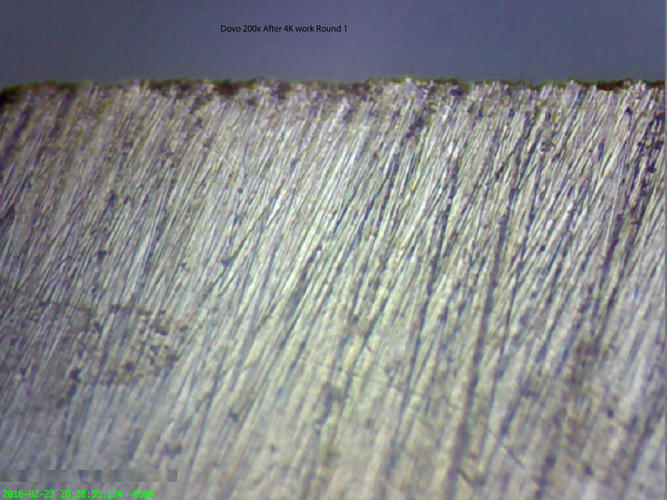
After circle method on the 4K and about 40 up and back angled passes so I can see the stria.
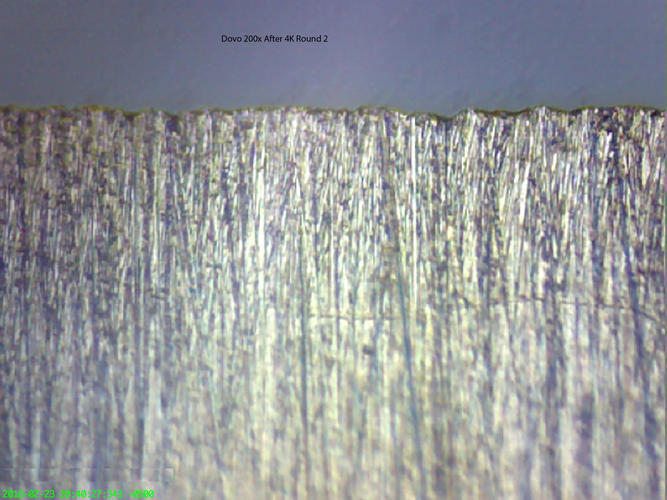
Round 2 on the 4K straight up and back
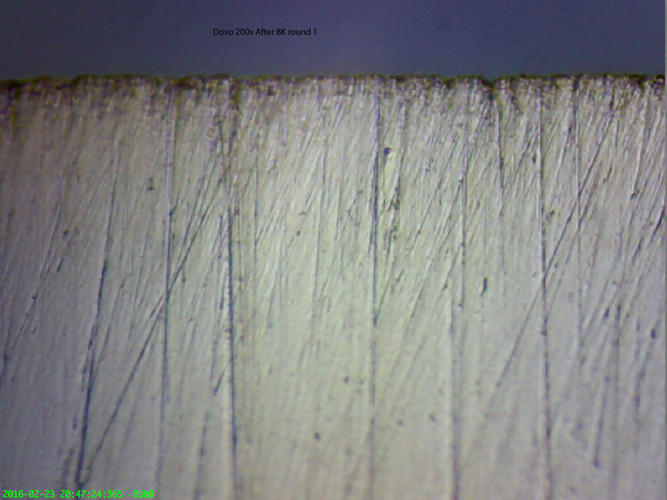
After the 8K up and back
After the 8K up and back Round 2
After the 8K up and back Round 3
Finally - After the 12K Round 1. I ran the edge gently over the corner of the stone here as suggested. Went to linen, then back to the 12K. Wouldn't shave arm air. So I went back to the 8K and did 20 laps ultra-light laps and then to the 12K for 20 ultra-light laps and then took this picture.

So there - you go. I finally have it back shaving almost as well as when I got it from SRD!
AdamLast edited by aalbina; 02-24-2016 at 05:59 PM.
Marshal likes this.
-
02-25-2016, 01:10 AM #28Senior Member
- Join Date
- Apr 2012
- Location
- Diamond Bar, CA
- Posts
- 6,553
Thanked: 3215
Adam, looks like about 200x, your bevel is still not fully set, it may cut arm hair but the edge will fail and chip out more, it will not shave comfortably.
Back to the 4k and stay on it until all the deep 1k stria is gone and the bevels are meeting fully. Notice how the deep 1k stria, end in a chip at the edge.
When you bread-knife an edge, it does not hurt to set the bevel, joint the edge and set it again to ensure you have a solid bevel of good steel. Jointing at the 4k also will ensure you have fully set the bevel.
Your 12k is polishing just fine, you just need a good edge.
-
02-25-2016, 03:11 PM #29Senior Member
- Join Date
- Apr 2015
- Location
- New Hampshire, USA
- Posts
- 296
Thanked: 83
OK - makes sense. It shaves reasonably well - but I think I will have the same problem with it breaking down over a short amount of time that I had last time if I don't follow your advice. Thanks for taking the time to coach me through this.
I am having a hard time seeing the 1K stria in the 4K pictures above. I do see them on the 8K photo after the 8K has removed all the 4K stria. So I'll have a go tonight on the 4K and then go up to the 8K and see if I have any deeper 1K stria left. I'll keep bouncing back and forth between the 4 and the 8 until the 8K picture comes up clean of 1K stria. I may joint it on the 4K in the process to get rid of the chips once the 1K stria are gone. Then I'll finish on the 8 and move to the 12 to polish.
I think this one is so much trouble and different than others I have worked on successfully because I must have put too much pressure on it while fixing the damage on the 1K originally. I think I'm still working out those deep 1K stria from that pressure. I definitely see what you mean - how the 1K line runs up the bevel and ends in a chip.
Thanks!
Adam
Originally Posted by Euclid440
-
02-25-2016, 06:35 PM #30Senior Member
- Join Date
- Apr 2012
- Location
- Diamond Bar, CA
- Posts
- 6,553
Thanked: 3215
Yes, bread-knifing can damage the steel at the edge if too much pressure is used or aggressive stones. You are literally grinding the edge. Often some more of the edge needs to be removed to prevent crumbling. So set the bevel a couple times on problem edges to avoid crumbling at the higher grits, you don’t have to remove that much often, just a few thousands.
Stay on the 4k until all the deep 1k stria is removed and you are honing all the way to the edge. Jointing and re-setting the bevel will ensure you have a good edge
Try angling your honing so the final 1k stria are at about 45 degree angle, then you will easily see which are 1 and 4k by the stria angle. It is better to do a few, (10 or so) extra laps to ensure you have a fully set bevel. Ink can be a good indicator also and will quickly tell you if you are honing to the edge.
Failing to fully set a bevel are probably 90 percent of new honers problems.
-
The Following User Says Thank You to Euclid440 For This Useful Post:
aalbina (02-27-2016)


 Reply With Quote