
Results 1 to 10 of 155
 47Likes
Thread: Is this microchipping...
 LinkBack URL
 About LinkBacks
Hybrid View
-
12-26-2015, 09:02 PM #1Senior Member


- Join Date
- Dec 2014
- Location
- Southern NH
- Posts
- 562
Thanked: 41 Is this microchipping...
I have a Union Cutlery Spike, which is one of my favorites. I got it from the classifieds and shaved about 20 times, before needed to touch it up, due to some dings (it was back when I first started shaving and trying honing). I was able to get it back to being comfortable to shave with and put it back into my rotation. I probably did 30-40 shaves with the razor, before it started to get a bit uncomfortable - pulling and increased irritation.
Now that I know a bit more on honing experience (did a minor restoration/honing of a JA Henckels with help from folks on the forum), I'd like to tackle "correctly" honing this razor to get it back to shave ready state.
Here are some really close up shots of the edge (the guide lines in the background are 1mm):
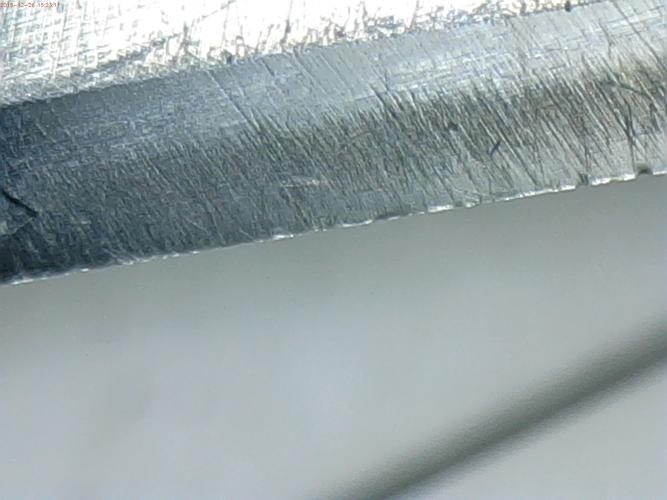
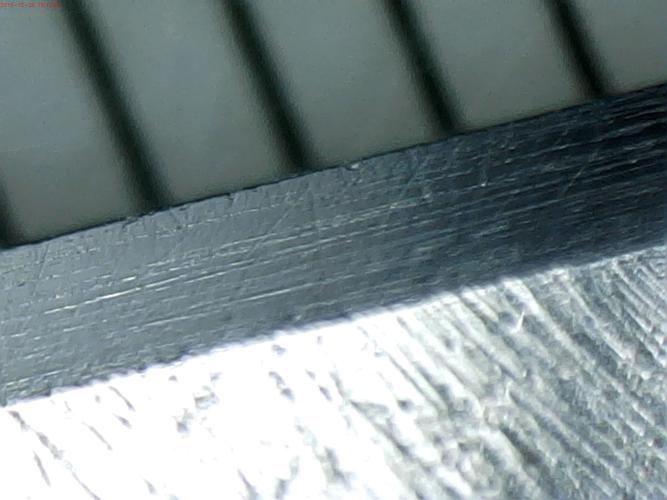
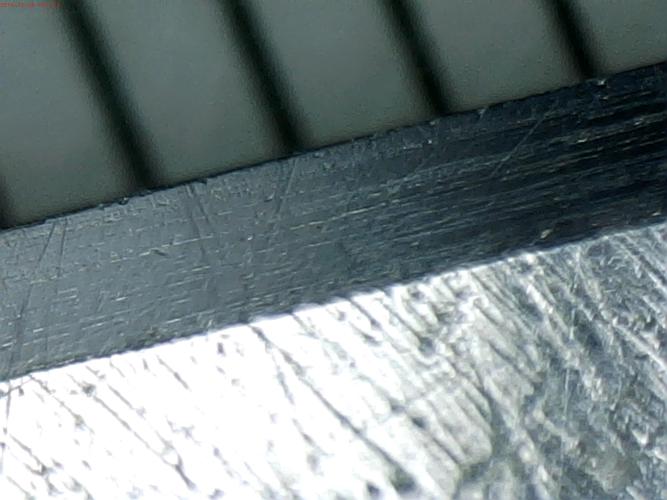
Is what I see on the very edge microchipping?
I see several other "issues" with the edge. One, is that at places, it looks like there parallel stria - but it is not very deep at all. Two, there are some places were deeper stria are going all the way to the edge. And three, there seems to be places, like in the first shot, where there is a rougher surface for part of the edge (maybe honing wasn't hitting all of the bevel?).
I was wondering what approach I should take at bringing this back to sharpness. I have a 1/4/8K Norton, and a 12K Naniwa SS to work with.
I was thinking, regardless of what hone I use, to ink the bevel and see how well the coverage (because of picture #1). I'd like to get rid of the deeper stria as well.
Should I go as far as setting the bevel, or is there some intermediate level I can drop to, for this razor (4K? 8K?).
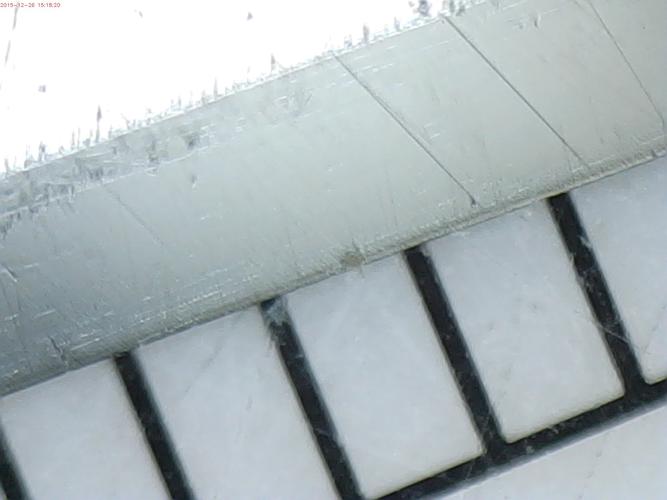
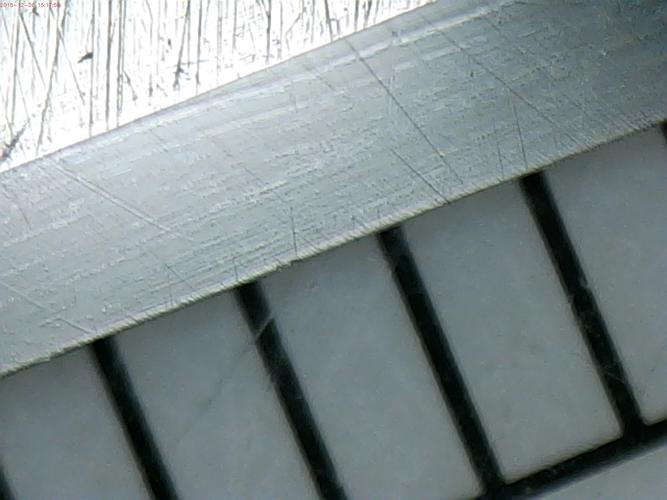
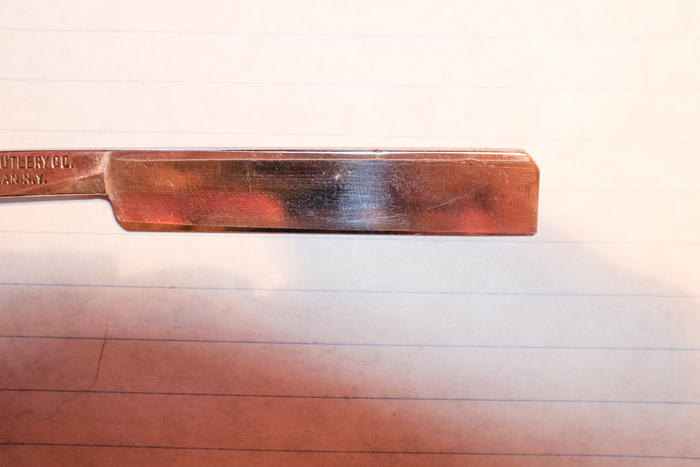
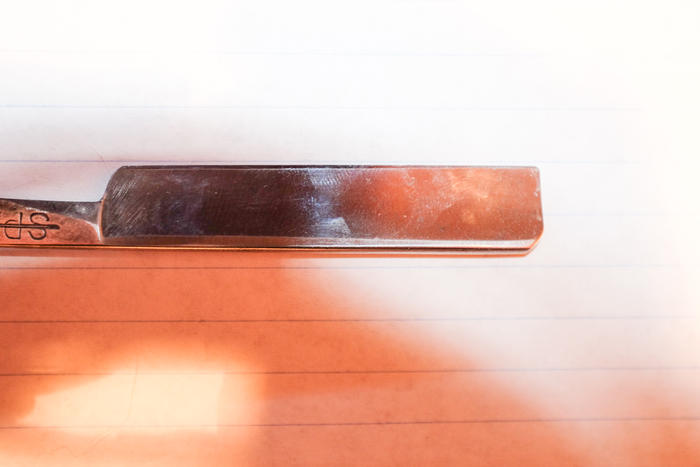
The spine has moderate wear. The edge is not totally flat, but there is a high spot, about 1/3 of the way from the toe (one can see light under the edge at the toe and heel, when the blade is perpendicular to my dia-sharp diamond plate. Visually, you can see that the height (width?) of the blade is smaller at the heel than the toe.
Here's some shots showing the wear, just so that there is a clear picture of the blade:
Wondering what peoples' thoughts are.Regards,
PCM
-
12-27-2015, 04:08 AM #2Senior Member


- Join Date
- Dec 2014
- Location
- Virginia, USA
- Posts
- 2,224
Thanked: 481
At some point someone definitely used too much pressure on the heel. That first pic also shows what I view as microchips, and I've never seen parallel striations like those.
If it were me, I would drop back to 1k - maybe with a layer or 2 of electrical tape on the spine - and reset the bevel. Hopefully that would eliminate both the microchips and the excessive heel wear.
But that may be overkill, hopefully someone with more knowledge/experience will chime in soon. Just my thoughts, take them for what they're worth.
-
12-27-2015, 05:40 AM #3< Banned User >

- Join Date
- Jul 2015
- Location
- Central Oregon
- Posts
- 789
Thanked: 98
Hi PCM, I agree with Marshal, drop back to 1K, 2 layers of tape and re-set the bevel and at a 45* angle joint or breadknife the edge Lightly, you may have to do that a couple of times to get the nicks out of the blade and at the same time you are aligning and leveling the edge. Today I used the hard plastic rim on a disposable drinking glass, worked perfect in that application, it will also take off a wire edge better than wood, end or cross grain.
PCM, have you got together with a mentor or another honer in your area yet? It would really help you I think, it will all come together for you soon, stick to it and another thing I saw was you need to get the lower grit marks out completely before moving up to the next higher grit stone.
Hands on instruction would really help me sometimes but I have learned many things on my own and never regret a minute of it, the science of sharp has taught me a few things, read it close and study the pics, I did and had a couple small Ahh Ha moments. Maybe you will too.
https://scienceofsharp.wordpress.com/
-
The Following User Says Thank You to FAL For This Useful Post:
pcm (12-27-2015)
-
12-27-2015, 05:49 AM #4Senior Member

- Join Date
- Apr 2012
- Location
- Diamond Bar, CA
- Posts
- 6,553
Thanked: 3215
So, all you see is probably correct, except the horizontal stria… it is most likely not stria at all and just dried swarf on the bevel. Wipe the blade with a damp microfiber towel and then repeatedly with a dry paper towel. You will probably find all the horizontal lines gone.
Yes, it need honing and full bevel set and when last honed was not honed to the edge.
First fix that heel or it will become a spur and cut you. With a small coin, penny or dime trace the heel corner with a sharpie and grind the shape to the coin radius.
Then put 2 layers of tape and set the bevel with a well lapped 4k, the edge will straighten out, though it will be narrower at the heel and bevels will join. Stay on the 4k until the bevels meet and all the deep stria is removed.
-
The Following User Says Thank You to Euclid440 For This Useful Post:
JoeSomebody (01-18-2016)
-
01-18-2016, 02:48 PM #5Who's that guy think he is...

- Join Date
- Jun 2011
- Location
- The North Coast, Ohio
- Posts
- 2,455
Thanked: 146
That is a Great Tip! Originally Posted by Euclid440
 Luck is a matter of preparation meeting opportunity. ~Lucius Annaeus Seneca
-
The Following User Says Thank You to JoeSomebody For This Useful Post:
Euclid440 (01-18-2016)
-
01-18-2016, 05:44 PM #6Senior Member
- Join Date
- Apr 2012
- Location
- Diamond Bar, CA
- Posts
- 6,553
Thanked: 3215
Looks like some funky steel at the toe and that you are still not honing all the toe as well as the rest of the blade. The rest of the blade looks good, but, still some chipping.
I would remove some more steel, as it does seem the deeper you go the better the steel looks. I would breadknife, (full edge flat on the stone face) on the 8k to remove a couple thousands and get the edge completely straight, probably take 4-5 strokes.
Then re-set the edge on the 4k, 1k will leave deep stria, then work it back up. You will know right away if you are getting good steel after the bevel set, it should go quickly.
-
The Following User Says Thank You to Euclid440 For This Useful Post:
pcm (01-18-2016)
-
01-18-2016, 05:49 PM #7Senior Member
- Join Date
- Apr 2012
- Location
- Diamond Bar, CA
- Posts
- 6,553
Thanked: 3215
Some good work on this thread. PM me your address and I will send you some lapping film.
I have had good luck with film and chippy hard razors. It would be interesting to see what it would do on this razor. Still think you need to remove some more of the edge and get to solid steel.FAL likes this.
-
The Following User Says Thank You to Euclid440 For This Useful Post:
pcm (01-18-2016)
-
01-18-2016, 11:12 PM #8Senior Member
- Join Date
- Dec 2014
- Location
- Southern NH
- Posts
- 562
Thanked: 41
Sure, willing to give it a try. Can you point me to some info on how to use the lapping film (I've never tried it)? Originally Posted by Euclid440
Regards,
PCM
-
12-27-2015, 06:04 AM #9Senior Member
- Join Date
- Apr 2012
- Location
- Diamond Bar, CA
- Posts
- 6,553
Thanked: 3215
You have to remember that we are looking at the bevel at a very high magnification, probably at 4 or 500X. What appears to be major damage is really not that bad. The bevel is not set in some spots, but with some tape will come together nicely and fairly quickly.
Also Union blades are very thin and should hone easily.
The bevels are reasonably flat and very close to meeting. A 4k will easily re-set the bevel. The heel is the worst part of the job, but that can be corrected on the 1k.Last edited by Euclid440; 12-27-2015 at 01:10 PM.
monkeypuzzlebeefeater and MJC like this.
-
The Following User Says Thank You to Euclid440 For This Useful Post:
pcm (12-27-2015)
-
12-27-2015, 03:13 PM #10Senior Member
- Join Date
- Dec 2014
- Location
- Southern NH
- Posts
- 562
Thanked: 41
So, do like we did on the other razor and round that heel, and then go to the 4K to bevel set? Should I do a leading heel X stroke for bevel set or use circles initially? Originally Posted by Euclid440
Will clean it better and see about the parallel lines.
Thanks!Regards,
PCM


 Reply With Quote