
Results 1 to 10 of 91
 148Likes
Thread: Can't get 2 razors to shave
 LinkBack URL
 About LinkBacks
Hybrid View
-
05-11-2020, 05:21 AM #1Senior Member


- Join Date
- Dec 2018
- Location
- Gainesville, FL
- Posts
- 6,002
Thanked: 613
Oz is right. Bottom line is there is something you are not doing right or else they would shave right. Shave testing at each stone will eliminate where.
Iron by iron is sharpened, And a man sharpens the face of his friend. PR 27:17
-
05-13-2020, 02:07 AM #2Senior Member

- Join Date
- Jan 2015
- Location
- Pinole, ca
- Posts
- 1,526
Thanked: 339
Just to follow up on what the guys are saying about shave testing each stone.
Magnification coupled with the shave testing can be eye opening. It was for me. I had similar problems to you. Looking at the bevels tells you what the bevels look like. The edge is formed by the bevels meeting at an apex which forms the edge or eventual edge depending on progress. This may seem like a simple concept but it is elusive for someone new to honing, it was for me.
So, back to the bevels. We want very consistent looking scratch patterns. All stria should look parallel to the other stria from which ever stone you’re on. What is immediately evident on your wedge. The patches of deeper stria next to areas that appear consistently polished. That is what you are looking for when you are honing. If your bevels look like that, you didn’t spend enough time removing the stria with the stone you are on. If you jump to the next hone and then stria “appears” that isn’t consistent with the stone you’re on, you didn’t spend enough time on the previous stone. After some time you will realize how far back you need to go in your progression to easily clear up the issue.
Everything I’ve typed to this point means nothing without a set bevel, in other words a formed edge. Setting the bevels is just creating two intersecting planes. Understanding when that happens is the difficult part. This is where trying to catch a reflection off the area where those two planes should be intersecting is helpful. A bright light behind you with a dark background behind the razor is the easiest for me. Once I can’t see any shiny spots, then I use the thumb nail test. I’ll drag the edge of the razor on the top of my wet thumbnail using as little pressure as I can and feel for the edge to “bite”. If it feels like it’s trying to stick to your thumb nail you’re on the right track. I’ll check from the heel to the toe. If it passes that test I do another few strokes to repair the edge. I may also joint the edge on the side of the stone to remove any possible burr if there has been a lot of honing and pressure while setting the bevels, make sure to reset the bevel afterward. This aids in comfort and possible issues later down the progression. Anyways, after the TNT, and assuming it passes, I’ll move to my next stone in my progression. Now that we know what we’re looking for with the bevels we can understand what that means at the edge.
The scratches you see on the bevels should extend all the way to the edge. If they don’t you definitely are only polishing the bevels with no progress at the edge. As those stria reach the edge it creates a saw tooth pattern. This is why what the bevels look like is important, as it relates to the edge. This is also why a test shave off the 1k is pretty uncomfortable yet will still cut hair. The honing progression after you form a complete edge is refining that sawtooth pattern as well as narrowing the edge, thus making it sharper.
Magnification is pretty much to look at everything but the edge. You are looking at all the things that need to come together that creates the edge. It’s a powerful tool and too affordable to be overlooked, imo.
The last thing to look for is how straight the edge looks. Occasionally a micro chip gets missed and isn’t evident at the bevel setting part of the progression, but as you start to progress small things become more and more easily recognizable. Just step back to a lower grit hone and work on it until it disappears.
I don’t do any edge testing after the bevel set until I come off the finisher. I tree top some hair on my arm. It’s been pretty consistent for me with my hair and hones to allow me to gauge whether I got as much sharp out of the stones as I want. The test does nothing for gauging comfort. For that the only true test is the shave test. It is the end all be all. I’ve produced some incredible looking bevels which in theory should result in a good comfortable shave but have made me look like I got in a fight with an alley cat. There is no replacement for experience. I try to work on one thing at a time and get proficient then add another variable, etc. As you try new things only change one at a time so you have a true understanding of its effect to your edge, and a baseline to gauge it by.
There are a few more things I do but the meat of any honing is at the bevel set. If you can get that accomplished the rest is easy in comparison. The best thing about setting the bevels is that you only need to do it once unless there’s an accident. The rest is just maintenance.
-
The Following User Says Thank You to jfk742 For This Useful Post:
PaulFLUS (05-24-2020)
-
05-15-2020, 11:52 PM #3Member
- Join Date
- Mar 2011
- Location
- Gyptuckey, CO
- Posts
- 57
Thanked: 1
Fellas, just a quick note to say thanks again for the feedback. I'm still processing it before proceeding. I haven't had any time lately to work on honing the razors, but I plan to do a little this weekend. I've used both razors to shave with, and it seems stropping on compounds a few times has improved the edges quite a bit, but not where I want them to be. I did get a loupe, and looking at the edges with it confirms that the bevels along the length are not evenly honed, and the bevels are not set along the entire length of the edge. Still forming further questions...
-
05-19-2020, 04:23 AM #4Member
- Join Date
- Mar 2011
- Location
- Gyptuckey, CO
- Posts
- 57
Thanked: 1
I spent some time ont eh straight-edge razor w/ black scales this weekend. I purchased a 40x loupe and a 250x scope f/ Amazon. Both showed me that the edge had a lot of micro chips. Very eye opening, and wish I had got them far sooner.
I focused on simplifying and refining my technique. 2k, 4k, 8k, 10k, 12k. I know, maybe overkill in the progression, but it's what I've been doing for years, so I don't want to change that yet. Taped the spine, and checked the tape and replaced it as it got worn. I did this series of strokes on each stone: 50ish circles on each side; bath-and forth strokes on each side in a ladder pattern, just to keep the #'s the same on each side - 20, 10, 5; and then sets of X's. I checked the bevels after each set w/ the loupe to notice the progression. I used very light pressure, and didn't get aggressive. I tested the edge w/ the TNT and arm hair after each stone to notice the results/changes. After each stone, the edge cut hair better and better. At the last stone, 12k, I bread-knifed the edge and then brought it back. First time I've done that technique. Stropping w/ 1micron diamond spray on felt, 0.5 micron paste on leather, and plain leather really brought the keenness out.
This was the 3rd time I've honed this razor - once, lightly, several years ago when I first got it, second time a couple weeks ago prior to posting here, again lightly. I think the edge was really, really rough when I started with it. The toe is banged up. I didn't do anything to it. Even now I can see and sense that the edge isn't as smooth as I'd like it to be. I stropped and shaved with it. It shaved far better than it ever has before, but still a little rough in some parts. The day after I had some serious razor burn on the face of my chin. Didn't feel it when I was shaving though.
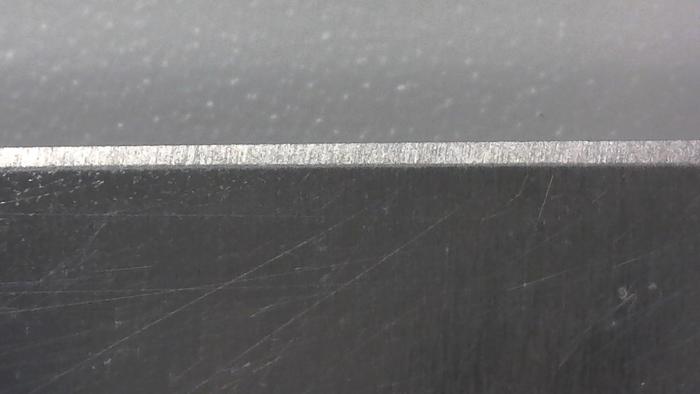
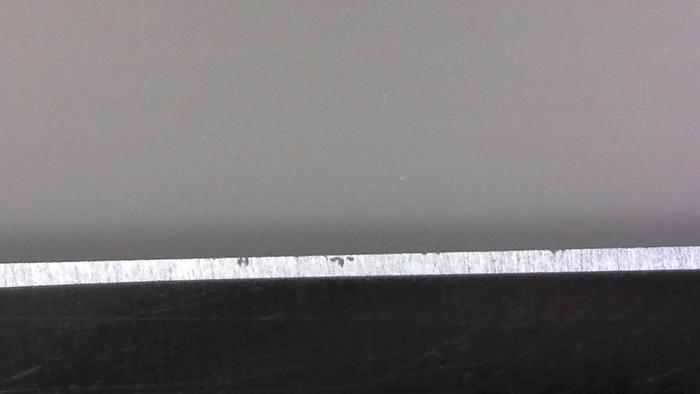
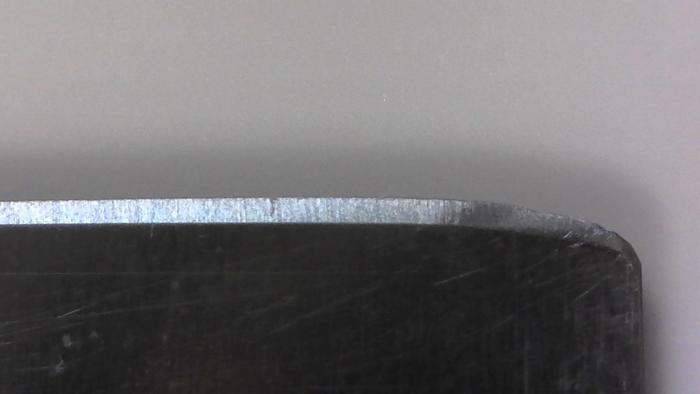
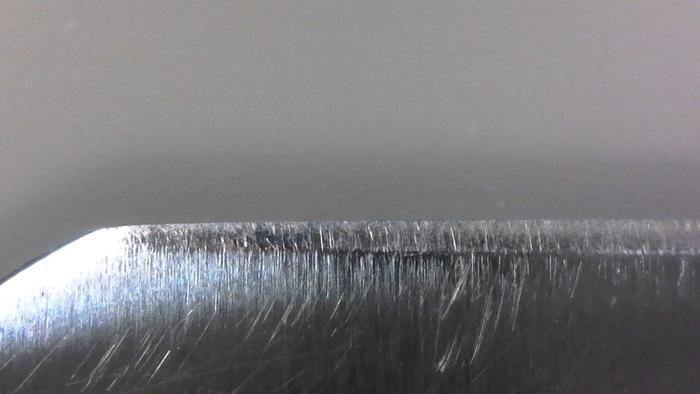
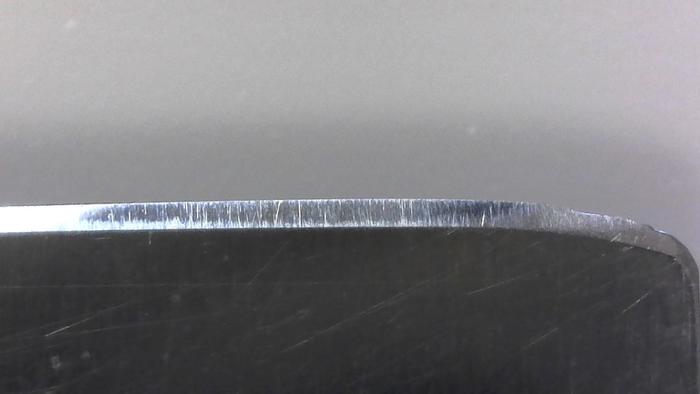
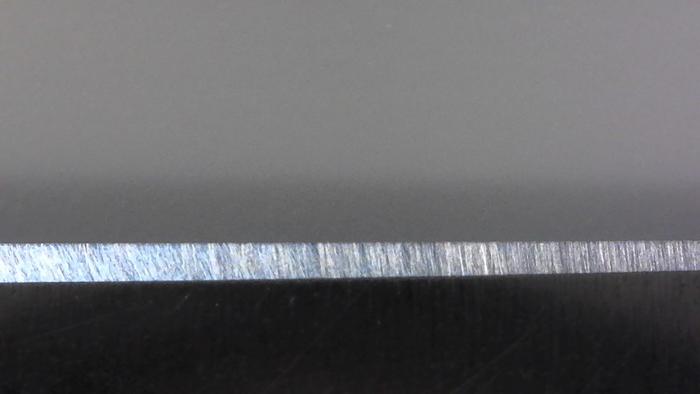
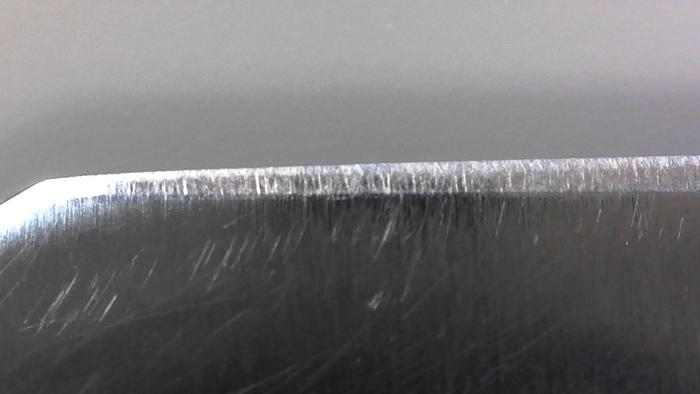
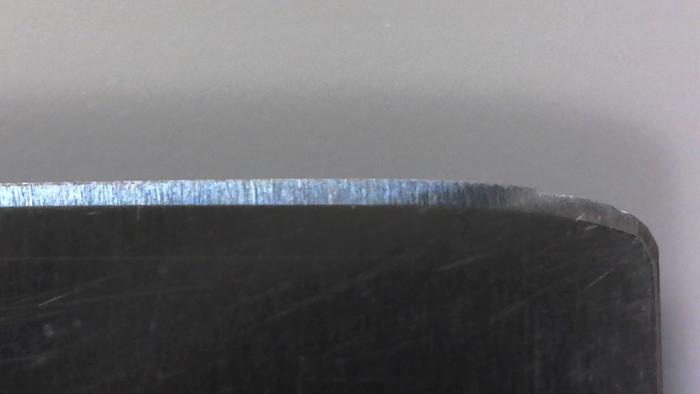
Here are a series of pics I took. I onl;y took pics of one side, and 3 pics at each stone, heel, middle and toe:
This is the edge after the 2nd sharpening session, having stropped and shaved w/ it a couple of times:
-
05-19-2020, 04:28 AM #5Member
- Join Date
- Mar 2011
- Location
- Gyptuckey, CO
- Posts
- 57
Thanked: 1
After 2K:

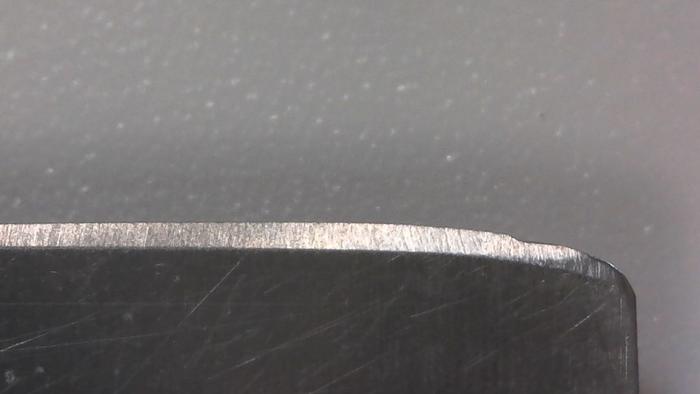
After 4K:
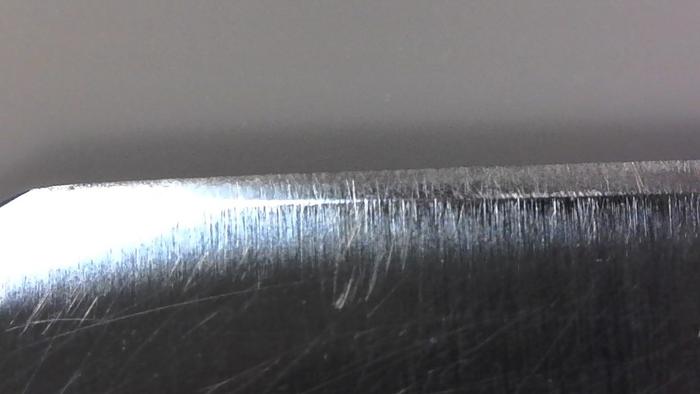
After 8K:
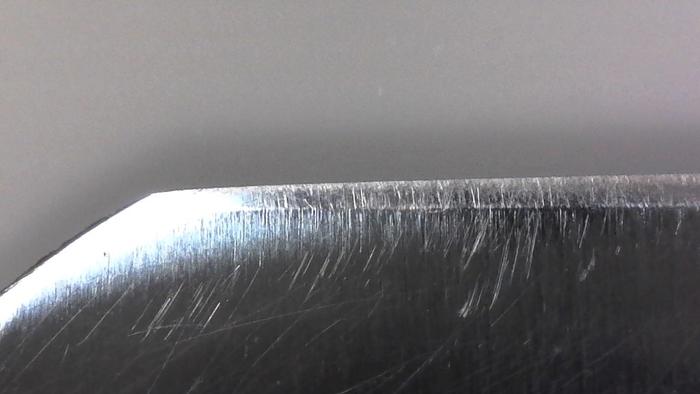
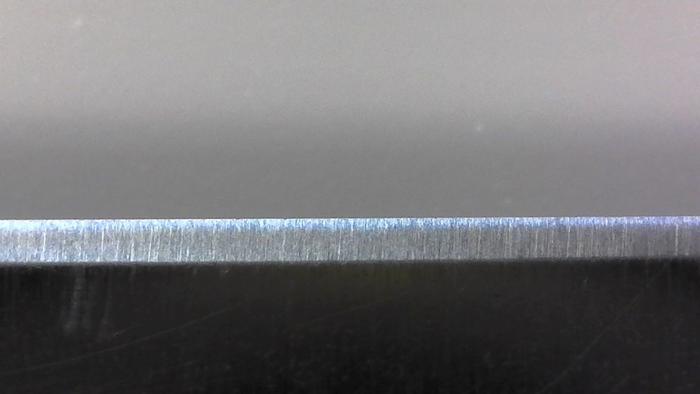

After 10K:
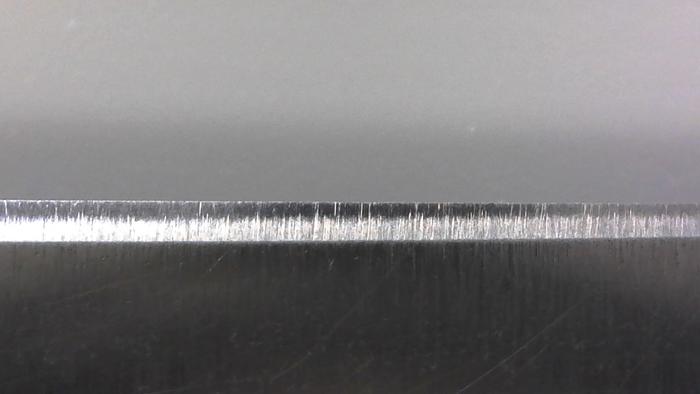
after 12k:
 HungeJ0e likes this.
-
05-19-2020, 04:33 AM #6Member
- Join Date
- Mar 2011
- Location
- Gyptuckey, CO
- Posts
- 57
Thanked: 1
Forgive the inconsistency in the pics. This is my first time using a scope, and it's tricky to get the lighting and focus just right.
Also, I used a marker on the edge to see where the bevels were at. I'd say that the bevels are not quite perfect, but they're nearly set. The marker wore off evenly. I don't see any shiny spots looking at the edge w/ a back light. I think the main issue is still the edge isn't refined. I didn't want to over do it. I could probably start all over again w/ the same progression, and maybe spend a little more time on the 2k to get out the previous, old stria out? Or may spend a little more time on each progression? I'm not sure at this point... Feedback and guidance is greatly appreciated. Thanks fellas.HungeJ0e likes this.
-
05-19-2020, 05:22 AM #7Hones & Honing


- Join Date
- May 2005
- Location
- Saint Paul, Minnesota, United States
- Posts
- 7,974
- Blog Entries
- 1
Thanked: 2204
.
.
IMHO, First test shave with what you have now.
Then go back to the 2K and stay there until the stria are all the same. Then test shave again.
Then go on to the next stone. Stay there until the stria are all the same.
Then test shave again.
Repeat this process as bigspendur said.Last edited by randydance062449; 05-19-2020 at 05:26 AM.
Randolph Tuttle, a SRP Mentor for residents of Minnesota & western Wisconsin
-
05-19-2020, 02:49 PM #8Senior Member

- Join Date
- Apr 2009
- Location
- Yamato, Japan
- Posts
- 258
Thanked: 48
You're on your way... you're looking at the edge pattern as you move along, and starting to understand what's what. Originally Posted by mpukas

That's how you learn. What is going on with this stone? What are my conditions when I'm ready to move to the next? That's a big reason I don't like the "systems" that work by a set number of strokes and don't look for feedback at every level... they encourage honing blindly without understanding what's going on.
As others have said, you need to start at edge repair, then go to a bevel setter. Euclid will be along soon; he is the master.Last edited by HungeJ0e; 05-19-2020 at 03:07 PM.


 Reply With Quote