
Results 1 to 10 of 35
 1Likes
 LinkBack URL
 About LinkBacks
-
04-28-2008, 03:41 PM #1Cheapskate Honer


- Join Date
- Nov 2006
- Location
- A2 Michigan
- Posts
- 2,371
Thanked: 241 3M Micro Abrasive Film, A Usage Guide and Review
About two weeks back this method for honing a razor was mentioned and at that time I said I would be posting a review of it in the coming week, well, I'm a little late. Here is the review and honing guide for the 3M honing films, or the scary sharp system as it applies to razors.
You might notice that I use in this guide a product I make, the glass bed hones, so yes this is another example of industry funded research but I hope I was able to keep my conclusions and analysis detached from my mercantile nature.
Without any further ado!!!
3M Micro Abrasive Films, Their Usage as a Razor Honing System
Summary
Since there is very little information about using the 3M films or the "scary sharp" system of honing on razors I set out to first, use it successfully for this purpose and second develop a set of procedures anyone could follow when using this method. In both I was successful. This guide follows every step I used to bring a out of condition razor back to shaving sharpness using the 3M films, and I did so with a minimum of difficulty as discussed in my conclusion.
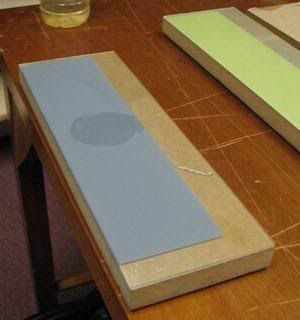
Materials
Everything I used in this experiment is pictured below
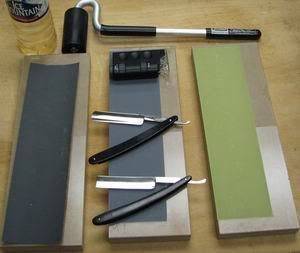
The water is simply from my tap.
The microscope used for testing is the one from Radio shack set at 60x.
The bottom razor is in need of a refresh honing, and will be covered in the future.
The top razor is the one I used in this experiment, it is a Geneva Cutlery Company 5/8's round point razor. I obtained it from my mother in law as it was her fathers or grandfathers. It had not been used in at least thirty years and was simply stored in a drawer for that time. Prior to this experiment it was polished using a Dremmel and MAAS with the felt pad as shown in Lynn's video. Nothing else has been done to it.
The beds for the films are glass over MDF treated to resist water with rubber feet to make a secure smooth surface for honing.
The papers/film were cut to roughly 3 inches by 11 inches and the grits used are as follows from left to right:
1000 grit 3M wet dry sandpaper form the auto parts store.
5 micron 3M Abrasive PSA film from http://www.toolsforworkingwood.com
1 micron 3m Abrasive PSA film from the same source, I chose this source as they have the best price in a quantity I desired.
Finally The laminate roller on the top is from Lowes.
Note: There is .5 micron film available as well, I didn't fell that it would be needed to make for a good shaving edge, and the ease of use of pastes in this grit make it superfluous.
Procedure
In order to develop this method and be successful I needed a place to begin. So for this experiment I started with the Pyramid method of honing as enumerated in the "Norton Pyramid Honing Guide" by Randy Tuttle which used to be available in the permanent archive off the main page but since the upgrade I can no longer find it (thank God I have a hard copy). This guide is for the Norton 4/8 K stone and I used it along with common sharpness tests, microscope views and my knowledge of honing on stones to sharpen the razor as follows.
step 1: Asses the razors edge. This is done to see where to begin in the honing process. I looked at the edge using the microscope and was able to see many tiny chips, most less than naked eye visible, all along the edge. The Thumb Nail Test (TNT) was then performed and the razor just slipped along its entire length with no bite, or total failure. This led me to decide that 1000 grit was the place to begin honing, or setting the edge.
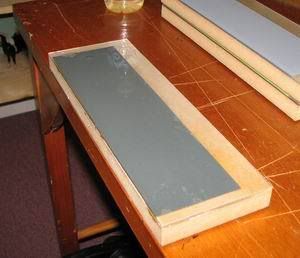
step2: Prepare the 1000 grit hone. I took one glass bed and wet it with about 2 tablespoons of water. I also put water in a bowl and soaked the 1000 grit paper until the backing was wet (less than 1 min). I then smoothed the paper out on the wet glass bed where it sticks because of the waters surface tension.
The prepared hone:
step3: Set the edge. The total was 28 strokes on the 1000 grit as follows.
a: 10 laps on the 1000 grit. Then I tested with the microscope seeing most of the tiny chips gone
b: 5 more laps. Then observed the most of the razor is free of chips excepting the toe area. The TNT confirmed this with biting over much of the length and slipping only near the center and on the toe of the razor.
c: 10 laps. the microscope now showed a perfectly set razors edge excepting a tiny chip near the toe.
d: 3 laps toe only. These laps were taken very lightly the intention being to emphasize the chipped area only. This got rid of the chip according to the microscope and the razor now passed the TNT, with the razor smoothly biting along its entire length.
Note: had these few strokes not worked I would have gone back to honing the entire edge to prevent wear to one section only.
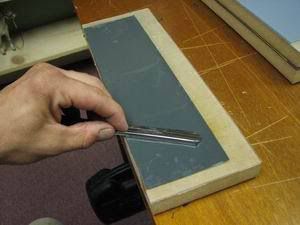
My honing strokes are pictured below note the angle of the razor, I also use the x pattern even on such a large surface. This stroke is taken the same way using only the weight of the razor or less on every grit of hone I use.
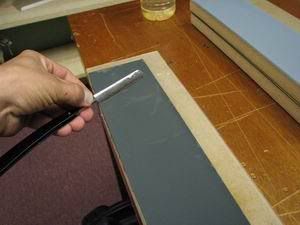
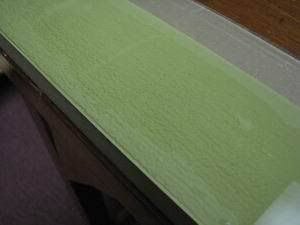
setp4: Preparing the hones with the PSA films. I peeled the backing paper off the honing film and setting it gently on the glass beds as it appears in the pictures below. if you set the film gently enough on the glass surface it does not stick right away allowing you to slide into perfect alignment with the edge. I then used the laminate roller with moderate pressure to press the film to the glass and to roll out any bubbles that appeared. This was the most difficult step and will be discussed in my conclusion below. Each hone was then lubricated with about a tablespoon of water, no more is needed or wanted, and kept this wet throughout the honing process as needeed.
5 micron hone just before spreading the water across the surface:
step 5; At this point, with the edge just set, I find an aggressive pyramid is usually in order when using waterstones so that what I did here as well. The strokes were as follow with the first number being the 5 micron and the second being the 1 micron honing films. This is exactly as taken from the Norton Pyramid Honing Guide:
15/5
10/5
5/5
3/5
1/5
1/5
At this point the edge looks much improved with the 1000 grit scratches removed but the razor barely pops hairs off my arm and fails the Thumb Pad Test (TPT) badly. Obviously we don't have a shaving edge yet.
step 6: I move to the conservative pyramid because the razor is getting an edge but it isn't shaving sharp yet. This is laid out like the Aggressive pyramid above and from the same source:
1/5
1/5
3/5
5/5
3/5
3/5
1/5
1/5
1/5
Now the edge looks very well polished to the microscope aided eye but still fails the TPT though it is much sharper than before.
step 7: This is where my experience steps in. This razor is quite sharp and almost ready to shave, another pyramid might lead to overhoning. So I did 30 laps on the 1 micron only. I'm done with the 5 micron It won't help me any more, and neither will my microscope as the edge looks the same as above. The TPT again show some improvement and the edge smoothly removes hair from my arm but the TPT also tells me the edge could be a bit better.
step 8: I gave it 20 more strokes on the 1 micron, and now the TPT tells me this is a shaving edge. So I move upstairs for a shave test.
Note: The stroke totals were 54 on the 5 micron and 125 on the 1 micron with the whole process from start to finish taking less than an hour and most of that being spent making notes and testing the edge. Very little actual time was spent scraping the razor up and down the hone.
The 1 micron hone showing the swarf when I was done with it.
step 9: Shave test. Surprisingly, this was a very good comfortable shave. I was expecting the edge to need a little refinement, perhaps on a pasted strop but I got a very nice and comfortable shave. I used TGQ Black Cavendish as this is a good performing and very consistent soap for me. I also used this razor for the next several shaves with various soaps and cremes and its performance remains consistent.
Conclusion
This proved to be a viable and not particularly difficult method of honing for me to use with several advantages over the more common stones. I felt it was quite fast. The films are very consistent. There is no soaking time. There is no break in time. The cost is extremely low for very large hones. It worked better than a two sided stone for pyramiding.
There is, on the other hand, one big drawback to this system. You must build your own honing surface. The glass beds worked well and, for me, were easy to make and I even sell them quite inexpensively so they aren't the problem. It is applying the honing film to them that can prove quite difficult. It was only on my third strip of film that I got the film stuck to the glass in a satisfactory manner. The first piece had to many bubbles and the film was misaligned, I removed it and reapplied it scratching it in the process. The second piece also had to many bubbles that would not press out and on removal from the glass the adhesive came loose in patches causing me to discard this piece as well. The third one went on quite well and easily making me wonder what the fuss was about, but I can't count on this every time. I also don't know the longevity of a piece of film, but I suspect that it is only three or four razors.
Because of the difficulty of applying the film and the fact that it will have to be reapplied at intervals I would not recommend this system to a beginning honer. Once someone has a good grasp of the quality of surface needed for honing a razor it isn't to hard to get it using the method described but this is outside the experience of the beginner. It is exactly those beginners whom will be most attracted to this system due to its low price so I highly doubt this will ever become a mainstream method for honing razors. It remains a very effective but outside of the ordinary honing experience, and one I will personally stick with, but not for everybody.Last edited by Wildtim; 04-28-2008 at 08:15 PM.
cariocarj01 likes this.
-
The Following 12 Users Say Thank You to Wildtim For This Useful Post:
BigJim (03-17-2011), Boker (10-08-2009), Detach (10-03-2008), DoctorSaul (01-17-2015), FloorPizza (10-21-2008), jockeys (04-30-2008), Joelski78 (06-23-2008), Lt.Arclight (08-30-2008), netsurfr (04-29-2008), nun2sharp (06-12-2008), shuredgefan (06-04-2008), tsquare (06-12-2008)
-
04-28-2008, 06:48 PM #2Razorsmith

- Join Date
- Aug 2006
- Location
- Western Pennsylvania, USA
- Posts
- 2,659
Thanked: 320
Tim,
Very, very nice job.
A couple of things: I think you put 100 when you meant 1000 a couple of times.
Also, I'd be very curious to see whether you can touch this edge up on a traditional hone when it starts to dull. Does the film leave a slightly rounded bevel? Maybe you could dull the razor by cutting paper and then try to touch it up with a barber hone or similar slow cutter.
That would help newbies troubleshoot if they ran into issues....
Josh
-
04-28-2008, 08:03 PM #3Previously lost, now "Pasturized"

- Join Date
- Oct 2005
- Location
- Winnipeg Manitoba Canada
- Posts
- 1,333
Thanked: 351
Tim, I'll let you and everyone else in on a little secret. When you apply PSA films to a smooth surface like glass and you don't want bubbles, wrinkles and the like, do what the pros do. Take a container of water and add just enough laundry detergent to make the water feel slippery between your fingers... when I used the stuff by the bucket, it was a handful of the old style powdered detergent (not the new triple concentrated stuff we buy now) to a bucket full of water. Splash some of that water onto the glass and the lay the psa backed film on top. It should slide around and let you get it just where you want it. Now you can start to squeegee the water out from under the film. If you are careful, it should only be water bubbles instead of air bubbles which can be manipulated much easier than air bubbles as air is easy to compress. By using detergent instead of soap, you'll find that as you squeegee the water out, the film will start to stick just fine. If you do run into a bubble that's hard to remove, it should still be easy enough to peel the film back and allow you to splash some more water underneath and let you try again... Once you start to use pressure though, the film will really stick so try to get it as perfect as possible before you grab the roller and start to put pressure on the film.
Regards
Kaptain "Scary, but not known to be all that sharp." Zero"Aw nuts, now I can't remember what I forgot!" --- Kaptain "Champion of lost causes" Zero
-
04-28-2008, 08:14 PM #4Cheapskate Honer
- Join Date
- Nov 2006
- Location
- A2 Michigan
- Posts
- 2,371
Thanked: 241
Josh
You are right I did make that mistake a couple of times, Its hard to proofread your own work, thanks.
Kaptain,
I never thought of the detergent, I'll give it a shot when I need to change papers. I tried water under the film on my first attempt but it didn't make any difference. The soap would suspend the sheet beter though. The worst part was when the adhesive remained on the glass rather than on the film in my second attempt, I had to scrape it off with a razor blade, goo gone the residue off, and then wash and dry the glass to get rid of the goo gone before I could try with a new piece.
I still think a laminate roller is needed wether or not you use a wet application or a dry one.
-
04-28-2008, 08:49 PM #5Previously lost, now "Pasturized"
- Join Date
- Oct 2005
- Location
- Winnipeg Manitoba Canada
- Posts
- 1,333
Thanked: 351
Yes, do use the roller once you've gently removed all the bubbles etc. but use something like a credit card (I cut squares from margarine tub lids) to gently smooth things out first.... When I was installing signs on car doors and the like, we would use a sponge to apply the soapy water and then use the sponge to squeegee most of the bubbles and water out and then switched to a firmer squeegee to finish the job.
Christian
 Originally Posted by Wildtim
 "Aw nuts, now I can't remember what I forgot!" --- Kaptain "Champion of lost causes" Zero
-
04-28-2008, 10:41 PM #6Senior Member

- Join Date
- Jan 2008
- Posts
- 842
Thanked: 165
If you get air/water bubbles under the film you can use a pin to prick the film from the other side to allow the water/air to escape.
The pin hole wont affect the honing.
-
04-29-2008, 12:49 AM #7Aspiring Newbie
- Join Date
- Apr 2008
- Location
- Guelph, Ontario
- Posts
- 261
Thanked: 23 Wow!
That's a fantastic guide, Tim... Thank you very much. I was actually intending to stop by Lee Valley sometime after work this week and grab myself some of those sheets, so in actuality, your guide wasn't late at all, very timely in fact, from my perspective.

I'm really glad that this worked out so well. For a lot of us younger folks getting our starts in life (24 still counts as young folk, right?) the costs of some of 4k - 8k stones can be a little prohibitive, so an inexpensive method of self-honing is pretty instrumental in making this a viable hobby.
Thank you again for this great resource.
-
04-29-2008, 01:25 AM #8Cheapskate Honer
- Join Date
- Nov 2006
- Location
- A2 Michigan
- Posts
- 2,371
Thanked: 241
Originally Posted by smythe
Some of the air bubbles that I had were only about twice the size of a pin hole.
My criteria for smooth enough for honing on is when I can feel NO surface imperfections, ie.. bumps or wrinkles. I can feel the edges of a pin prick, so I assume it isn't smooth enough when I am looking for a 1 micron or less hone.
-
04-29-2008, 01:29 AM #9Cheapskate Honer
- Join Date
- Nov 2006
- Location
- A2 Michigan
- Posts
- 2,371
Thanked: 241
I don't know if you read this paragraph. Originally Posted by Cobo
"Because of the difficulty of applying the film and the fact that it will have to be reapplied at intervals I would not recommend this system to a beginning honer. Once someone has a good grasp of the quality of surface needed for honing a razor it isn't to hard to get it using the method described but this is outside the experience of the beginner."
But I would caution anyone who hasn't used a stone before that making a honing surface can be a little tricky.
-
04-29-2008, 01:41 AM #10Aspiring Newbie
- Join Date
- Apr 2008
- Location
- Guelph, Ontario
- Posts
- 261
Thanked: 23
Don't worry, I read it all. If I bugger up I won't hold you responsible.
In all honesty neccessity is a great dictator. Eventually my razor will become dulled, if I can't afford the stones or to send it off to be honed at that point I'm going to wind up back with my DE, which I'd rather not have happen. I understand your concerns and don't expect it to be idiot proof by any stretch of the imagionation, but at very least your guide will be a big helping hand, which I appreciate.


 Reply With Quote