
Results 1 to 10 of 25
 LinkBack URL
 About LinkBacks
Hybrid View
-
01-10-2012, 11:28 PM #1There is no charge for Awesomeness


- Join Date
- Aug 2006
- Location
- Maleny, Australia
- Posts
- 7,977
- Blog Entries
- 3
Thanked: 1587
Listen to Gugi - he knows of what he speaks. I would just like to add that if this is among your first honing attempts you will find a bit of the old magic marker along the edge can do wonders to help you visualise what is going on with a warped blade.
Good luck!
James.<This signature intentionally left blank>
-
01-10-2012, 11:38 PM #2

- Join Date
- May 2005
- Location
- St. Louis, Missouri, United States
- Posts
- 8,454
- Blog Entries
- 2
Thanked: 4942
Can you show a couple pictures of the whole razor so that we can look at the spine wear on both sides??
Thanks,
Lynn
-
01-11-2012, 12:13 AM #3The Great & Powerful Oz


- Join Date
- May 2008
- Location
- Bodalla, NSW
- Posts
- 15,608
Thanked: 3748
It is hard to tell from pics in general as light angle is often varied but the second pic may show an incomplete bevel or slight wire or burr. First pic looks ok.
It is common to create a burr on warped blades as unless your stroke perfectly follows the edge & spine you will hone more on one side due to lack of contact on the other. Stropping on linen will magnify the problem further as the edge is more fragile in spots & will look rough @ magnification. It is not a problem with your hones but your razor.
Some people find narrow hones easier to use in these cases but it is no problem on a 3" hone with a little practice. You need to rock &/or roll the blade more near the edge of the hone & be sure the hone edges are well smooth & chamfered. You may choose to hone specific areas a little more to compensate but it must be done carefully to avoid creating frowns especially if the warp is in the centre of the blade.
The plus side is, if you can get it right, you will be able to hone most razors The white gleam of swords, not the black ink of books, clears doubts and uncertainties and bleak outlooks.
-
01-11-2012, 04:53 AM #4Member

- Join Date
- Dec 2011
- Location
- Finland
- Posts
- 59
Thanked: 2
Thanks, for the replies. This really is a great forum, I hope I can some time also contribute and help others. Taking pictures of edges is challenging and the varying light (like in the above) angle makes the edge seem very different from picture to another. My guess is that there was a bended burr or incomplete bevel.
I already got some pointers last night from the chat. I honed again on the side of my hones and rounded the hone corners with sandpaper. I made some progress and got closer but it still needs more work. According to the marker test the edge is making proper contact on both sides.
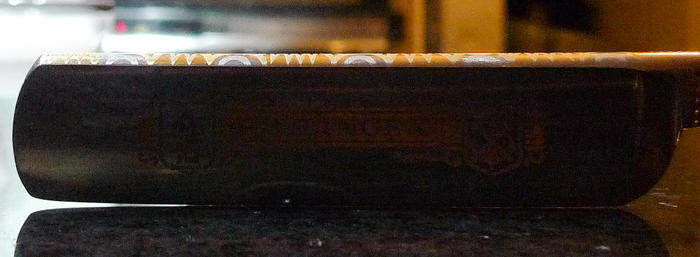
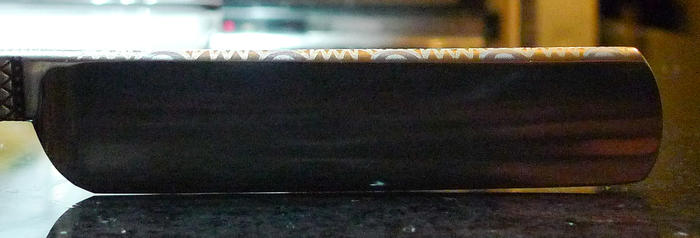
Lynn - I use tape so there is no wear marks on the spine, but I will post some pics anyway.
As you see, slight smile and uneven bevel wear.
-
01-11-2012, 06:48 AM #5The Great & Powerful Oz
- Join Date
- May 2008
- Location
- Bodalla, NSW
- Posts
- 15,608
Thanked: 3748
I've seen & honed worse. This is an instance where not taping may have helped correct the spine a little but carry on. I wouldn't mind betting your close. Remember however that the edge follows the shape of the spine.
The high spots are highlighted. The warp is at the yellow line. From the factory honing it appears the warp is in the spine rather than an oddly ground edge.Last edited by onimaru55; 01-11-2012 at 06:51 AM.
The white gleam of swords, not the black ink of books, clears doubts and uncertainties and bleak outlooks.
-
01-11-2012, 07:10 AM #6Member
- Join Date
- Dec 2011
- Location
- Finland
- Posts
- 59
Thanked: 2
You are right, the spine is not even and it is pretty obvious. The middle of the spine is narrower than the heel or the toe. I guess not using tape might flatten that out a bit, but with my experience I rather first learn how to set the bevel and hone from there than start correcting warps and other slight irregularities in the razor. Later, I might come back and do some correcting.
BTW. The hone bug really bit me as I am not liking my 6k king that much. I ordered a long and narrow coticule for this kind of problems and also the 3k/8k naniwa ss combo. That should get me covered.
-
01-12-2012, 06:51 AM #7Member
- Join Date
- Dec 2011
- Location
- Finland
- Posts
- 59
Thanked: 2
Ok, I think I am catching on. Still not good bevel set but learning all the time. My problem might be that I am doing too much and too unevenly. Frustrated by the failures - I decided to ditch the tape and the microscope and go with as few strokes as possible. Also I really tried to hit that edge evenly. Looking at the jagged edge with the microscope was driving me crazy and kept me honing on when I should have stopped. It cant take for hours to get a bevel set. Especially, if you are already close.
I went down to dmt 600, because i was setting the entire bevel again (without tape). 40+40 circles on both sides with firm pressure and few light rolling-x strokes. Good drag on the heel and the toe (because of the warp the middle was not getting even grind) and cuts hair well at those parts. I did few more x's and tnt drag all along. So I think I was set for the 1k. Again 20 circles and few rol-x's and the edge was completely gone?! WTF? I did few more really evenly and lightly and the bevel almost came back. This taught me how little it takes to set the bevel and how little it takes to mess it up.
Having said that, it is interesting that Lynn and Glen seem to use quite a bit of pressure on the bevel setting. I can do that too, but it seems always the following light strokes that are supposed to set the bevel do more harm than good as the edge gets these chips and seems to fall apart.
Is it so that the firm circles just get rid of enough metal to establish a new bevel and the *light* x-strokes are what actually set the final bevel. By that I mean, is the razor passing tnt and shaving hair already after the firm circles?
One culprit of mine might also be that pressure is directed to a much smaller portion of the edge with the rol-x and it is too uneven and it just cant take it.Last edited by MikkoK; 01-12-2012 at 06:57 AM.
-
01-12-2012, 08:02 AM #8The Great & Powerful Oz
- Join Date
- May 2008
- Location
- Bodalla, NSW
- Posts
- 15,608
Thanked: 3748
The unevenness may well promote edge fragility. Sometimes you need to work a specific area, ie the high spots,a little more than the rest. I think this what Glen calls "pushing" the edge but don't quote me. That's just my interpretation. Originally Posted by MikkoK
 The white gleam of swords, not the black ink of books, clears doubts and uncertainties and bleak outlooks.
-
01-13-2012, 01:02 AM #9Senior Member
- Join Date
- Jun 2011
- Location
- Vancouver, BC, Canada
- Posts
- 115
Thanked: 19
Totally feel like you. Originally Posted by MikkoK
Once I'm good at DMT 325 and move on to Naniwa Super Stone 2k, the bevel "disappear" (or once I'm good at Naniwa Super Stone 2k and move on to the 5k)
Especially when I try a with some pressure at the very beginning to reset things.


 Reply With Quote