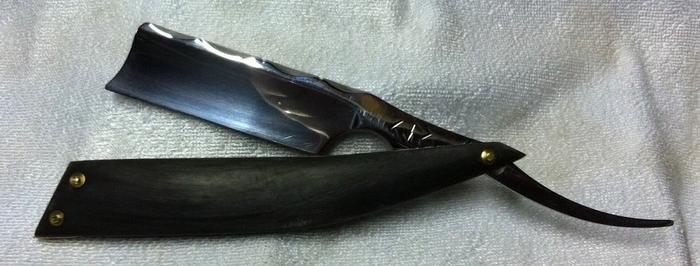
Thanks Bruno. It's a testament to your blade, since I wanted to emphasise the shape as much as possible. The idea is to have almost a mirror image when open to 180 degrees for stropping.Quote:
Originally Posted by Bruno
Printable View
Thanks Bruno. It's a testament to your blade, since I wanted to emphasise the shape as much as possible. The idea is to have almost a mirror image when open to 180 degrees for stropping.Quote:
Originally Posted by Bruno
Great blades guys and thanks to Bruno. A definite win-win
Can't wait to be able to post my bruno blade pictures. Gonna be a good one.
Good to hear you did end up getting one David, what design did you go with any early pics yet?
Attachment 161847Attachment 161848Attachment 161854
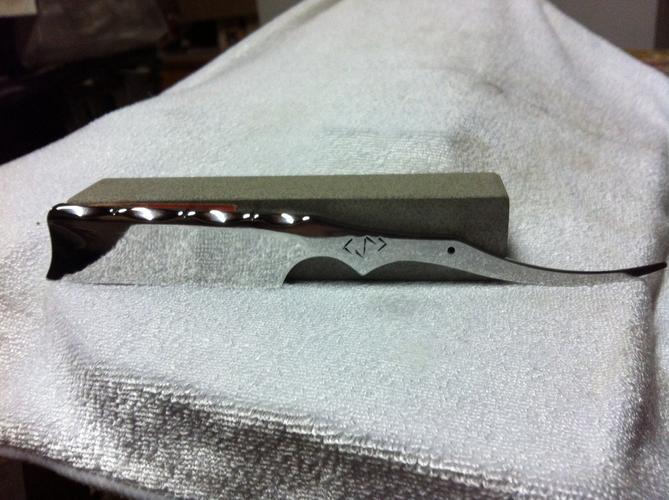
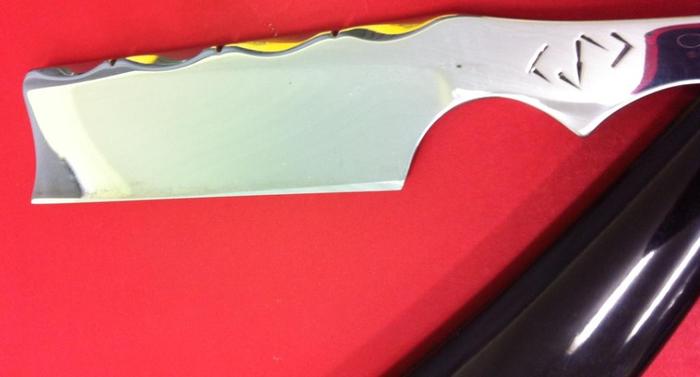
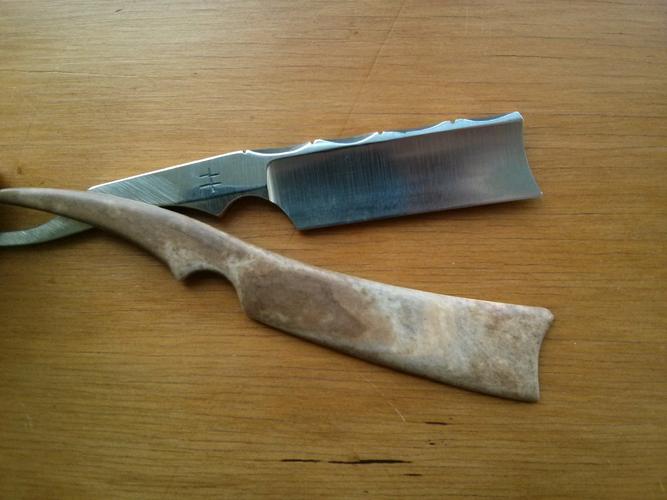
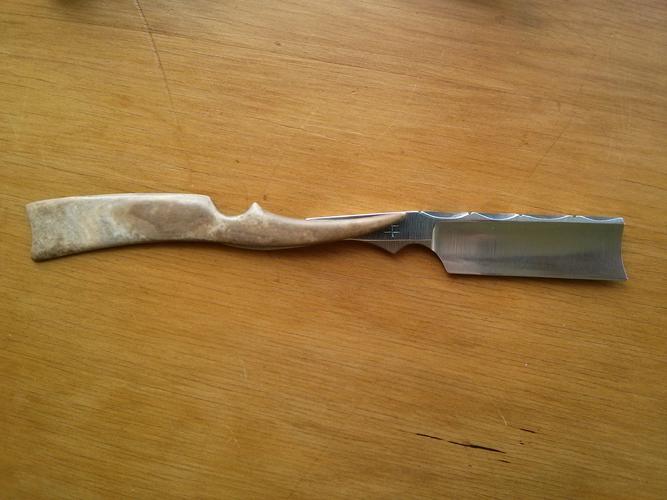
Finally finished sanding my blade last night to 5000 grit then autosol polished
Came out pretty good i think for close to 18-20 hours all up so far from start including changes to the tang shape.
Now the scales since my search for 6" dyed bone has not worked out yet I am stuck between black horn in the draw or waiting for white bone in the mail both with brass wedges ah the decisions of the lowly razor worker.
Note: hand sanding from 80 grit sucks but well wealth it
Makes me definitely think a little buff is required if I go down the path again
Handsanding from that point does indeed take some time, but the results are wonderful!
I WILL own a Bruno blade some time soon!
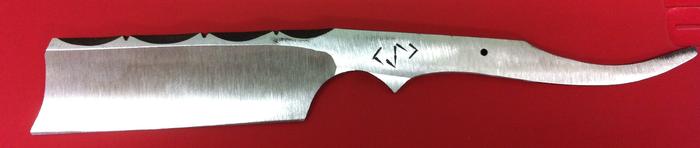
I made this one after I saw some of the changes you were considering: I call it my 'alien' designQuote:
Originally Posted by Substance
It will get a Spanish point of course, and it needs to be ground so that the blade hollows almost touch the notches on the spine.
Attachment 161885
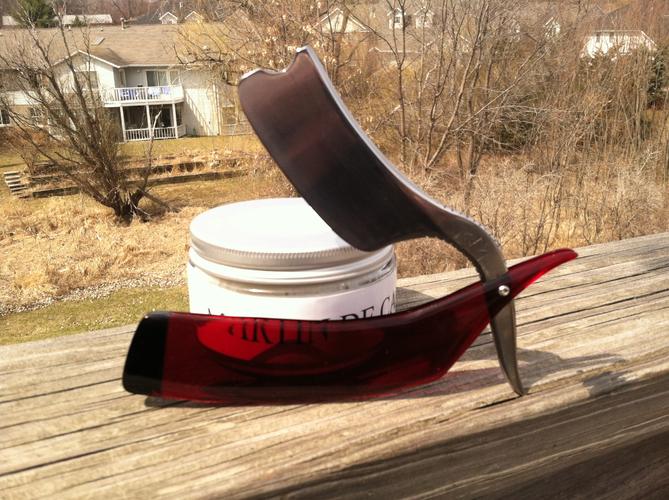
Well, after much procrastination here is my BrunoBlade. I'd intended to scale with carbon fiber, but I didn't have any stock large enough. I did have some acrylic however, so that's what I did. Probably will hollow out the scales a bit, either a slot or a series of holes. I found it necessary to shorten the tail a bit, simply in the interest of ergonomics.
And for the good stuff: the first shave. The blade took an edge nicely and was very well behaved on the hones. Stropping is a bit slow, but hey, it's a big razor. The shave was very gentle and smooth, just like an old Sheffield wedge. It's a bit of a bear to handle, but the blade felt sweet against my face. A good shaver.
Attachment 161905
Attachment 161906
Attachment 161907
Attachment 161909
[QUOTE=entropy1049;1320056]Well, after much procrastination here is my BrunoBlade. I'd intended to scale with carbon fiber, but I didn't have any stock large enough. I did have some acrylic however, so that's what I did. Probably will hollow out the scales a bit, either a slot or a series of holes. I found it necessary to shorten the tail a bit, simply in the interest of ergonomics.
And for the good stuff: the first shave. The blade took an edge nicely and was very well behaved on the hones. Stropping is a bit slow, but hey, it's a big razor. The shave was very gentle and smooth, just like an old Sheffield wedge. It's a bit of a bear to handle, but the blade felt sweet against my face. A good shaver.[QUOTE=entropy1049;1320056]
Need to see a pic with it full open or at a 90 ....please?. It's a shame about the tail cropping, R.R.A (Razor rights activist) wouldn't like this. I have an almost identical razor on it's way or preparing for travel to me. So I'm stealing idea 's from you ;)
That polished up really well. And the high polish goes well with the deep red of the acrylic.
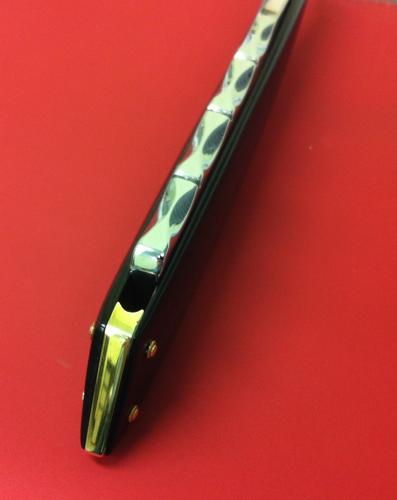
Just a quick update pre-assembly teaser
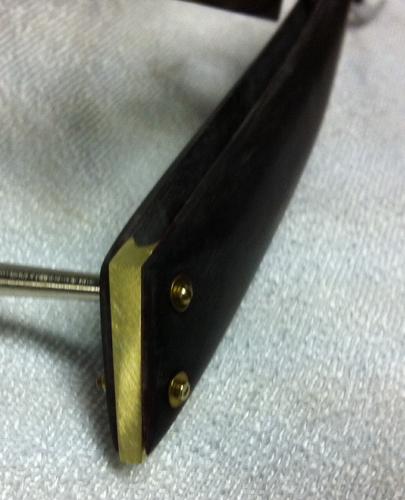
Horn scales shaped & sanded to 320grit with brass wedge
Attachment 162202
Attachment 162203
Attachment 162204
Attachment 162205
Attachment 162206
Attachment 162207
That is downright SEXY!!! :nj Well done and thanks for sharing.Quote:
Originally Posted by Substance
Ask and you shall receive Substance.
Attachment 162260
Attachment 162261
Quote:
Originally Posted by Substance
Substance, that is a beauty! Great work, and inspirational for my own. Looking forward to seeing the final pictures. Thanks!
My Bruno Blade just arrived.
Attachment 162431
Attachment 162432
as so the fun begins David
David that is similar to what I want my next Bruno to look like!
Substance. Wow. Awesome!
I told bruno exactly what I wanted and he put in every single design element i wanted.
Quote:
Originally Posted by showmeshiner
I have another of Bruno's blades - this time I put it into camel bone scales with a lined wedge. Getting an even bevel was a challenge with this blade - I think I maybe went a little too close towards the mid-section when I was polishing and thinned the edge too much. I ended up having to breadknife it and start again.
http://i1270.photobucket.com/albums/...ps4519ea29.jpg
http://i1270.photobucket.com/albums/...psbac769c2.jpg
http://i1270.photobucket.com/albums/...ps3bc9dd01.jpg
http://i1270.photobucket.com/albums/...ps7991abdc.jpg
I like the bone scales. Awesome job all around.
very nice Rob what size is it now
I have done the same with mine & need to breadknife it a bit also to reset it so I know it will be fun to hone as well
where did you get the bone from ?
Thanks for the comments - the blade is still near enough 7/8" - the original bevel thinned towards the centre which is an indication that I'd removed more metal there than the ends. The bevel is now even but still quite wide - even though I used 4 layers of tape, but that's because the blade is probably less than half hollow ground.Quote:
Originally Posted by Substance
The camel bone came from a supplier called Highland Horn in Scotland - he contacted me after I ordered some to let me know that he had some larger pieces available. Also excellent for top quality (spectagles grade) horn as he carries 4 shades - white, light, brown and black. I don't know whether he ships to the USA but drop him an email via the website if you are interested.
Excellent job, Rob! Love the look of the bone. Thanks for posting, you guys have set the bar high. I'm excited but a little nervous about completing my own.
Here's a little tip for recovering from several potentially wasted hours of work. After cutting, shaping, sanding and fitting the wedge - I flexed the scales too far when fitting the pivot and broke the rear scale at the pivot hole. Rather than start again, I cut two pieces of the liner that was used on the wedge and used CA to glue them to the insides of the scales, then re-drilled the pivot hole when set. You can just about make out the small patches on the last photo. Most durable material will do, in this case it's a rubberised paper used in knife making for spacers. I'm guessing that it would take years of use before it wears away, but in any case I'm no worse off.Quote:
Originally Posted by Suavio
Getting excited my Bruno Blade is in the US
I did see that square edge in the 2nd last shot then in the last shot the shape & black liner on the back of the pivot, I just thought you just made it that way the match the wedge.Quote:
Originally Posted by UKRob
nice save in deed
Here's my Bruno blade
Attachment 163557
Attachment 163558Attachment 163559Attachment 163560
Finished honing my razor last night after posting the pic's. Plan to shave with it today and post an SOTD, if you don't see it some more honing was needed ;)
Wow, I love the tail on that blade - stunning and unique! Very nicely finished and great choice in scale shape. Very nicely done sirs.
I've decided the red acrylic weren't doing justice, so they're history.Quote:
Originally Posted by entropy1049
BRB when I figure out what to try next :)
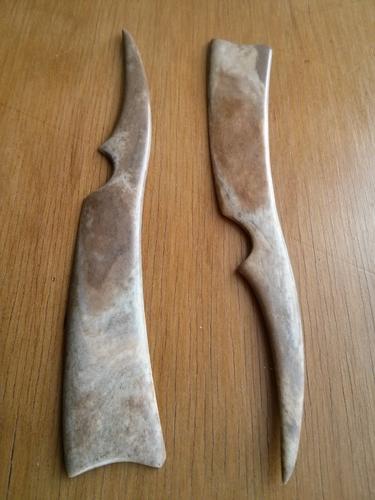
Pictures don't quite do them justice, but I have the shape and thickness sorted - these are the thinnest bone work I've done so far and I'm really liking the natural markings of the bone.
Attachment 163668
Now just waiting on some tests with stain to see if I'm going to darken these or keep them light...
I admire your nerve in making these - I'd be very nervous that the long tails will break off. I'm really looking forward to seeing the blade fitted.
I'm sorry if this a dumb question but what does bread knifing mean?Quote:
Originally Posted by Substance
It's a way of reducing the edge by using a sawing (breadknifing) action at about 45 degrees on wet&dry paper - not in the same spot but moving the blade across the paper.Quote:
Originally Posted by dexter90723
breadknifing is to remove a curve weather a frown or an unwanted smile on the edge to make it straight again
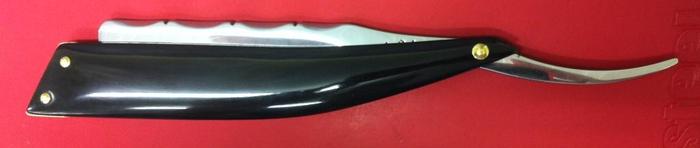
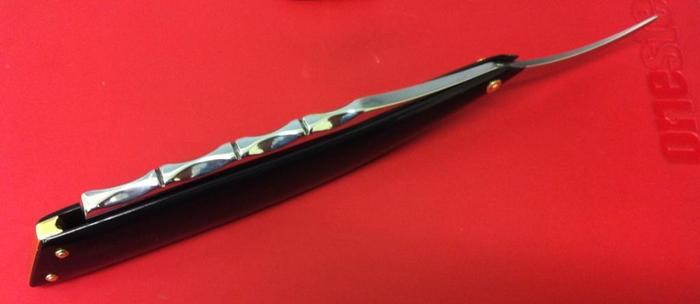
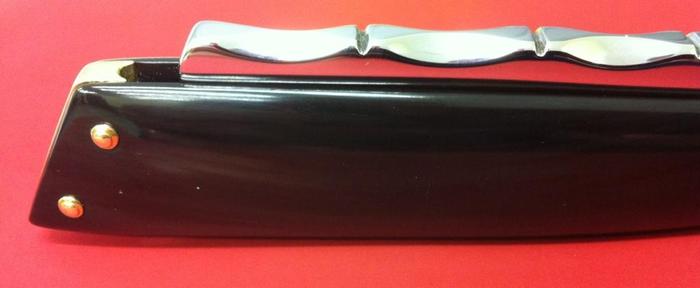
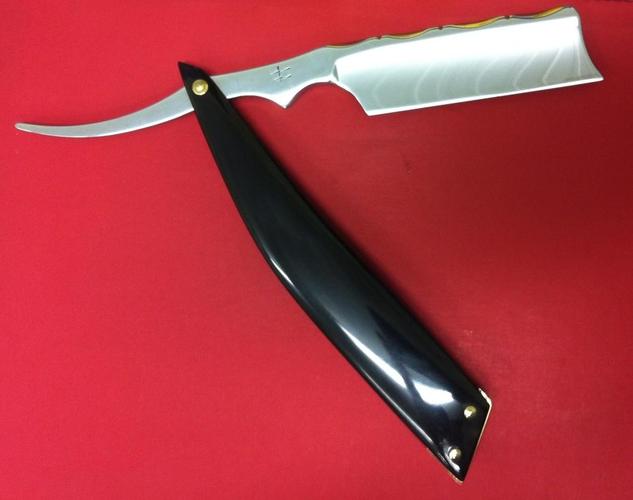
I finally finished my BrunoBlade off.
After much deliberation on adding an inlay which I just couldn't get right to match my imagined idea,
I decided I didn’t want to screw up the nice work so far so ditched the inlay for now (so I could use it) until I can get the cutting process right
I hope you enjoy & are inspired to complete your own
Original
Attachment 163752
Finished
Attachment 163753
Attachment 163754
Attachment 163755
Attachment 163756
Attachment 163757
Attachment 163758
sorry for the photo quality they were all taken post shave this morning
Final size is a mickey hair over 15/16” after re straightening
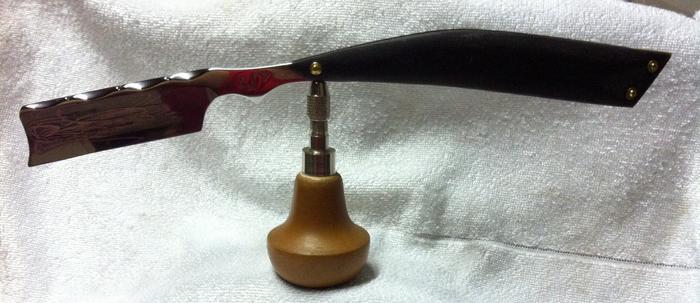
Blade – BrunoBlade O1 Spanish point monkey tail
Scales – Black Buffalo horn
wedge – Brass
Thrust washer, Pins & washers - Brass
Total of about 27 hours spent to date with 95% hand sanding & tooling
Blade shaping & sanding - an easy 18 hrs (could have saved a couple of hours odd with lessons learnt)
Scales - about 5 hrs
Wedge - 2 hrs
pinning - about 0.5 hrs
honing - 1.5 hrs
Honing – I used a combination of the 40 Circles, 40 X strokes & tried a bit of pyramiding for the finish
Bread knifed - Norton 360 oil stone @ about 30-45º (needed to remove a frown I managed to sand into the edge as my bevel shows)
Bevel set - Naniwa 1K - 4 layers of tape then dropped to 2 layers of tape for final set
Main polishing - Norton 4/8k
Finisher - Naniwa 12K
Stropped – Big Daddy – 100 laps of Felt then about 150 on leather
My intention is to later re-hone it done to a single layer of tape & keep it that way the same as the rest of my blades.
The first shave went very well on Easter morning with about 5 days growth
I am quite chuffed & happy with the finished product
would I do it all again?
Yes but definitely not fully from 80 grit by hand, as my fingers start cramping just thinking about the hand sanding
I would invest in a buff with compounds long before I do it again LOL
Quote:
Originally Posted by Substance
Wow, you nailed it! Your hard work shows through-Well Done!
Beautiful finish, you really nailed the horn and brass combination! To see them both shined up so nicely is fantastic, bravo!
@ Substance - Great job! You definitely have way more patience than I. Mine lacks refinement (didn't spend near the time sanding) and at some point I will have to invest the time to make that happen, like it should have the first round. But hey I just wanted to shave with it :)
The steel has a nice feel, it's a very forgiving blade, almost a "soft feel" comparable to my Double duck.
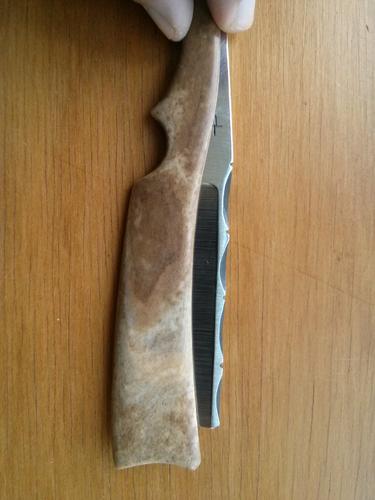
Okay, so despite my best efforts and various combinations of natural tannins and stain recipes (including ones that seemed jet black), I've decided that a mottled brown is as good as I'm going to get with this pair. And to be honest, I actually like the result even more - it looks like a dark marble or petrified wood, with the grain and markings in the bone really showing through.
I've taken some pictures holding the blade underneath so that you can see how the shape works... A wedge is still in the making (I'm thinking dark horn, possibly with copper lining, which is what I've done on another bone pair recently). Any thoughts / comments / critiques welcomed.
Attachment 163864
Attachment 163866
Attachment 163868
Attachment 163869
Attachment 163870