
Results 1 to 10 of 14
 20Likes
Thread: CLEAN Black Jack in Red
 LinkBack URL
 About LinkBacks
-
10-29-2017, 02:37 AM #1Senior Member


- Join Date
- Feb 2015
- Location
- Duluth, GA - Atlanta OTP North
- Posts
- 2,546
- Blog Entries
- 1
Thanked: 315 CLEAN Black Jack in Red
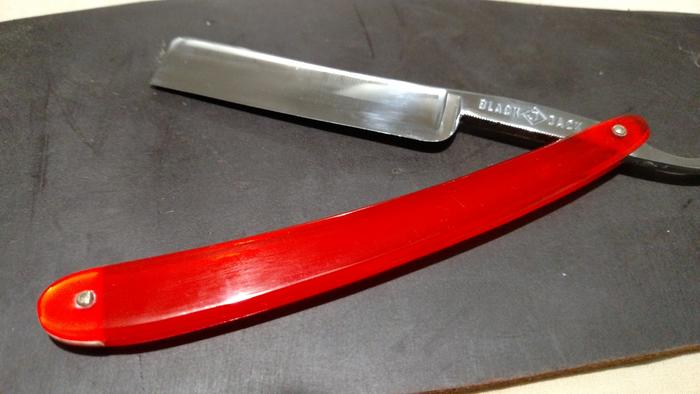
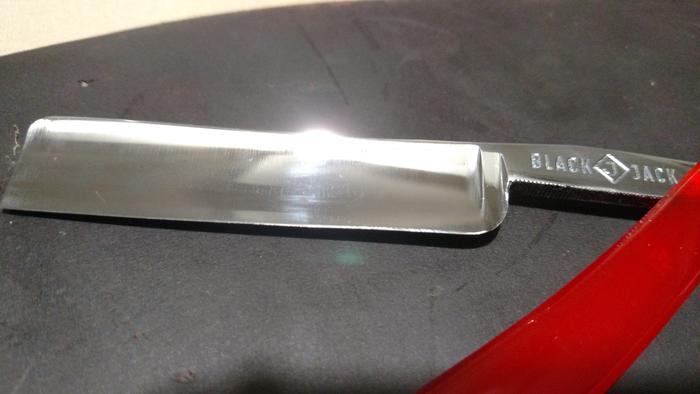
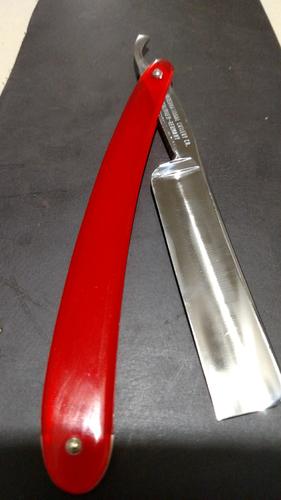
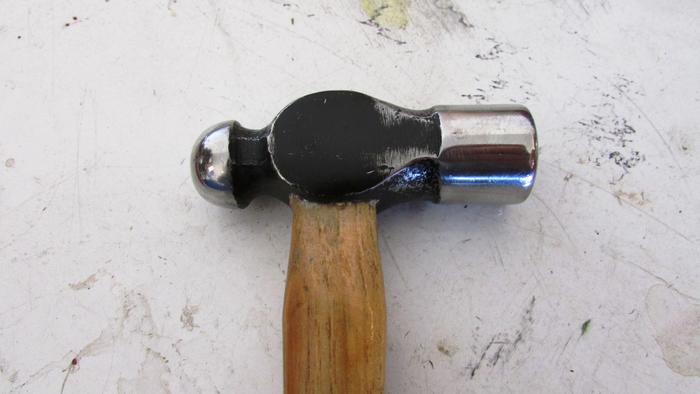
This is one of the razors I recently acquired and thought I would get some better pictures of it.
Black Jack on one side and International Cutlery Co. Solingen Germany on the other.
Cleanest blade I've probably gotten so far. It is already really sharp. Didn't have any trouble shaving a few hairs off my cheek so I may see how it shaves with just stropping.
Only issue is to that it isn't pinned tight enough. Eventually I would like to get a good chasing hammer and try to tighten the pins up if possible.
-
10-29-2017, 03:26 AM #2Senior Member


- Join Date
- Dec 2010
- Location
- South Florida
- Posts
- 13,530
Thanked: 3530
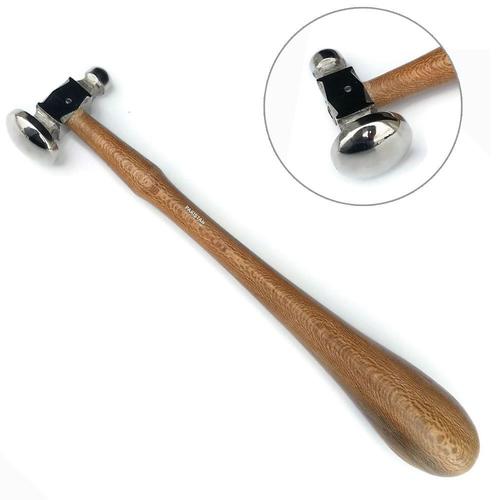
That's a nice looking razor. What is a chasing hammer?
-
10-29-2017, 03:35 AM #3'with that said'


- Join Date
- Aug 2010
- Location
- Walla Walla in WA State USA
- Posts
- 11,246
Thanked: 4237
A small (4oz) ball peen works well enough to get you started but you will need some kind of polished steel or iron as a background. I started with a chunk of steel that my dad called his 'Field Anvil' it was just a scrap of heavy steel that I filed and sanded until it had a near mirror finish. Remember that the brass is much softer than the steel and any imperfections in the steel (hammer included) will transfer to the brass.
I also sanded and polished up an old time clothes iron/the one that was set on the wood stove with the handle removed and it works well.
You could also just stop by any machine shop and ask for a 1" thick piece of round stock and file and sand that smooth be sure to round the edge over well. I'm sure for a fee they would machine the surfaces in a mill to help get the deep cuts out.
Now--when you are ready to tighten those pins up remember---It's tap tap tap---NOT---Bang Bang Bang. Our house is as Neil left it- an Aladdins cave of 'stuff'.
Kim X
-
The Following User Says Thank You to cudarunner For This Useful Post:
Hirlau (10-29-2017)
-
10-29-2017, 03:37 AM #4'with that said'
- Join Date
- Aug 2010
- Location
- Walla Walla in WA State USA
- Posts
- 11,246
Thanked: 4237
.. Originally Posted by Hirlau

 ..
Our house is as Neil left it- an Aladdins cave of 'stuff'.
..
Our house is as Neil left it- an Aladdins cave of 'stuff'.
Kim X
-
The Following User Says Thank You to cudarunner For This Useful Post:
Hirlau (10-29-2017)
-
10-29-2017, 03:42 AM #5Senior Member
- Join Date
- Dec 2010
- Location
- South Florida
- Posts
- 13,530
Thanked: 3530
Roy, I can't believe I actually have this hammer & use it for my pinning; I just didn't know it was called a chasing hammer. Thanks.
-
10-29-2017, 04:00 AM #6'with that said'
- Join Date
- Aug 2010
- Location
- Walla Walla in WA State USA
- Posts
- 11,246
Thanked: 4237
I didn't either----------------til Glen told me the proper name
 BobH likes this.Our house is as Neil left it- an Aladdins cave of 'stuff'.
Kim X
-
10-29-2017, 07:38 AM #7Senior Member
- Join Date
- Mar 2012
- Location
- Thunder Bay, Ontario, Canada
- Posts
- 17,322
Thanked: 3228
Good looking razor. You could try using a heavy old soup spoon to tighten the pivot pin with.
Boboutback likes this.Life is a terminal illness in the end
-
10-29-2017, 12:30 PM #8Senior Member
- Join Date
- Feb 2015
- Location
- Duluth, GA - Atlanta OTP North
- Posts
- 2,546
- Blog Entries
- 1
Thanked: 315
Thanks for the advice. I think the biggest problem I had last time I tried pinning was Originally Posted by cudarunner
1) Didn't have the right hammer for the job
2) I grew up using 16-18oz hammers to drive nails
3) Peening brass rods is slow work
4) I really want to go bangbang instead of taptap!
I had watched Glenn's video on pinning and going around the pin so that helped though. He makes everything look easy though.
I'll have to look into getting something smooth to use as a polished background.
-
10-29-2017, 04:52 PM #9'with that said'
- Join Date
- Aug 2010
- Location
- Walla Walla in WA State USA
- Posts
- 11,246
Thanked: 4237
Originally Posted by JP5
I thank you for being so honest in pointing out #'s 2-3 and 4. Originally Posted by BobH
Bob is quite correct in using a heavy spoon like a serving spoon.
As far as a surface while I've never tried it I have known of guys smoothing up the side of one of those bigger hammers you mentioned in #1.
I hope this has been of some help.Our house is as Neil left it- an Aladdins cave of 'stuff'.
Kim X
-
10-29-2017, 09:36 PM #10'with that said'
- Join Date
- Aug 2010
- Location
- Walla Walla in WA State USA
- Posts
- 11,246
Thanked: 4237
I had a road trip earlier today but when I got home I took out a 16oz ball peen that's part of my pinning set up to show how to make a small but efficient pinning block. (I would have used a larger hammer but couldn't see putting the effort in a hammer that would just be used for Brute Force and Ignorance). Originally Posted by cudarunner
Ok, here's the back side of the hammer (the front side has the maker and weight stamped into it) before any work:
While I could have done this all by hand I used a small palm sander from start to finish for sanding.
120 wet and dry till all the minor dings were removed followed by 220 w&d to remove the 120 scratches then 400 w&d to remove the 220 scratches.
Then I used some well crumpled newspaper (newspaper has a very find abrasive in it) with some Mothers Mage and Aluminum Polish followed by Mothers with a shop towel.
Total time involved: 15-20 minutes;
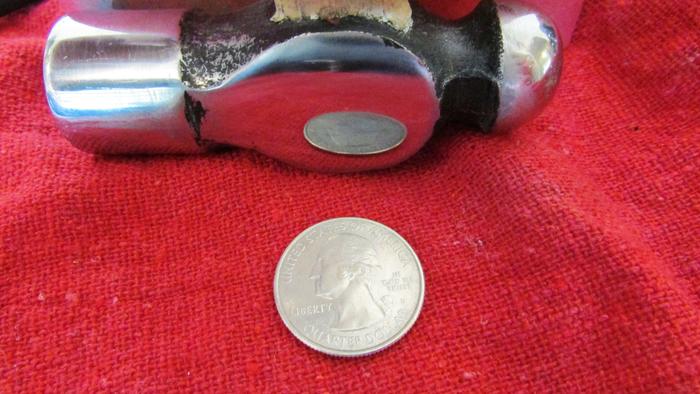
I hope this has been of some help with your pinning
Hirlau likes this.Our house is as Neil left it- an Aladdins cave of 'stuff'.
Kim X


 Reply With Quote