
Results 1 to 10 of 27
 34Likes
 LinkBack URL
 About LinkBacks
-
10-10-2020, 04:26 PM #1Senior Member


- Join Date
- Dec 2008
- Location
- Finland
- Posts
- 164
Thanked: 76 Deepen my stropping technique, microscope photos
Good evening to all
It's been years when last time shaved with straights and even more when wrote anything in here (kept 3 years full beard..just wanted to study that grooming section too).
Earlier three years every day shaving with straights and learning a lot, but now decided to come back to learn more and having fun again, DE world is familiar too.
Read carefully articles from this site https://scienceofsharp.com/2016/04/1...-razor-honing/ ....so great site for information....and started to think about how to develop my stropping technique better. I am not sure are all these cheap microscope photos and writings beaten to death in here but just understood couple of things after reading and honing and stropping and clicking photos etc.
Razor is Edwin Jagger TI Le Grelot imitation 6/8. With other honing session I just stared only scratch patterns and took photos, shaved and result was bad. Well, not totally bad but far away from perfect. Then I started to think that I need to correct my honing/stropping somehow.
Science of sharp says "...It is also important to understand that scratches in the bevel are of no consequence when the bevel is micro-convex as the scratches do not reach the apex".
Here are photos of my study. Apex and scratch pattern change between 2k - 5k - 10k but stropping with cro-ox and TM red Latigo + horsehide will show how I tried to create a micro-convex and now I can hardly wait tomorrow morning and how apex and shave really feels. Hopefully smoother and learning still continues.
I wanted to took also different views of result if they help to show more.
-
10-10-2020, 05:06 PM #2Senior Member

- Join Date
- Sep 2016
- Location
- Silicon Valley
- Posts
- 465
Thanked: 113
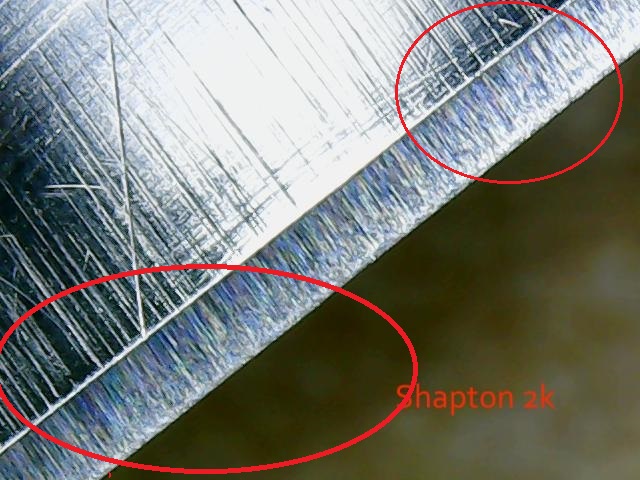
Your last 4 pics show you are not getting to the edge. You did not do enough 5k to get rid of 2k scratches. They are there in the end.
The glow on pictures 5,6,and 7 show it clearly. You must get rid of that "glow" to know you have reached the edge. It is difused light going in different directions causing a glow versus the rest of the bevel reflecting the light in the same dirrection. I use that glow to verify I'm ready to go to the next stone in my progression.
Good thing is not to much more work.
-
The Following User Says Thank You to Toroblanco For This Useful Post:
TonyJ (10-10-2020)
-
10-10-2020, 05:22 PM #3Senior Member


- Join Date
- Apr 2012
- Location
- Diamond Bar, CA
- Posts
- 6,553
Thanked: 3215
The bevel gets better as you progress, by you do not have an edge. The edge is ragged because the bevel was not fully set.
Science of sharp says "...It is also important to understand that scratches in the bevel are of no consequence when the bevel is micro-convex as the scratches do not reach the apex".
Yes, true… if you are honing to the edge and have a straight edge where the bevels are meeting. You are not honing to the edge at 2k and your 5k is not removing the 2k stria.
2k stria is visible at the edge, in your final photos, it was never removed
How about some pictures of the whole razor, to see if there are other issues with the razor, the belly looks pretty rough? Eliminate as many variables as you can, one at a time.
Try to photograph the same spot each time so you can compare the results on the same spot. Mark the belly with a sharpie from edge to spine for registration.
-
The Following User Says Thank You to Euclid440 For This Useful Post:
TonyJ (10-10-2020)
-
10-10-2020, 05:31 PM #4Senior Member
- Join Date
- Dec 2008
- Location
- Finland
- Posts
- 164
Thanked: 76
Thank you for these advices, I will correct and learn more, also for renovating progress. It's so great to have help.
-
10-10-2020, 10:29 PM #5Senior Member
- Join Date
- Apr 2012
- Location
- Diamond Bar, CA
- Posts
- 6,553
Thanked: 3215
Tony, it looks like the razor was hand sanded or buffed on a course compound. There are a lot of deep stria that go from the belly of the razor on to the bevel and to the edge. A lot of the deep stria are still visible at stropping. Look at the stria on the 2k photo especially on the lower left-hand corner where the lighting is better. Notice the deep double stria (railroad tracks) that run from the belly to the bevel and all the way to the edge.
Your 2k, should have removed all that stria easily, most probably you are not using enough pressure, which is why you are not getting the bevel fully flat and honing to the edge, to create a new edge.
Also, when stropping, typically you will remove metal from the edge, before you remove material from the back of the bevel. But you are not, you are removing material from the back of the bevel and not the edge.
You need to add a bit of torque to your stropping, by torqueing towards the edge.
Do not be afraid of using a bit of pressure when bevel setting, the worst that can happen is the edge will get chippy, (make sure to tape the bevel, 2 layers if the bevel needs a lot of work) if so, just joint the edge straight, one or 2 lite strokes on the corner of the stone.
Once the bevels are flat, and you have an even stria pattern from back to edge, you can reset an edge in less than 20 strokes. It is faster and the edge will be stronger.
Again, post some photos of the whole razor so we can eliminate any other issues. Hone with 2 layers of tape to put more pressure on the edge. If you have a lot of hone wear you may need more tape.
Nice photos, which brand of scope are you using?
 TonyJ likes this.
-
The Following User Says Thank You to Euclid440 For This Useful Post:
TonyJ (10-11-2020)
-
10-10-2020, 10:35 PM #6Senior Member

- Join Date
- Jun 2006
- Location
- The Netherlands
- Posts
- 5,475
Thanked: 656
I think it is very hard to assess bevels under a mike. So much depends on the amount of light and also the angle of the blade. Angle of blade with light, angle of blade with your eyes. Some of the pics suggest the bevel is not set on the right side of the blade. Marking the bevel is a good way to check whether the bevels meet. You pictures suggest that you removed almost all scratches with leather only. I find that hard to believe. IMHO that suggestion is due to a different angle.
Plus ça change, plus c'est la même chose. Jean-Baptiste Alphonse Karr.
-
The Following User Says Thank You to Kees For This Useful Post:
TonyJ (10-11-2020)
-
10-11-2020, 04:53 AM #7Senior Member
- Join Date
- Dec 2008
- Location
- Finland
- Posts
- 164
Thanked: 76
Thank you again, all comments are important. So, last night I took 5k and 10k again and honed and honed. I am not sure but is this steel tougher than some others (my long time ago memories recall also that)?
I am a woodworking teacher and love to do teaching with basic hand tools, planes, saws and chisels. I am also teaching my students how to sharpen those and it's sorewarding to see people learn these basic skills.
I always want to learn more and I knew that I will get a great advices from here.
I don't remember do I handsanded this blade earlier. Maybe not because it was new. I have tried to learn renowating stuff for a other blades and if they are rusty or in a bad condition I will do wetsanding by hand from 240grit to 3k, around 10 steps.
After that buffing with hand drill but now we have at work Sorby's proedge with buffing ( light blue compound , tested other colors too but like this one most) wheel and it's easier to do buffing when only have to keep the blade not a drill with other hand. I live in a small flat and I don't have much space or everything must be compact. Those thing and my own stupidity it leads to mistakes, but that's how life goes. Like I wrote earlier want to progress in restoration genre too. I have great chance to make own wooden scales etc. but those are for later. Now sharpening is more important because shaving every day. Of course I have Lot of DE's for a back up and will chnge between straights and DE's anyway in the future.
Pressure. Yes, this one is one absolutely to think about. What is right amount and how much different steel affect on that? Also lower grits more and higher grits less? I was thinking yesterday that maybe Superstones are not the best for this steel. Shapton 2k felt good. I have notice with kitchen knives and chisels the same that steels and stone formulations vary. I have Shaptons, both naniwas, Imanishi, kitayama and some individual stone. I want J Nats for sure but really expensive and hard to order from here and they are so expersive anyway that cannot afford . Hopefully in the future
Microscope. Hard to get proper angle and lightning etc, but I think it's a good tool with own flaws but still thinking and understanding what to try to find from those photos are more important. Will all you guys great help I now understand much better those photos. Mine is a cheap ebay with 500x magnification and poor stand but this far it enough.
Stropping, torgue and pressure -appreciate this thinking and advice really, thank you (got a good ideas to tell for students too ). Yes, I have been testing pressure and torguing parts on stropping and trying to find a own good feeling on those. Needs more work too and gladly I have over 20 straights where I can practise slowly one by one. I have TM red latigo, horsehide and hand american strop set with boron, diamond sprays, cro-ox and plain too.
On honing I am using usually 1 tape layer which seems to be ok this far for me.
Edit: Test shaved and it was even worse, not happy. Yesterday when honing I tried to check with microscope all the time the results. I got better stability for bevel (at least how I saw reflections and all) when watching microscope . Visual check for bevel was ok, I think. Is bevel too wide? Edge it's not aggressive at all Maybe needs more torguing stropping with cro ox?
Last edited by TonyJ; 10-11-2020 at 05:30 AM.
-
10-11-2020, 08:49 AM #8Senior Member
- Join Date
- Jun 2006
- Location
- The Netherlands
- Posts
- 5,475
Thanked: 656
Looks to me like your blade has a frown. That may be the problem. Especially towards the heel in your last picture. I may be wrong, bit hard to see due to the background (carpet? terry cloth?).
You see: you often do not need a mike to find the problem.TonyJ likes this.Plus ça change, plus c'est la même chose. Jean-Baptiste Alphonse Karr.
-
10-11-2020, 09:07 AM #9Senior Member
- Join Date
- Dec 2008
- Location
- Finland
- Posts
- 164
Thanked: 76
I understand what you mean Kees, no problem. It's still a bit of a fun to play and trying to connect some dots.
Here is a new test
First I tried more with cro-ox just laps with light pressure and torque, loooks like edge gets more attention
Second just like first but more laps, not a big change
Third "heavy" pressure and clear torque, much more what I expected
Last samewith Red latigo and horsehide
-
10-11-2020, 09:58 AM #10Senior Member
- Join Date
- Jun 2006
- Location
- The Netherlands
- Posts
- 5,475
Thanked: 656
I am not sure what you are doing exactly when you "torque" your blade. Make sure you do not damage the cutting edge in the process.
In your first picture above I see a burr on the left-hand side. So you start off with a damaged blade.
The torque pictures do look to me like you did some damage.TonyJ likes this.Plus ça change, plus c'est la même chose. Jean-Baptiste Alphonse Karr.


 Reply With Quote