Page 2 of 4 FirstFirst 1234 LastLast
Results 11 to 20 of 32
Like Tree23Likes

Thread: My stropping experiment

  1. #11
    Senior Member xMackx's Avatar
    Join Date
    Sep 2011
    Location
    Michigan
    Posts
    344
    Thanked: 61

    Default

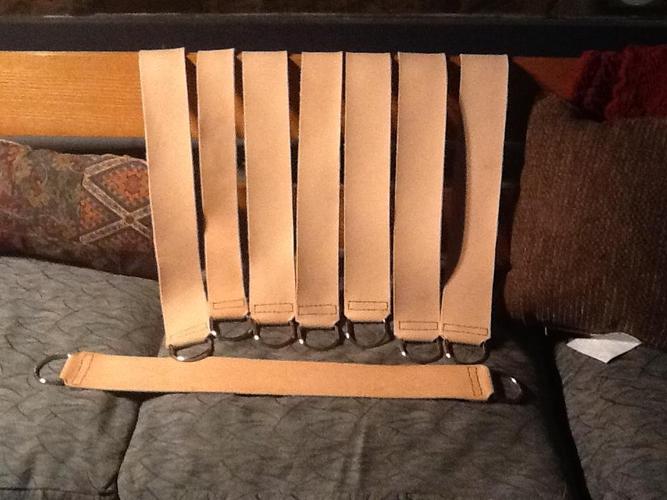
    Those strops look great!

  2. #12
    32t
    32t is offline
    Senior Member blabbermouth 32t's Avatar
    Join Date
    Oct 2010
    Location
    50 miles west of randydance
    Posts
    9,573
    Thanked: 1352

    Default

    Quote Originally Posted by HNSB View Post
    What did you use to sew the strops?
    First I glued them together with contact cement. Then I used a 4 prong thonging chisel to make the holes. Then hand sewn with waxed thread.

    Not hard to do but I could certainly tell the first one from the last. One thing I learned is in the future I should use a more ergonomically designed piece of fire wood and a pad for my rear while sitting on the floor of my basement punching holes.

    Tim

  3. The Following User Says Thank You to 32t For This Useful Post:

    HNSB (03-06-2012)

  4. #13
    32t
    32t is offline
    Senior Member blabbermouth 32t's Avatar
    Join Date
    Oct 2010
    Location
    50 miles west of randydance
    Posts
    9,573
    Thanked: 1352

    Default A short tutorial

    Getting this thing posted is more work than the strops. :-]

    I had some questions about how I did this and I was short one D ring from the 2 3/4 inch strop so I decided to finish it and take some pictures.

    First I measured

    Name:  DSC00019.JPG
Views: 260
Size:  23.1 KB

    Then I used a 1/2 inch punch to make some partial holes. For the the 3 inch strops the holes were bigger.


    Name:  DSC00020.JPG
Views: 263
Size:  34.4 KB

    Then I folded it and cut the rest of the V's with a scissors

    Name:  DSC00021.JPG
Views: 258
Size:  28.0 KB

    Next put on some contact cement to glue.

    Name:  DSC00022.JPG
Views: 250
Size:  36.3 KB

    Next, marking my lines and the tool I used to punch the holes. It is not relly a punch. It splits the leather for the hole and allows the leather to close back up after stitching. The marks are very important, at least to me!

    Name:  DSC00023.JPG
Views: 266
Size:  23.8 KB

    My block of wood and the basement floor. Not very ergonomic!

    Name:  DSC00027.JPG
Views: 251
Size:  42.6 KB

    Another view on the bench.

    Name:  DSC00028.JPG
Views: 262
Size:  42.4 KB

    The final product with some of the tools next to the one I put graphite on. I decided to mark them in the rectangles although I don't think that I will forget which one has graphite on it.

    Name:  DSC00030.JPG
Views: 262
Size:  46.9 KB


    I hope this helps and answers some of your questions.

    Tim
    xMackx likes this.

  5. The Following User Says Thank You to 32t For This Useful Post:

    xMackx (03-06-2012)

  6. #14
    32t
    32t is offline
    Senior Member blabbermouth 32t's Avatar
    Join Date
    Oct 2010
    Location
    50 miles west of randydance
    Posts
    9,573
    Thanked: 1352

    Default

    I now have applied 4 different leather treatments. Lexol, Nor-v-gan shoe oil, Neatsfoot oil, and Mink oil. that is the order of my first impressions with the Mink oil the best. I have a piece of CroMoly roll cage tubing in a vise to burnish them with. 1 1/2 inch in diameter. [I wouldn't use anything else!]. I put about 500 strokes/rolls on each of the first three. The Mink oil I got to 300 and my arms were tired. Much more draw. The strop and tube were warm.

    I had a good shave today but I stropped on all of them to test the draw etc. No conclusions yet!

    Tim
    xMackx likes this.

  7. #15
    Senior Member xMackx's Avatar
    Join Date
    Sep 2011
    Location
    Michigan
    Posts
    344
    Thanked: 61

    Default

    I work lather into my strop with a glass bottle on a flat surface. Adds a lot of draw and leaves it very supple, something you won't wanna do until you try it kind of thing.
    32t likes this.

  8. #16
    learning something new every day Deerhunter1995's Avatar
    Join Date
    Apr 2010
    Location
    Pa
    Posts
    1,211
    Thanked: 185

    Default

    you deffinityl lost me on ths experiment i just a plain leather and linen strop and a barber hon to keep my razor runnign smooth and ive had alot of luck so far. let us know how this goes.

  9. #17
    32t
    32t is offline
    Senior Member blabbermouth 32t's Avatar
    Join Date
    Oct 2010
    Location
    50 miles west of randydance
    Posts
    9,573
    Thanked: 1352

    Default

    For the time being my stropping experiment is degenerating into a strop making experiment. I made 10 more today. 5 combo ones with leather and fire hose. I gave one of them to my neighbor who supplied me with enough fire hose for 8 strops. I then made a leather and seat belt one and 4 more seat belt singles.

    Lots of learning going on here.

    I used a little heavier leather today more in the 7 ounce range and that seems better.

    I never thought you could over oil leather. I was wrong. I over did one with neatsfoot oil and am trying to use lather to get rid of the excess. It is removing some but I don't know where it will end up. I am thinking that it might be good for a post shave stropping to oil the edge before storage! :-]

    I used rivets today. Much quicker. Although I did screw up a punch trying to remove cores that I think were stuck from the contact cement.

    I found some "fine" valve grinding compound in the garage today. I am going to put that on one of the seat belts to give it a go. The strops cost me nothing more than my time and I can make them in about 5 minutes so I have nothing to loose.

    Now if I only would shave 5 times a day this experiment might make some headway.

    Tim
    xMackx likes this.

  10. #18
    Senior Member xMackx's Avatar
    Join Date
    Sep 2011
    Location
    Michigan
    Posts
    344
    Thanked: 61

    Default

    Quote Originally Posted by 32t View Post
    For the time being my stropping experiment is degenerating into a strop making experiment. I made 10 more today. 5 combo ones with leather and fire hose. I gave one of them to my neighbor who supplied me with enough fire hose for 8 strops. I then made a leather and seat belt one and 4 more seat belt singles.

    Lots of learning going on here.

    I used a little heavier leather today more in the 7 ounce range and that seems better.

    I never thought you could over oil leather. I was wrong. I over did one with neatsfoot oil and am trying to use lather to get rid of the excess. It is removing some but I don't know where it will end up. I am thinking that it might be good for a post shave stropping to oil the edge before storage! :-]

    I used rivets today. Much quicker. Although I did screw up a punch trying to remove cores that I think were stuck from the contact cement.

    I found some "fine" valve grinding compound in the garage today. I am going to put that on one of the seat belts to give it a go. The strops cost me nothing more than my time and I can make them in about 5 minutes so I have nothing to loose.

    Now if I only would shave 5 times a day this experiment might make some headway.

    Tim
    How is the fire hose working out? I have seen a few people like using that stuff. Keep up the good work!
    32t likes this.

  11. #19
    32t
    32t is offline
    Senior Member blabbermouth 32t's Avatar
    Join Date
    Oct 2010
    Location
    50 miles west of randydance
    Posts
    9,573
    Thanked: 1352

    Default

    Quote Originally Posted by xMackx View Post
    How is the fire hose working out? I have seen a few people like using that stuff. Keep up the good work!
    The fire hose has a heavier draw than the seat belt for example. It has a much courser knit. I have been using a piece for a while. Mine tends to cup or maybe it is the fold on the edges but it gets dirtier on the sides after use. I don't think that you could cut it in half lengthwise because it would unravel.

    I washed and dried the seat belts and fire hose today and got in a hurry and pulled a couple of the hoses out before they were dry to get going. The ones that I pulled out slightly damp are a lot more stiffer. If you try this let them stay in the dryer for a full cycle. [with jeans] They were much more supple afterwards.

    tim

  12. #20
    epd
    epd is offline
    Senior Member epd's Avatar
    Join Date
    May 2011
    Location
    Orillia, Ontario, Canada
    Posts
    741
    Thanked: 164

    Default

    Oh man I hope your linen didnt shrink in the dryer like mine did, it came out afull 3/4" shorter then when it went in

Page 2 of 4 FirstFirst 1234 LastLast

Posting Permissions

  • You may not post new threads
  • You may not post replies
  • You may not post attachments
  • You may not edit your posts
  •