Results 1 to 10 of 13
Thread: Fixing the Gap on Inlay
-
12-09-2013, 06:05 PM #1
 Fixing the Gap on Inlay
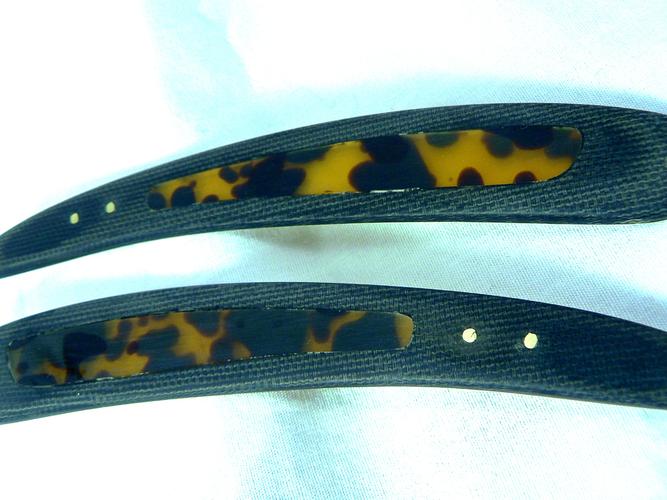
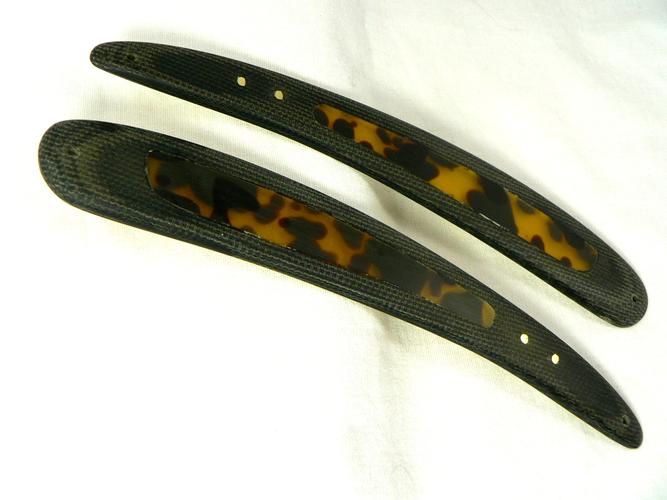
Below are a couple of photos of a pair scales from the half dozen I've been toying with forever now. The "inlay" on this set is not really inlay, I cut a hole in each scales and then cut faux tortoise of the same thickness and inserted them into the hole then epoxy and sanding, followed by backing the scale inside with brass to reflect light better. What's been taking so long is that I'm exploring what I can do with different types of Micarta (beyond just shaping it), pins for decorative purposes, and various inlay ideas.
That's all fine but the issue of how to fill in some spaces between the inlaid faux tortoise and the Micarta is eating my lunch. This set of scales would be about 1/16" thicker but for the number of times I've sanded CA and other things to try to fill in the gaps. The most promising approach seemed to be to put CA on/in the gaps, sprinkle in a bit of black Micarta dust, and then sand after drying. No dice - the gaps reappear. My wife took a look and gave me a pin from her quilting stash to see if that'll clean out some dust (the light stuff in the photos) and it did clear it out but that's only part of the solution - the white stuff along some edges are dust from sanding that's gone now - now the issue remains as to how to fill those gaps.
Thin CA hasn't done it yet. Am I just doing something wrong in my application of CA, in my sanding, or is CA just a stupid idea and there's a better way to fill these gaps? Maybe using the needle to work CA deep into the gaps? I'm now at the point where I need to step away from it, accept that I'm stuck like glue, and ask for ideas. I'd just leave them as is but I won't be able to honestly look at these and not have it bother me. And if I decide to sell them around a blade, well, I just couldn't do it in good conscience.
Thanks - Mike


Last edited by AirColorado; 12-09-2013 at 06:19 PM. Reason: Add the bit about the dust
-
12-09-2013, 06:25 PM #2At this point in time...


- Join Date
- Jun 2007
- Location
- North Idaho Redoubt
- Posts
- 27,235
- Blog Entries
- 1
Thanked: 13252
What glue did you use to set them in ???
-
12-09-2013, 06:31 PM #3
-
12-09-2013, 06:36 PM #4At this point in time...


- Join Date
- Jun 2007
- Location
- North Idaho Redoubt
- Posts
- 27,235
- Blog Entries
- 1
Thanked: 13252
That is what I would have done also but I would have done a "Looser" application letting some ooze out to be sanded back and fill the gaps, other than getting some back in there and getting messy with pressing it in I can't think of another way..
I am assuming you tried wicking it in with the CA and a Plastic paint brush
-
12-09-2013, 06:42 PM #5Senior Member

- Join Date
- Mar 2011
- Location
- Corcoran, Minnesota
- Posts
- 665
Thanked: 170
When I make polyester for brush handles, I use powdered dye for coloring. I have used it to color epoxy for various repairs. Comes in many colors. I got mine from Douglas and Sturgess.
-
12-09-2013, 06:43 PM #6Member

- Join Date
- Apr 2013
- Posts
- 50
Thanked: 3
In my experience, the best trick to have flawless inlay is to cut them out in the same stroke by superimposing the materials, use the thinest jewlers saw blade. The trick for the peices to fit exactly with no gap is not to cut them vertically but at a constant 15-20 degree angle, this is hard to do if you are using a hand saw but easier if using a variable speed scroll saw.
-
12-09-2013, 06:44 PM #7

Well... now I have a sheepish grin... heading back out to the shop now.... Thanks Glen - not sure why I didn't think of that. - and I'll let you know if my greaseless is any easier to apply in this cold, though it's up to a solid 18 degrees now (I heat my shop with a kerosene heater when I'm in it so the compound may be thawed a little).
-
12-09-2013, 07:05 PM #8

Work the dust into the gap THEN the CA. If you put the glue first the dust will make the CA on the top go off and not sink in.
-
12-09-2013, 07:11 PM #9

A technique that works very well for inlays in guitar fingerboards is to fill any gap between the pearl inlay and the ebony board with two part epoxy with some vegetable black mixed in. I let this cure overnight and sand the fill back, it's an almost invisible repair. CA adhesives used in this way need to be of a high viscosity type to work effectively. CA does have the advantage of curing quickly using accelerator.
For what it's worth my method of inlaying is to cut the inlays out first with a jewelers saw, then clean the edges up. I position the inlays on the board where they will eventually live and fix them with a tiny dab of CA. Then I scribe around each piece with a fine scalpel point, this leaves a fine incised line in the fingerboard. I then prise each inlay piece carefully from the board.
The next job is to rub chalk into the scribed lines to highlight them, I then go to town with a Dremel in a home built router base, using dental burrs as router bits to hog out the ebony carefully working gradually up to my scribed lines. I finish off any corners or missed edges with home made 1/16" chisels. I make these by grinding down the top section of old three sided hand saw sharpening files, honing them up and attaching a simple handle to the blunt end.
This method almost guarantees near perfect fitting inlays.
-
The Following User Says Thank You to osdset For This Useful Post:
samircanada (12-13-2013)
-
12-09-2013, 07:57 PM #10

OK Glen I'm not sure if the greaseless went on any easier (certainly wasn't more difficult as I'd have expected) but I didn't need any Glu-tite today. Odd because I'd think the wheels and compound being near frozen would make it harder. Maybe it was imagination but still, first time I didn't HAVE to use Glu-tite. One benefit of this cold is using the wheels on a blade is more fun because of the heat on cold fingers - and the blade cools faster!
The scales - did the wicking CA into the grooves using a pin. Looks OK but I won't know until later when I sand the CA.
Skip and Sam, thanks - good stuff to keep in my mental file cabinet. Though Sam I can't quite picture how to consistently keep a 15 degrees on a cut...maybe I'm picturing it wrong.
Splash that's 180 degrees from what my logic is normally. I'd think the CA would just sort of settle on top of the dust and lock it there without absorbing any. I guess it pulls it up?
Osdset that's an excellent technique! I'd read that in a luthier book I have but didn't use the technique on these scales - mainly because I'm an idiot and after a few failed drillings into the micarta finally gave up on the original idea, went with the idea of using the same thickness for the inlay, and took it all to the scroll saw. I can see now that a few other approaches would have taken a whole lot less time!
OK back to the bench. I'll let you know if the wicking worked.


 15Likes
 LinkBack URL
 About LinkBacks


 Reply With Quote

