
Results 1 to 10 of 18
 16Likes
Thread: Dahlgren Ongoing Resurrection
 LinkBack URL
 About LinkBacks
-
12-09-2013, 08:21 PM #1Senior Member


- Join Date
- Apr 2009
- Location
- Boulder County CO
- Posts
- 1,004
Thanked: 127 Dahlgren Ongoing Resurrection
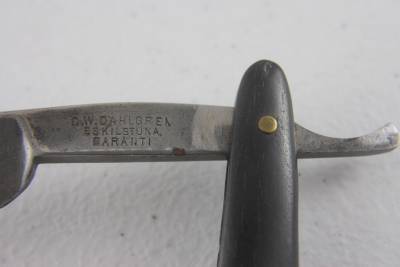
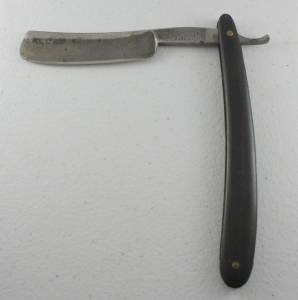
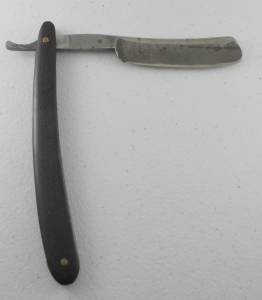
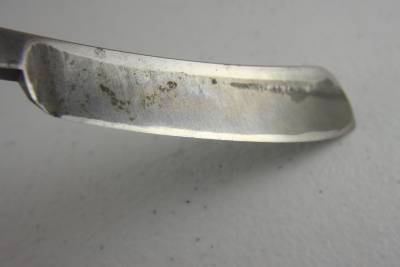
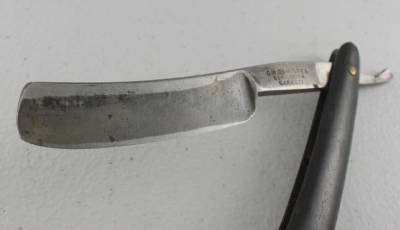
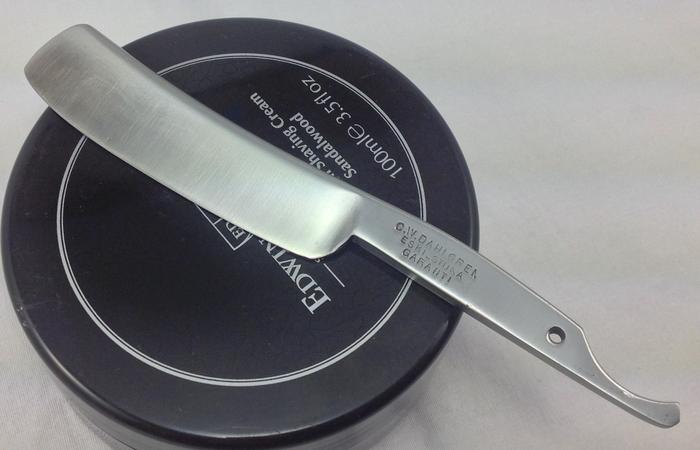
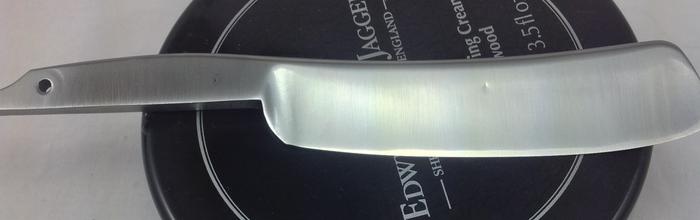
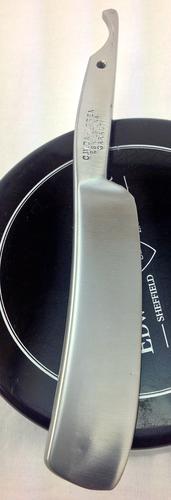
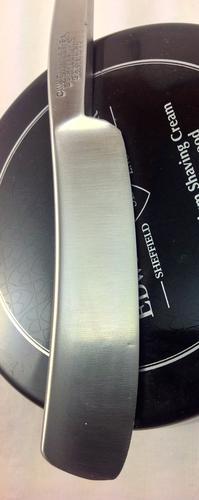
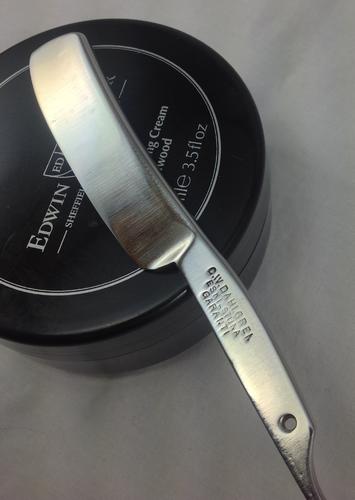
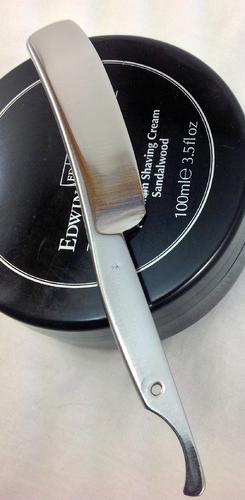
Here are some eBay pics of a blade I picked up a week or so ago (hope the seller doesn't mind me using the pix). I really like the shape of the blade and of course it's Swedish so I couldn't resist the challenge - can't rest anything that came from Eskiltuna. My idea is to regrind the blade and lose the nasty bevel (assuming that's what it is) as well as the odd hone marks at the top. Looks like someone went to town on this girl and lost track of time. It's as close to a wedge as I've seen out of Sweden so I can grind it more than a hollow ground.
I may name her Inga... stands for "I Need Gentle Attention". Maybe not...
Today I'm in the process of grinding all the sins off the blade. Just finished some time at 600 greaseless but it wasn't nearly enough to get the job done without 5 reapplications of compound. So I dropped to 400 and it's starting to look better. Another half hour and I think it may be ready to go back to 600 and then hand sanding. The pitting is pretty deep in places so I may want to get it all polished up and then drop back to 600 or so for a satin finish. Doing a final mirror finish may just accentuate the pits that will remain.
The scales aren't too bad, but I may gin up a design to replace them anyway. I'm thinking streaked horn but if anyone has seen a blade like this in something better I'm more that willing to go that way. I suspect the key will be that the lines of the scales should compliment the blade shape.
I'm posting this because the blade was so badly abused and I know I'll forget to post anything like "before" pictures once I'm really into this one. Also because I wanted to get some ideas before I go off into creative land in my head and wind up making a half dozen sets of scales before I'm happy with one. Finally I'm less likely to call something "good enough" if you guys are looking over my shoulder. OK here we go - here's the before pictures...
-
12-09-2013, 09:04 PM #2Senior Member
- Join Date
- Apr 2009
- Location
- Boulder County CO
- Posts
- 1,004
Thanked: 127
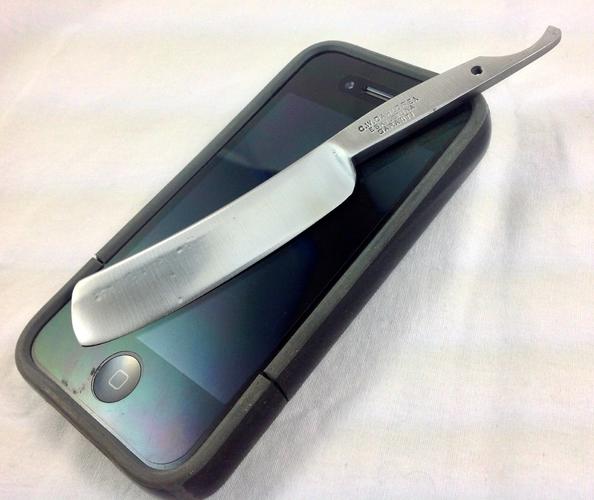
And here's the blade after losing it's scales and some more time at 400 grit greaseless. The reverse side isn't too bad (I may be able to live with that pitting) but the "face" side still has tons of pits and I can still make out the hone marks as well as a bit of that big bevel. Back to the wheels and more 400.
One question that pops up in my head is if I should completely grind out the bevel and hone marks or leave it close to where it is at this point. Still want to disappear some more pits so maybe the blade will take care of it anyway.

-
12-09-2013, 09:21 PM #3Senior Member

- Join Date
- Jan 2008
- Location
- Sweden, Gotland, Visby
- Posts
- 1,888
Thanked: 222
I would try to get all hone marks away, make a new nice rounded side up to the back.
A DMT 600 shim slightly bended in my hand is my go to tool for that.AirColorado and bongo like this.Hur Svenska stålet biter kom låt oss pröfva på.
-
12-09-2013, 09:38 PM #4Senior Member
- Join Date
- Apr 2009
- Location
- Boulder County CO
- Posts
- 1,004
Thanked: 127
Lemur I haven't used a DMT shim before, is it used essentially like sandpaper? I've just finished up with the 400 and will post something shortly but I like the shim idea if it bends enough to erase hone marks along the spine.
-
12-09-2013, 09:59 PM #5Senior Member
- Join Date
- Jan 2008
- Location
- Sweden, Gotland, Visby
- Posts
- 1,888
Thanked: 222
I use them like this; http://straightrazorpalace.com/works...rp-sheets.html Originally Posted by AirColorado
 AirColorado likes this.Hur Svenska stålet biter kom låt oss pröfva på.
-
12-09-2013, 10:53 PM #6Senior Member
- Join Date
- Apr 2009
- Location
- Boulder County CO
- Posts
- 1,004
Thanked: 127
Thanks - guess I'll need to get some, I can come up with a few things I can use them for. Hope my Amazon Prime is still active...
-
12-09-2013, 11:07 PM #7Senior Member
- Join Date
- Apr 2009
- Location
- Boulder County CO
- Posts
- 1,004
Thanked: 127
Forgot to mention earlier, this one is 5/8 at the heel and goes up to just over 6/8 at the toe - probably why I like its shape.
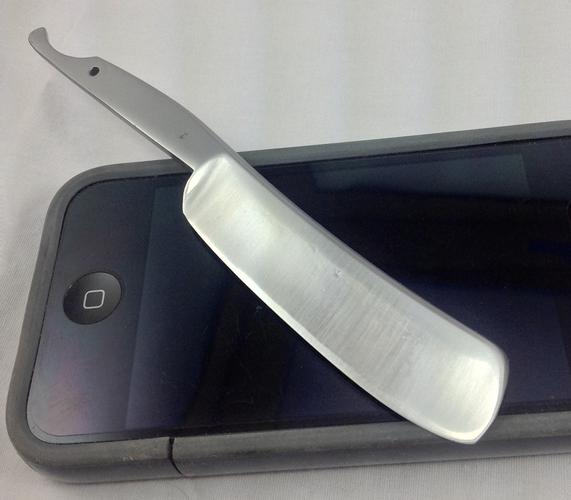
Thought I was done with 400 greaseless but after looking at these pictures I'm thinking I need one more session before going to 600. Here's both sides of the blade. You can see the back side is basically good, just one pit left on the blade and one behind it. I'd hate to remove more metal to get the last of it - but maybe I'm wrong.
The face side is much better too, but, there are 2 pits on the blade I may not be able to take looking at. One near the bevel that's pretty small and another near the toe that seems to have a little more metal around it that's "depressed looking" in the right light.
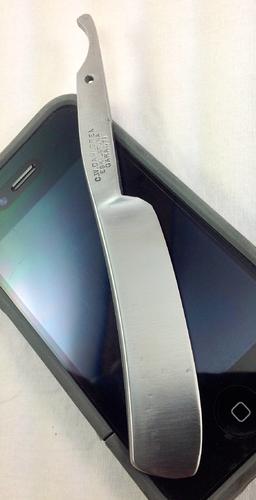
The face is much better now - you can see the pit near the bevel area about an inch before the toe
Reverse side now has one dimple on the blade and one in front of the pivot hole - it's just a dark area in the photo
Back to the face, the pit near the toe in the right light looks "depressed" somehow
Turn the blade slightly and the depressed area disappears and you see only the pit near the bevel area
So the question is do I stay at 400 and get what I can of those remaining pits or move on to 600 and start cleaning up the scratch marks? I'm thinking another 15 minutes at 400 is necessary but I may be too much of a perfectionist.Last edited by AirColorado; 12-09-2013 at 11:15 PM.
-
12-10-2013, 08:47 PM #8Senior Member
- Join Date
- Apr 2009
- Location
- Boulder County CO
- Posts
- 1,004
Thanked: 127
Went back into the shop this morning and back to this blade. Decided to give it a bit more time on 400 and then go to 600. Once it looked like all the scratches from 400 were gone I did about 30 minutes hand sanding with 800 and 1,000 wet/dry paper. Then back to the buffers and hit it well with black, white, stainless (green), and rouge (red). Wiped it down and it looked good. Then after working on a few other projects came into to snap some pics.
My eyes must be going! It looked smooth and ready to go in the shop, but after looking at the pictures it's clear I need to go all the way back to 800 for a bit. It shines but there are way too many scratches to be anywhere near ready to go. Okay, back to the grind... Have some business to attend tomorrow so it'll be Thursday before I'll make any more progress on this one. Hopefully this is done then and I can start on scales.
 bongo likes this.
-
12-11-2013, 10:00 PM #9Senior Member

- Join Date
- Dec 2012
- Location
- Perth, West Australia
- Posts
- 1,431
Thanked: 497
Inga is looking hot !!
AirColorado likes this.http://straightrazorplace.com/workshop/18504-welcome-workshop-how-do-i-where-do-i-what-do-i-answers-here.html
-
12-11-2013, 11:55 PM #10Senior Member
- Join Date
- Apr 2009
- Location
- Boulder County CO
- Posts
- 1,004
Thanked: 127
Unless I maul her she should be a real looker! Didn't do anything to it today because I had to actually cross my property line and go do some stuff. Tomorrow she has another date with the wheels and some hand sanding. Then I have to find (or make) her scales to mate with.


 Reply With Quote