
Results 1 to 10 of 14
 2Likes
Thread: Novelty Restoration Part1
 LinkBack URL
 About LinkBacks
-
02-26-2007, 02:44 AM #1Senior Member


- Join Date
- Feb 2007
- Location
- Tucson, AZ
- Posts
- 571
Thanked: 4 Novelty Restoration Part1
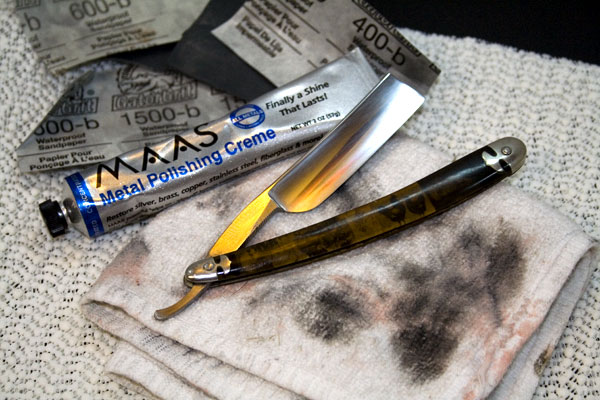
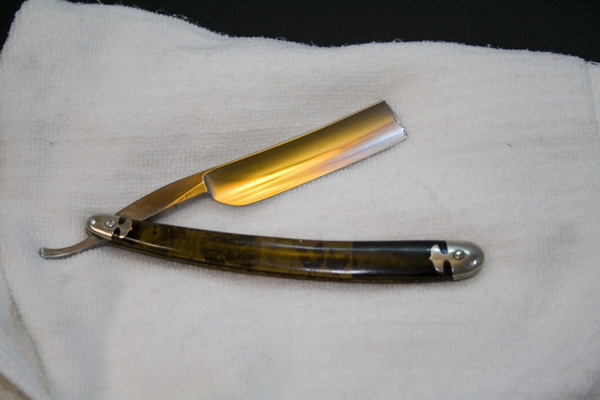
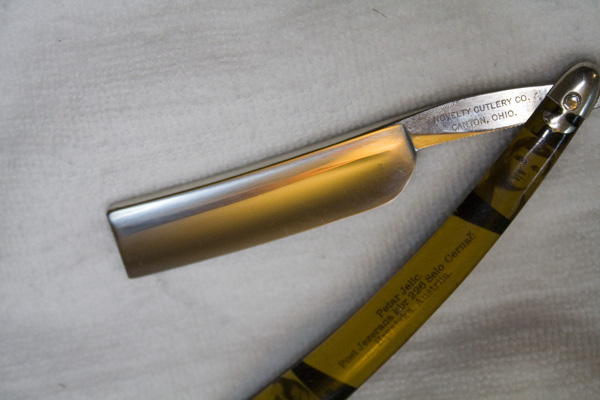
So, as some of you may remember, I got a old Canton Ohio Novelty Cutlery Co. Razor from my uncle when I first showed and interest. Well, today I decided to begin the restoration process and so I went to my local ACE to get some supplies. I was very please to find Maas for four bucks a 2oz. tube. I bought a couple just have on hand. I also bought some wet dry sand paper in grits of 400, 600, and 1500. I still need to get some higher grit to really get this baby polished up nicely, but I may have to order it as I couldn't get it at ACE. Anyway I am happy to post some picture here for you guys. They are attached below. I am still waiting on my pasted paddle strop, and my norton 4/8. Both should be in this week sometime. Once I lap my hone, I will be sharpening this baby up and giving her a try. I will let you guys know how that go it the next few posts. If you would like to see what she looked like before, then go to this thread.
http://straightrazorpalace.com/showthread.php?t=10327
If any of you more experienced guys have any tips or recommendations, please
let me hear them.
Matt
 sharptonn and Havachat45 like this.
-
02-26-2007, 03:08 AM #2Senior Member

- Join Date
- Jan 2007
- Location
- Rhode Island, USA
- Posts
- 387
Thanked: 1
Matt, nice work. That is a beautiful razor in my opinion. I love the scales. - John
-
02-26-2007, 02:19 PM #3scots hone man

- Join Date
- Nov 2005
- Location
- Landrum,SC
- Posts
- 517
Thanked: 10 nice job
well done on your restoration, and what a beauty to boot,she realy came up nice and im sure it'll shave like a champ.
Good luck,simon
-
02-26-2007, 02:44 PM #4Loudmouth


- Join Date
- Jun 2005
- Location
- Etobicoke, ON
- Posts
- 7,171
Thanked: 64
I'll definitely want to hear the results of the shave test, but don't forget to tape up the spine when you take it to the hone

-
02-26-2007, 02:52 PM #5Senior Member
- Join Date
- Feb 2007
- Location
- Tucson, AZ
- Posts
- 571
Thanked: 4
Will do, I actually hadn't thought to do that sense it wasn't a damascus blade, but it does have a slight smile to the spine, so I can see how taping will help. Thanks again for the tip. Originally Posted by FiReSTaRT

Matt
-
02-26-2007, 05:39 PM #6The Voice in Your Head

- Join Date
- Aug 2005
- Location
- North Idaho
- Posts
- 1,228
Thanked: 8
So, Matt-
The results that we're seeing - was that JUST the Maas, or did you also do some sanding?
Looks great - good job!
-whatever
-Lou
-
02-26-2007, 08:38 PM #7Senior Member
- Join Date
- Feb 2007
- Location
- Tucson, AZ
- Posts
- 571
Thanked: 4
I did sanding as well. I started out with about four or five applications of Maas just to see what would come off. Originally Posted by scarface
After I was pretty sure that the Maas had done all it could with just my rag, I moved onto sanding. I started with 400 grit, wet/dry sand paper. I work with this stuff for about 45 minutes to an hour until I was certain all the rust was gone. There was some minor pitting left, but as it was only noticeable from certain angles I decided to move on.
Next I sanded with 600 grit for probably a half hour or so. This helped to further reduce the pitting, but mainly helped to lessen the scratching done by the 400. After I was done with the 600, I moved onto 1500 grit and sanded for another half an hour or so. I then did a couple more applications of the Maas to get it polished back up.
All those years of sanding cabinets sure paid off, though we never got above 320 sandpaper in the shop.
1500 was the highest I cold get at ACE. I want to get something in the 2000 - 3000 range for finer polishing, preferably reusable. I know someone posted about an abrasive that had a cloth backing that was reusable, but I couldn't find the thread again. If you guys have any suggestions, let me know. I really have enjoyed cleaning this razor up and will continue to do more restoration as I find project razors. My Dad is letting me borrow his Dremel with all the attachments. I should be getting it tomorrow. I will probably throw on one of the polishing wheels and go to town with the maas again.
Matt
-
02-27-2007, 05:42 PM #8Plays with Fire

- Join Date
- May 2005
- Location
- Sometimes here, Sometimes there
- Posts
- 980
Thanked: 12
Looks great!
Watch those scales though. That clear celluloid rotts with time. As it degrades, the color will turn slightly yellow and you'll start to see a uniform rust haze on the blade, where the blade is inbetween the scales.
All in all a fantastic looking razor!
C utz
-
02-27-2007, 09:18 PM #9Senior Member
- Join Date
- Feb 2007
- Location
- Tucson, AZ
- Posts
- 571
Thanked: 4
So, do you think that the scales were tansparent at one time, and have yellowed over time? Should I consider replacing the scales? Originally Posted by C utz
Matt
-
09-27-2011, 12:44 AM #10Junior Member
- Join Date
- Jan 2010
- Location
- Cape Girardeau, Missouri
- Posts
- 8
Thanked: 2
no, the scales were not clear they have another scale under the celluloid it is made of brass. I think the razor looks great.


 Reply With Quote