Good work gents, Jerry the scales turned out great very nice work.
Printable View
Good work gents, Jerry the scales turned out great very nice work.
Dang fine job there Jerry :tu
And the rest of the stuff in here is, as always, top notch work fellas.
Tom the minibike is just way cool. Sure does bring back some memories
Lovely scales, Gasman. Very nicely done!
Knowing how to fix our mistakes is as important as not making them. Your scales came out quite nice.Quote:
Originally Posted by Gasman
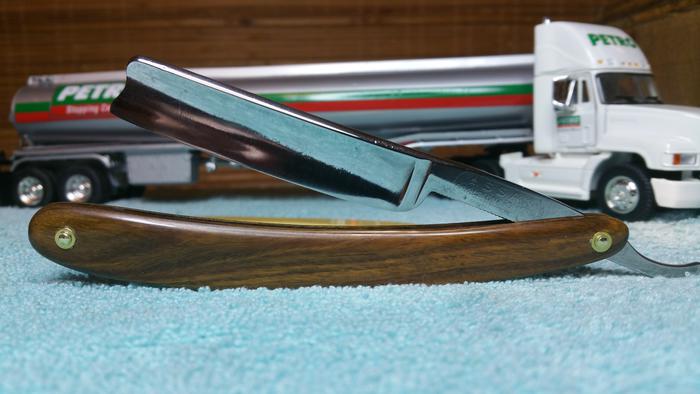
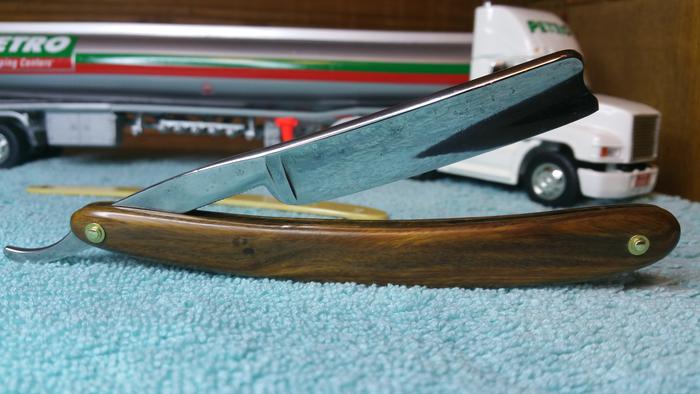
I'm working on a set of bone scales. This bone seems to have more capillaries than other similar projects I've done. I know all bone is not created equally.
I'm at he point where I'm thinking of filling and polishing to get a smoother surface. Maybe I should relax, leave well enough alone and realize it's the nature of the beast.
Attachment 261143
Once there is stain in there is can be tough to get it out, perhaps go with the flow and just get it either even or in a pattern you like. Depending on what the stain is made from as to how you can get it out. All bone is not created equal. I have gotten several batched from several sources, I know what I can easily work with and what I can't. What are you hoping for with that piece?
Rez, The stain is not the problem, its the dimples in the surface created by the tiny capillaries. I would like a smoother surface on these scales is all. Thanks, FreddieQuote:
Originally Posted by RezDog
I like the look of all the capillaries. Goes well with more rustic old blades.
Don't think you could smooth/sand it out ?
I to like to looks of the bone markings.
BTW, the shave this morning with the SSA i restored went well. As always, i think it could be a touch sharper. This is my feeling on all my blades. Guess i need to get that 20k and hope it makes the difference.
Thanks for the comments gents.
There are two paths you can take. I have wiped ca on bone and it did get a smoother looking finish and I have read that you can also use shellac to seal bone. I am willing to bet you have both of those things in your workshop. I think you should sand them to a pretty high grit before coating them. In general I use ren wax as a finish coat. I have never tried waxing them and then sanding them a little finer, and then relaxing them. It does make a difference with scrimshaw to wax several coats to fill the osteo so the ink does not go places I don't want it to.
As I understand, bone and ivory 'move' with changes in humidity and temperature.
With that in mind, sealing one side with CA or the like may not be the best thing?
I suppose if one was to do it, sealing the whole things may be best?
Always seal both sides, or it will cup on you.
@Outback I ordered the Howards restore a shine to add to my collection of stuff. I'll give it a go on the scales when it gets here. Hoping to bring up the polish/shine on these last scales I made.
Lots of nice work going on here guys. Fine work and great jobs as always.
When I used the ca I did both sides to avoid that happening. It did make for a nicer finish and I broke the scales pinning them so I have no idea about the long term.
Working on the font for the Otto etch and I tell ya men, block script that's worn or deformed is impossible to clean up in paint programs no matter the zoom level you work at.
Case in point;
Attachment 261233
The three upper sets are actual new typed characters in a variety of TTF's, and the white on black is the original image off the actual scales, cleaned up as best I could.
Realizing the total image on the scale will be quite small maybe the sins in the original will not look as bad as I fear, and I am going to run all of them onto actual stock and then let the project manager decide, ;)
They used unique spacing on the rows in the original that also were not easy to match up. For example, the upper row @ a font size of 16- normal character spacing and a lower row of say font size 6 would have the lower row too close to each other compared to the upper so I had to finesse row height as well as character spacing to get them as close as I have.
Anyway, that's what's goin on up here tonight.
:tu
High grit hones doesn't always equal a smooth sharp edge, that we all chase.Perhaps it's the hand behind the stone, don't ask how I know...Quote:
Originally Posted by Gasman
Really! I spend lots of time toning down edges. Never have seen the need for a 20k?Quote:
Originally Posted by Martin103
It must be a 6-stroke hone! :D
Same here Tom, tone down from 16 k shapton to natural usually gain smoothness.
I think it looks awesome, Mike!Quote:
Originally Posted by MikeB52
Let's keep in mind that the originals were hot-stamped!
Mostly less than perfect.
Less than perfect is authentic!
So hurry-up and do those so I can persuade Tuzi to make me a set of green ones for my Green Lizard so I can send it to you so you can do the lizard thing on them!
That! :roflmao
[emoji38] [emoji38] [emoji38] [emoji38] [emoji38] [emoji38]
I spend most of my honing time on the 1,4,8K hones, the 10, 12, and natural finishers see very little action. On the old Sheffield wedges I go 1,4,8, natural. I however do have a nice Wade and Butcher that I received in a trade with a member here, and he finished it with the 20K and it shaved nice and smooth and held an edge for a long time, still has it actually. It is a very nice razor. So the hand does have a lot to do with the finish for sure.
Think I found my new quote right there I have, hehe. True dat Tom, true dat.Quote:
Originally Posted by sharptonn
I didn't realize this job was akin to a chain letter, I will put nose to grinding stone forth with!!
Tally ho and all that..
So......Ever made any green acrylic scales, outback? :shrug:Quote:
Originally Posted by outback
:roflmao
Could I borrow that one a while? :)Quote:
Originally Posted by RezDog
The hone, I mean!
Nope, but I've thought about it.
Gonna have to replace the scales on my Genco, Gold seal eventually. The fog keeps Rollin in faster, n faster, all the time. I can wipe it off and silicone them, but its coming back and growing. Always in the open and singled out from the crowd, let's say "QUARANTINED"
But I'd have to cut them from sheet, and hand sand them like wood, only difference being of a finish. Crystal clear, satin, satin inside/ polished outside, lots of ideas for plastic/acylic.
The Wade and Butcher, absolutely.Quote:
Originally Posted by sharptonn
Yep. My Craftsman and Sta-Sharp are going North.
Give 'em to someone who can fix them!
So I am in Genco 6/8 La La Land! :rofl2:
Attachment 261237
Wait, what hone. One of my naturals. Which one.
The 20k thing!........Uh!Quote:
Originally Posted by RezDog
OH! Nevermind! Rocks are expensive to ship! :)
Oh. No, I don't have the 20K. I have a Wade and Butcher that I traded for and it was finished on a 20K. I am stuck on natural finishers. I have a few. Some are ones I shaped and others are vintage hones.
Sorry, Rez! :)
Attachment 261238
In the "on deck" circle for the burl blast blanks is green actually as a heads up.
A green swirled with the the right burls might look pretty cool I'm thinking so it's on the to cast list..
Just in case folks are interested..similar to the blue and red it shall be I expect...
This is looking AWESOME, Mike! It's true, on the original scales the letters were not perfect so I'm thinking perfect looking letters would look less than authentic? Whatever you come up with will be fantastic I'm sure, and very much appreciated. The work and careful consideration you are giving this project is amazing and I want to say another big THANK YOU! It feels pretty cool to have something of mine in your workshop/laboratory. :tuQuote:
Originally Posted by MikeB52
In the meantime, I'm going to repaint the lettering on the blade to try to get a brighter red. I'll follow (outback) Mike's suggestion and put a coat of white in the tang stamp first then follow up with red.
Make sure the white is good and dry before the red....unless you want pink.Quote:
Originally Posted by xiaotuzi
https://uploads.tapatalk-cdn.com/201...3632802d43.jpg
GAWD, Mike, those things are like neon! Where on EARTH did you............Quote:
Originally Posted by outback
Nevermind! :o
I hear you! Some razors do not like my 16K Shapton Glass hone. I have found doing 4 to 8 very light , no pressure laps on my Coti. make it shave much better & smother after the 16K hone.Quote:
Originally Posted by Martin103
Slawman
A coticule is usually the last stone my blade touches as well. My face, especially my neck, is subject to irritation if the edge is too crisp from a high number synthetic. A handful of passes on the coti after my highest synthetic puts it right in the sweet spot for me.
Nearly ready to drop the hammer.
Went with the original scan as per consensus and have scaled the dimensions to those recorded off the originals.
Trialed it out on a scrap of corian as it gives a cleaner edge than wood and filled it for effect.
Attachment 261287
And Tuzi, appreciate the fine compliments, and your patience on the job. I'm thorough, not fast, hehehe
:beer1:
Looks very cool Mike, looks aged, like it's been around for years.
Perfect, Bruv! :tu