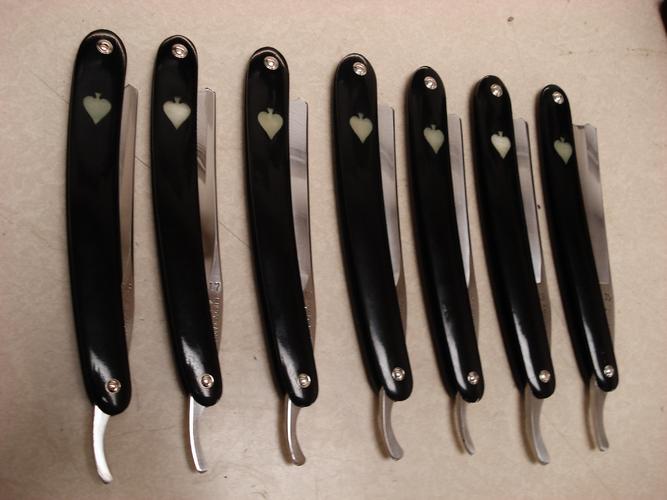
I had to work within the box, Tim. Inlaid with horn and bone.......Just had to! :shrug:Quote:
Originally Posted by 32t
Attachment 297261Attachment 297262
Printable View
I had to work within the box, Tim. Inlaid with horn and bone.......Just had to! :shrug:Quote:
Originally Posted by 32t
Attachment 297261Attachment 297262
Thank You, Rez! In appreciation of your comments, I will share a pic of your favorite brand before going to snooze...Quote:
Originally Posted by RezDog
Old Henckels in bone....
Attachment 297263
The box/swap debacle to come! G-nite! :chapeau
Henckels and carved bone!
:y
You got to hold it in your hand and wield it properly to know! :cool:Quote:
Originally Posted by RezDog
It works for me, Tom. At least u can polish CA, once cured.Quote:
Originally Posted by sharptonn
While Im waiting on scales in oil, I started on the last of MikeTs razors he sent a Gray, I assume to be from late1700- early 1800s, but haven't done a history search.
Only got as far as disassembly, and a scrubbin with a degreaser. Should be dry and ready for the iron, and sand paper, after work today.
Attachment 297267
Attachment 297268
Attachment 297269
Attachment 297270
I missed your question earlier Tom. The Case says
Case Bros
Little Valley NY
On the Back
Tested XX
That old stubtail is in exceptional condition Mike and Mike.
(Low soft whistle)
Very little hone wear. Exceptional condition, it is.
That's a beautiful old blade, Mike. And Tom, you are the undisputed King of the 7-Day Set, and the Hero of the Herders!
I'm thinking about working on a 7-Day set of Ern Ators myself (my favorite razor). They would all be Ators; each would go into a different scale material. I've only got 2 so far-time to start haunting ebay again.
Simply amazing! Seriously, those 7 days sets are over the top, and the box with inlaid bone all the way around!
Sets of razors, and awesome boxes, that's what I love.
Some day I will have some cool sets and make some cool boxes for them.
Until then please keep showing these sets of inspiration!
:beer1:
Edit: Dude. The inlaid bone box (no pun intended), sweet!!!
The lines on that stubtail are so clean. Its amazing to see something that old in such great shape. Be gentle Mike. And congrads on owning such a fine razor Mike T.
I got it on the bay a while back, it was hidden in a box among a lot. Just luck I guess, as I think people would have bid much higher knowing it was there.
Never shaved with one like this, it may be a challenge.
Mike was explaining to me scything motions/angles of blades.
Looking forward to seeing it on shave of the day and hearing what he has to say about the shave.
I'm really taken aback by his generosity in helping me with these blades, as I suggested he pick one or two to fix up, he worked on all of them!!!
Seriously there's gotta be some kind of award for such a guy!
I'm hard pressed to think of an appropriate way to express my gratitude, but I will say that he has a friend for life, and I'll be taking his example of selflessness and comradery to heart.
Thanks Sharptonn! You are an awesome person! I have 7 different blades that are the best of the best in my little collection. I will search out scale material to make the scales all the same. I plan on using a high end cigar box to house this 7 day set. You have inspired me to give it a try! I'll send pictures of before and after on I find the right scale material.
Thank You!
When i shave, i use the heal for getting into corners around my heard and to get the hollows in my neck. Most folks use the tip. Im just odd i guess. I have a blade of this era and shape. Its a different animal with no heal. When i use mine i can get a great shave but its not my standard way of shaving. Just think about how old it is and where it might have been when using it. You will love it.
I was thinking the same thing Jerry. I use the heal for my hollows. Also with sharp spike points I have a tendency to get cut. So I'll need to change it up a bit.
Made some repairs and a bunch of sanding in the scales for MikeT's, Gray.
Attachment 297337
Off to the oil, they go.!
I see that little pin to keep the wedge from spinning!
Holy bagpipes! They are beautiful! Oh man I never thought that they would look THAT good! Oh man, and they don't even have oil yet.Quote:
Originally Posted by outback
Dude. I'm excited about this one Mike!
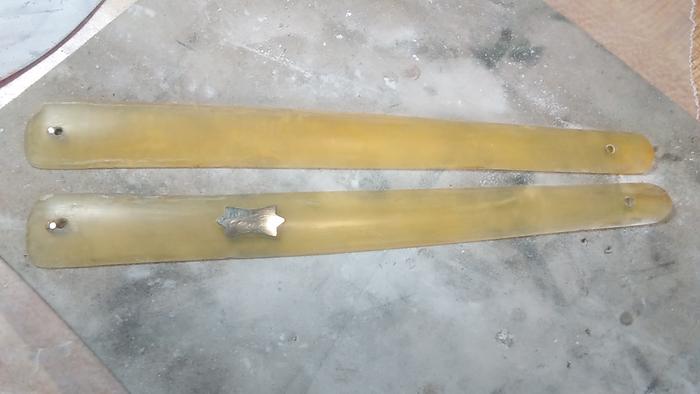
I made a set of scales. Dyed bone.
Attachment 297342
They are ready to pack. The owner will put his own pin holes in them when he gets on his Stenton project.
Their not perfect, Mike. But a far cry from what they were.
I did some rubbin on the blade, a bit ago. I believe they'll compliment each other quite well.
A bit of age n beauty, instead of battered beast, so to say.
I'm hoping you don't want it sanded in any way. To find one this old, in this condition, would be blasphemous IMHO.
Its cleaning up quite well with the 3M and steel wool at the moment, but I got a long way to go. Trust me Bro, ya don't wanna sand it. :nono:
Agreed. Best not take the character away.
:beer1:
Wow.!
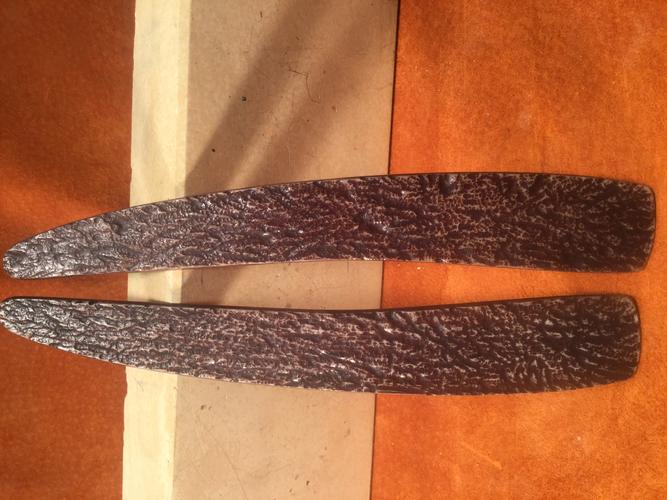
Those are cool as hell, Rez.
How'd ya do the texture, and what'd ya use fir dye.
Those have a great texture, what did you do to achieve that?Quote:
Originally Posted by RezDog
Man. Like old picbone. Remarkable work, Rez! Hat's-off! :chapeauQuote:
Originally Posted by RezDog
Righteous..Quote:
Originally Posted by MikeT
They are a combination of techniques with both a chisel and a Dremel. They are dyed with a concoction of fabric dye and vacuum experiments. I’ve been working at it off and on for some time. I finally got some decent dye penetration and a repeatable texture.
I hope you made notes, Rez! That is the coolest contemporary picbone I have seen. What is the thickness of the bone?
It started at 0.090 so I’m guessing the high spots will be really close to that. Average is likely around 0.075”.
I've been wondering about vacuum chambers for achieving max penetration with oils in scales. Sometimes the inclusions in the horn don't get oiled, so thought maybe..
I was wondering also if heat would play a role in opening up the material for better penetration of oils and dyes and stabilizing agents...?
Anybody know about this?
I had Roy vacuum oil into a bunch of chalky dry slabs at one point. It hydrated them well but they are still quite chippy, so not good for carving but the colour they became makes them look a lot like ivory. I still have some kicking around here.
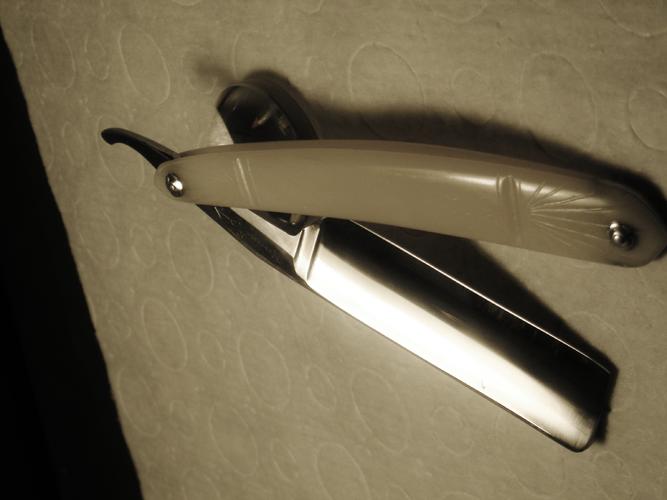
Yup. .090 overall on these oldies! Spot-on! :beer1:Quote:
Originally Posted by RezDog
Attachment 297344
Indeed, I finally got a set of Shaun's bone scales completely saturated past summer.Quote:
Originally Posted by MikeT
They spent a few weeks soaking on the dashboard of a derelict Suburban out in the sun.
Worked great!
Attachment 297345
I was looking online at the set ups that are used for stabilizing, maybe I didn't see the right website, but they didn't look right.
Basically, a tube like this with sanitary ends, with the clamp on ends, one with a valve connected to vacuum pump.
Have a trough inside holding the oil, put the scales inside next to trough, close it up, suck down the pressure, let the temp raise back up (or actively heat it), and then tip it over to spill oil over scales.
Let it soak in, relieve the pressure, soak some more, and your done!
Does that sound right?
Attachment 297346
Looks like something under the sink!
Could be? ..............I figure the ones on the dashboard went through a cycle a day........Hot and not so badly hot!
That was a fun project.:tuQuote:
Originally Posted by RezDog
I think maybe I'm over complicating it.
Best just to get a cheap starter kit, put the wood in, suction it down until the bubbles stop..
Any picks of your systems?
:)
Is it better just to send out to someone with the set up and skills already?
That has been my approach Mike. I had a vacuum pump from past jobs already, so I just ordered a small container. If I had budget for tools right now I might order a stronger vacuum pump. Mine struggles to get 25 inmg and the better ones will do 30. There is tons of information on dying and stabilizing wood.
Didn't work out well for me for wood stabilization ( probably due to poor sealing, cheap parts, super soft wood) but I've heard of people using large glass jars with a brake bleeder for DIY vacuum chambers.Quote:
Originally Posted by MikeT
Ive never done this myself but would a hand pump like that really work?Quote:
Originally Posted by JP5
I have a hard time seeing a hand pump doing the job. I've worked with vacuum pumps, high and low pressure systems big and small.
But seeing the info online, it looks like it can be done very cheaply, except the vac pump would be the biggest purchase.
Maybe the hand pump would be sufficient, but Rez did he got to 25, that's not too much under 30, and he said it may not have been enough.
What do those hand pumps pull?