Why are you using another example for your pattern?Quote:
Originally Posted by JellyJar
You are attempting to make custom scales..............
Printable View
Why are you using another example for your pattern?Quote:
Originally Posted by JellyJar
You are attempting to make custom scales..............
So did the Packwood not have scales or not have appropriate scales?
I’m not sure I would go with the point on the pivot end, however if that is what was original, I probably wood. I am not certain there is enough scale under the heal. It looks very close. You could make a mock up with cheap wood not fit for scales just to make sure it is all good before you push forward with your good material.
I would definitely mock it up with tongue depressors glued double up, (my go to for mock up).
I too think the pivot is a bit too long/pointed and wide. and the belly a bit thin. It may be uncomfortable to strop and shave. Though I know the design is similar original.
If you are looking to match original, then go for it, but now is the time to make any design changes. There are many good pics on this site of vintage Packwood and Sheffields of the time, that you can take measurements from for scale and pin placement.
Nice scale material is that Masecraft tort ice? If so, it is nice to work with, though a little floppy, polishes nicely.
Attachment 305084Attachment 305085
Just dug a peanut out of my 2 yo daughter's nose!
Attachment 305089
She is in a much better mood now. :D
What a good dad.
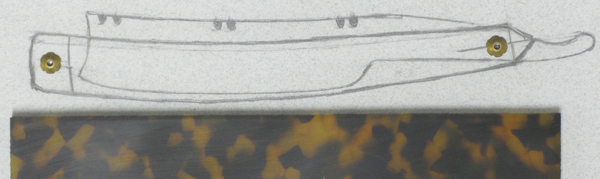
32T - Post #4 on this thread https://sharprazorpalace.com/razors/...stubtails.html is what I'm using for a pattern.
Rezdog - No, original scales. They were pretty..umm..interesting. https://sharprazorpalace.com/show-te...f-my-list.html
Euclid 440 - Tongue depressor mock up will be my next step.
I think you're right about the width at the pivot and the edge being a bit close to the bottom of the scale. I'll make some adjustments.
Yes, I'm trying to replicate the shape of originals. You're pic is another great example of the scale pattern I'm going for. I haven't been getting measurements from the images on the site because they don't have rulers in the picture. :gaah: I just realized I can size the image using the length of my blade...wow sometimes my brain is a bit slow.
The scale material is tortoise Kirinite I got from USA Knife maker (https://usaknifemaker.com/kirinite-t...-material.html). It's a bit thicker than I'd like at 3/16", so I'll need to do some thinning. I've seen other scales from Kirinite, but haven't worked with it before. I've heard it can be a bit brittle, so I'm hoping it will be ok with the flex when opening/closing the razor. If it can't handle the stress, I'll try a spacer instead of a wedge.
Thanks to all of you for your feedback. This will be the second set of razor scales I've made, so I'm still finding my way through the steps. Appreciate the help.
I wasn't sure how aggressive I should be at the beginning. 220 is the coarsest wet/dry paper I've have. I got some progress in the first couple of minutes and just continued till that piece was done. I noticed some grayish slurry forming, but I suppose that could have been the paper dying. I don't have any 60 grit. Do you think 3M 80 grit with "sharp, synthetic minerals and strong resins" would get me there?Quote:
Originally Posted by Euclid440
After the first couple of minutes
Attachment 305099
After first sheet
Attachment 305100
If thats an arkie you got a long way to go. Those thing are hard as hell!
The lower the grit the more aggressive, loose grit is more aggressive than sand paper. You have a high spot along the middle and all that and the edges will have to be removed before you get to the bottom of the low spots.
Do yourself a favor, GotGrit.com. (Grit and Pitch/ Silicone Carbide). For $15 you can get a ¼ pound assortment of 60-500 grit Silicon Carbide and get it to you in a couple days.
Get a Steel cookie sheet from the Dollar store and sprinkle a teaspoon on a wet cookie sheet on a flat cement floor. Use your body weight to make it flat, add ½ teaspoon as needed.
You can do it on sand paper, but you will be there a LOT longer and go through a LOT of sand paper.
Smoothing is easy, flat is work.
Good advice, thanks.Quote:
Originally Posted by Euclid440
Much cheaper using loose sic, too.
As advised starting with loose low grit SiC will flatten arks in no time.
What have you marked your stone with ? Looks like Sharpie pen. If so the ink can absorb into a stone to varying depths giving you false readings.
I always use an 8B pencil just barely touched to the stone. Hate to lap off more than needed.
If you truly have a high spot in the middle it may be easier to flip the stone & try the other side. It's tricky to flatten otherwise as you will always be rocking on the high centre.
Sounds like loose grit is the way to go.
Yep, sharpie. Found the suggestion in a post. Didn't think about the ink soaking into the stone.
Not sure if the cleared grid from top right to bottom left is really a high spot as it matches my hone stroke with 99% of the blades I've had on this stone. Might be a polished area that didn't hold the ink. Good idea flipping the stone, that side has never seen steel.
On a hard ark the ink will not absorb into the stone. You should spin your stone every few laps to even out the pressure.
And no, those are high spots, not your hone stroke.
I also remark the stone a few times, to make sure that you are grinding the stone and removing the sharpie marks and it is not just the slurry removing the marks. Once the stone is flat all marks will come off in a few laps.
With loose grit, pencil will wash off quickly with the slurry.
Yes, it is easier to lap the flattest side, but if you do both sides, you can have a progression by burnishing one side. It is really not that difficult with loose grit.
Yes, as Marty said, be sure to rotate your stone after a bunch of strokes. Helps keep the wear area moving as its hard to make the preasure even with your hand.
Trying to turn one of these;
Attachment 305197
Out of this, freehand without anything more than the above pic for reference.
Attachment 305198
Slapped the green on just for fun before I final sand and shape.
Didnt quite get the curve radius right, looks more grenade than beehive.
Hoping for a worn mottled green before I seal it up.
First try..knots a 26 mm 2 band bulb, very dense.
Pencil won't wash off waterstones. Don't know about arks as I never bothered with any grids on arks as the lapped area is obvious , at least to my eyes.Quote:
Originally Posted by Euclid440
This might be true, but the slurry you bring up while lapping will rub it off.Quote:
Originally Posted by onimaru55
Mike, I think I like the more elongated look better. The knot looks good too.
Just hasn't been my experience using a soft 8B pencil & I apply it with 2 fingers :shrug:Quote:
Originally Posted by Gasman
I agree with this depending on the matrix of the stone.Quote:
Originally Posted by onimaru55
I used a sharpie on a no name flea market find.
The ink didn't soak in much but when the hone was flat it just touched the top of the low spots. There was still ink in those areas even though the surface was flat.
Rather than waste my time etc. to lap the ink out I decided it was a lesson learned and for the time being I have an "ugly" flat stone.
In a few more years and lapping the ink will disappear! :D
Did a quick experiment tonight. Put a pencil grid on the same side as the sharpie and spent a few minutes on some 80 grit. Pencil was gone in the same areas as the sharpie, so I don't think the sharpie will hang around. But even if it does I figure it will only affect it's looks. I then put a pencil grid on the other side and it wasn't really any flatter, so I'll stick with the one I started on.
Checked the website for the loose grit and I couldn't find the kits (the kits they had were specifically for mirrors and seemed a bit pricey). Single item purchases of the different grits in 1/4 and 1/2 pound packages is pretty reasonable. I'd think a 1/4 pound should be sufficient, but not sure. I've got a small medium ark that I might do once the memory of this one has dulled. So maybe a 1/2 pound?
:OTQuote:
Originally Posted by JellyJar
Several years ago I'd done some honing at the kitchen sink and had rinsed my King 1200, Norton 4/8 and Naniwa 12K off and had them by the faucet drying and my son's girlfriend went to wash some dishes and accidentally got a few drops of oil on the 4K side of the Norton. :gaah:
She quickly grabbed the Dawn, squirted some on and started scrubbing with a nylon bristled brush under a trickle of water. Well she got most of the oil but----for months my 4K had bubbles while lapping and honing. She was so apologetic. The sudsy bubbles didn't seem to harm nor hurt my honing.:shrug:
The bubbling finally stopped.:rofl2:
As for razor stuff, didn't get much done this last weekend. Friday night was a date with my wife for our anniversary, Saturday I took my son to a parkor competition about an hour and a half away and got back kinda late, Sunday was getting the regular weekend chores done.
I was able to get my W&B and Weyhand honed up and got a first shave on the W&B. Not the best shave/not the worst. I think I need to refine the edge a little. But, that will wait until l re-pin the pivot. The blade is closing off center to the right, while it was acceptable to get my first shave in it's going to drive me buggy if I leave it. The Weyhand is next weekends stubble remover of choice.
Got a bit done on my Packwood scales tonight. Tweaked the pattern a bit and did a quick mock up with tongue depressors. I think the pattern will work out pretty well. Hopefully, I'll get the pattern on the scales and get them rough cut for this weekend.
:rofl2: Ok, that's funny. Reminds me of when my son spilled a half bottle of orange concentrated dish soap on our blue carpet. Spent weeks trying to get it out with a carpet cleaner. The foam just kept shutting the cleaner down. We finally just gave up and moved the couch. :shrug:Quote:
Originally Posted by cudarunner
Ok, back to working on stuff.
They don’t sell a kit for honing stones, they are set up for grinding lenses. A ¼ lbs of each grit from 60-500 is just under $15 and will do several stones.
You will use more of the 60 but still a ¼ lb is enough to do a few stones. You will only use a teaspoon or two of the finer grits. Then go to wet and dry, after 60 grit is goes fast, you will remove all the sharpie on an ark.
Thanks Euclid440, will order up this week and save some shoulder strain.
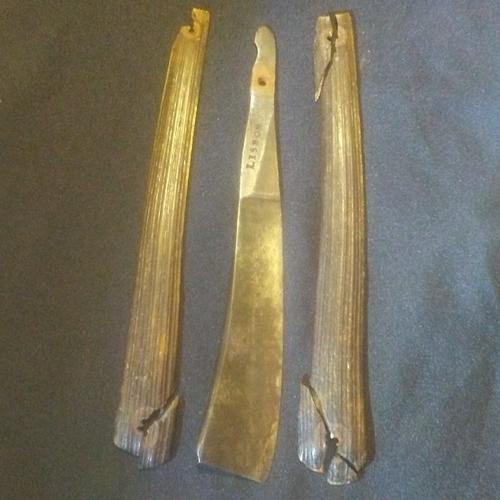
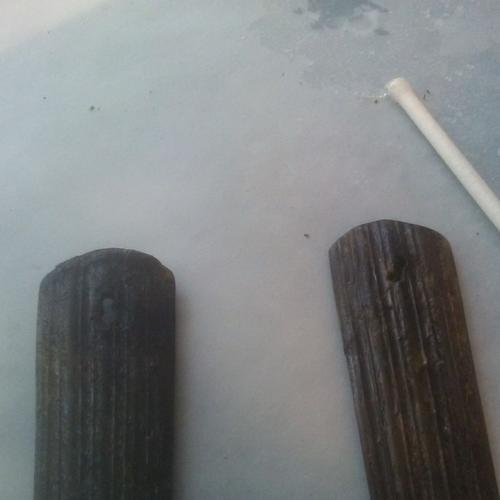
Started work on this Lisbon stubby.
It has the somewhat corrugated horn scales.
When I dismantled it, it broke into pieces.
So I cleaned every piece with mild degreaser, and CA glued it together.
Not too bad. I'll then very carefully sand, trying to keep the sharp edges of the ridges/grooves, and try to patch that missing piece at the pivot if I have time today.
Attachment 305455
Attachment 305456
Attachment 305457
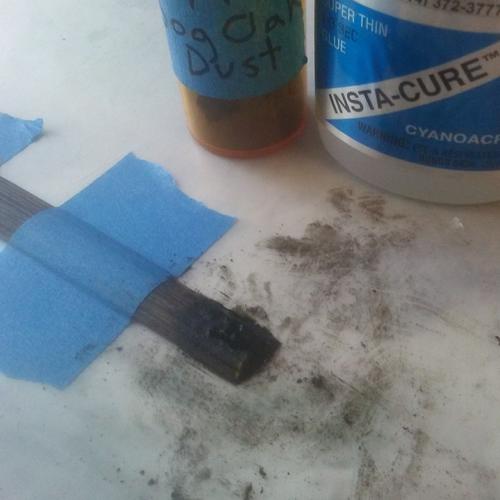
Got a bit more work done.
Decided to try out packing with Bog-dust and dripping CA into it, instead of bog-epoxy.
We will see. I assume sanding CA will be harder, but maybe not.
One benefit is that I won't have to put a thin layer of CA on after epoxy for the shine.
Wasn't too hard, but it sinks down with the CA so repeated fillings..
Attachment 305458
I'm wondering if you might need a bit of a thin liner on the inside of those scales to give strength to those mended pieces.
After all that work to only have it all go to shite when you go to pin would be 'unpleasant' at least in my opinion.
Thanks Roy, I was wondering the same.
That would be terrible!
Had to stop, taking my daughter out to bbq.
Will get some work done tomorrow.
Fiberglass liner? Something else? I've got limited supplies.
Could order.
I've never done any scales with liners--Fellow Members How About Some Help!
Outbacks fiberglass layers would work well. And it very thin.
Hands down the thinnest liner is the style outback mike does. You can get g-10 around 1/32 of an inch, thinner if you shop around.
Yes I think you guys are right. 3/4oz. Fiberglass.
Gotta order it online, shopped around and nothing in the area.
Actually I was quite surprised to learn that there's also no woodworking shop in the Charleston area either.
I dyed some scales for the first time last night, used black beard dye.
Also purchased some powdered dye to experiment with.
The dye was brown in color, thought I purchase the wrong one, very strange, it works very well! Black as it gets!
I know what ya mean Mike. My first dye job was also brown in color. But it turned black after some time.
Make sure you get marine resin epoxy, not bondo for your fiberglass liners mike.
Want to, must avoid styrene in the reaction or they will crack in time.
Most automotive mixes have styrene, marine ones don’t.
Styrene makes the cure never stop hardening. Ergo, they will be become brittle and crack again, in a few years, regardless of care.
Good luck!
My current project is a black/white pair of big old Wade and Butchers, one a Celebrated Hollow Ground, and the other a Diamond Edge. I just finished one in black horn with brass dome collars, and a camel-bone wedge lined with .010 brass sheet. The other one is its mirror image, and will be scaled in Austin's camel bone with a brass-lined horn wedge-so opposites. Sorry no pics-I get in the zone in my shop and forget, just too lazy, whatever. I'll post pics when I'm finished.
Oh, and these are my 1st lined wedges (after some experimentation and cussing!).
Thanks Mike, lots of epoxy down at the boat yard, though not the 3/4oz glass, never use that lightweight stuff.Quote:
Originally Posted by MikeB52
I'll remember that about the poly-something-styrene (forgot the long name). Good to know.
Looking forward to seeing those wedges!Quote:
Originally Posted by ScoutHikerDad
I need to make a couple wedges, and am debating what to do. Every time I tell myself just do something simple to get it done.. Then I think "but I want to make a sandwich!".
Also have some other non-sandwich "composite" wedges in mind.
One thing I've been thinking about today is how to give the wedge more width to show off a cool wedge, while keeping the correct taper angle, BUT not so that the blade rests too deep down into the scales.
I've got an idea for that (not the vertical protrusion seen on some old celluloid scales). The idea is taunting me.
Standing by A A Ron