You got it, I was referring to the scale material. Sorry, I guess I could have been clearer.Quote:
Originally Posted by RezDog
Printable View
You got it, I was referring to the scale material. Sorry, I guess I could have been clearer.Quote:
Originally Posted by RezDog
I am guessing if you have enough to two sets of scales you could do a different finish on each half and get four different looks. I’d like to see how the appearance changes from one finish to the next.
I might have enough left to do a thinner set with less curve. I couldn't quite get two sets out of this pattern, it was like 2-3 mm off every way I tried. What I was thinking was taking one of the small scraps and just photo it after each grit/polish combo. The smaller piece would be faster to run up through the grits. If that sounds good, I could get the pics up next week for sure, maybe this weekend.
Euclid440-HUGE THANK YOU! :bow
Got the grits in a couple days ago. Started with the 60 grit tonight and got both sides of my black ark almost done - only took about 35-40 minutes. I've got a 1/2 inch spot left on one side to finish off. I had things cleaned up and put away when I noticed it, so I'll finish it off tomorrow. Time to relax with the family.
Time to get back to some projects.
Here's my first time taking scales apart without mangling them. :D
Attachment 305833
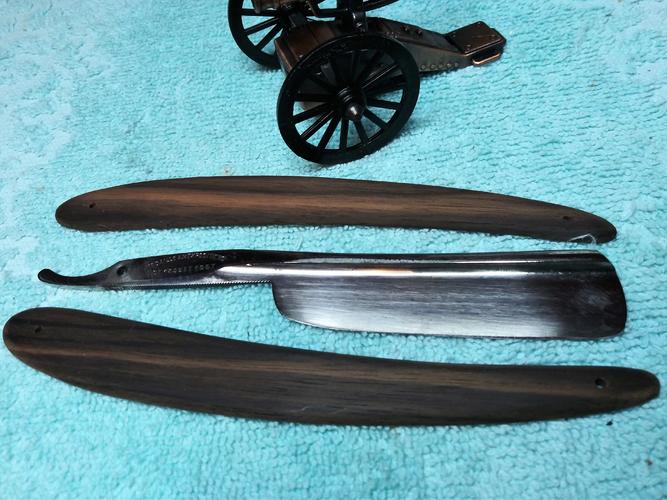
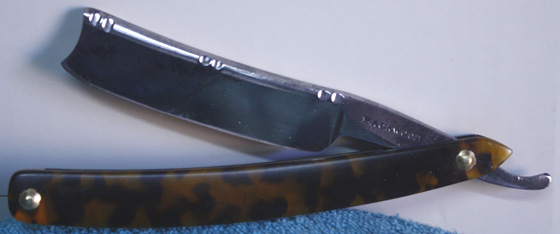
That's a big ol' Mappin. Time to see if that old razor can be shined up a bit.
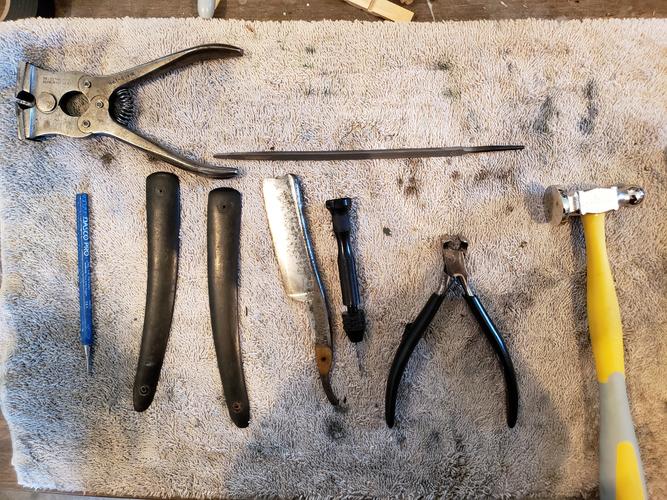
Where did you find that brute of a tool in the top left of the photo?Quote:
Originally Posted by sonnythehooligan
I believe it was Cudarunner who was recommending these.
If I'm not mistaken these are for cutting piano wire, but it works great for brass rod.
You can get vintage ones on Ebay- they are called Starrett cutters. Some go for a little dough, but I got mine reasonably priced.
Congrats on removing the pins. Hope you didn't put many gouges on the scales with those clippers. It can be tough to do without any marks left over. I don't see a roll of tape. Tape helps this marking on the scales.
Thanks!
That little black drill did most of the work (not sure what those are called). Once I got the pins drilled down far enough, then the collars and washers pop off on their own. Then I use the big cutters to snip off the ends of whatever brass rod is showing, then finally pull the cleaned up rod through with the smaller set of flush cutters. I had to take a file to it once or twice and got lucky- no marks. I'll remember the tape next time, good recommendation!
Well, this is going to one of those razors that has "character" and a few battle scars.
Removal of the devil's spit has revealed the pitting underneath. I'm going to keep sanding for now (I work by hand) but if I'm not seeing any progress I'll just leave it be. There's no spine wear and it has a tiny bevel so it should shave well.
Sometimes it just dont clean up as well as we want. Your on the right path. Just go slow and easy. Enjoy the process.
I've got way more razors with character, than I do pristine.
And like it that way. Clean um up, hone um out, and enjoy shaving with a relic that puts the smack down, on any cartridge razor.
Agreed. This should be a fun one to bring along.
I knew before I started that the devil's spit had set in pretty well, but this is a Mappin For Barbers Use and I don't see many of them. I figured it would be worth a little effort.
Sonny-You're really making me want a Mappin! And I hear ya on the devil's spit. "Well, that doesn't look too bad; it should sand right out.....um, wait." I'm starting to let some of the old Sheffields I favor that come across my bench with battle scars keep some of them instead of chasing perfection. Myself, I don't have the skills of a guy like Karl, and am always barely a step ahead of carpal tunnel, so I try not to do too much hand-sanding if I can help it. Let us see the finished product.
It is pretty typical that black rust hides pitting. How deep it runs is impossible to tell ahead. Most of the ones I have restored I just left the pitting. It’s a lot of sanding to chase it all out. Essentially you need to sand the entire blade to the level of the pitting. That a lot of metal to remove in most cases. Once the black rust is removed it will not progress, and I think it looks better. Some leave the black rust, and that’s a choice too.
Im with ya Aaron. My hand scream at me for days after sanding blades. Karl does his main sanding with belts I believe. Sure he does hand sanding too. And you will notice most of the blades he does are near wedge. Lots of steal to work with so it can take a lot of sanding. He is a pro restorer for sure.
The hollow blades cant take a lot of sanding. My collection is full of pitted blades. I like the battle scars. As long as they are cleaned out well.
That’s is a good point Jerry. I did wreck a nice full hollow razor trying to chase out the pitting. I wound up getting the blade so thin it was floppy.
I don’t think anyone has a secret way of going a regrind without a ton of hand sanding. Even new grinds require a fair amount of hand sanding.
I got a need to make some scales since I haven't made any in a while. Madagascar Ebony scales, Bone wedge, and 7/8 French Faux Frameback blade. I put in an order for a few collars from Austin. Right now the scales are just shaped and sanded to 320 grit. Next I will get a couple coats of CA on the insides. I'm thinking of the Tru-oil on these and hope it brings out some of the wood grain.
Time to get out the hones for the rest of the night.
Attachment 305883Attachment 305884
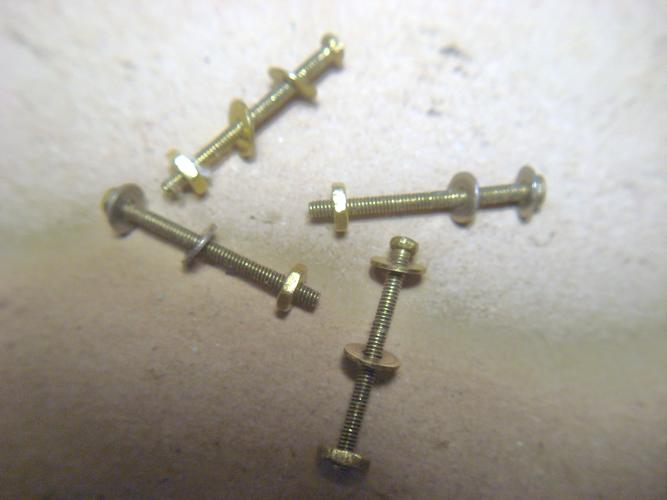
Jerry-Where do you get those twist bolts? Seems like they would be a lot easier to use than the micro-fasteners I'm currently using for mock-up.
Here's where I got mine.
https://www.ebay.com/itm/Miniature-s...d=173185245907
Sure look like the same ones.
Yep, I got mine from Tom, but that link is where they come from. They are big but easier to use for sure. I keep wanting to order up a couple more sets but haven't got around to it.
Yeah, That is Sorin, the collar guy!
I tried them, they do work well. Esp if making scales, I would think.
I prefer the brass microfasteners nutsy-boltsies for the type of stuff I do.
I have about given away and worn mine out. Anyone have some to peddle?
Be happy to send ya a few Tom. Sending PM. The nuts and bolts that is. I have a few I can spare.
These are what I use & they're from Micro-Fasteners
Attachment 305901
Weird crap, I suddenly stopped receiving email notifications from the group for 2-3 months until suddenly this morning, I got one.
Here are the scales with the first coat of Tru-oil and the blade after removing and blending in the hone wear. One pic of the hone wear before I started. The other side was worse but I didn't think to get a shot of it...
Attachment 305909Attachment 305910Attachment 305911Attachment 305912
A difference of 0.013 from toe to heal on the spine thickness. Not too bad. I've seen a lot worse with no hone wear.
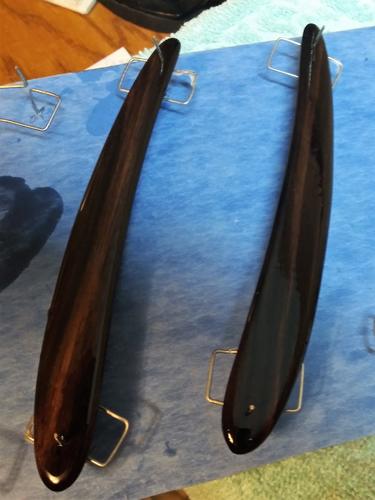
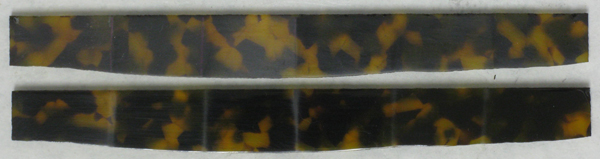
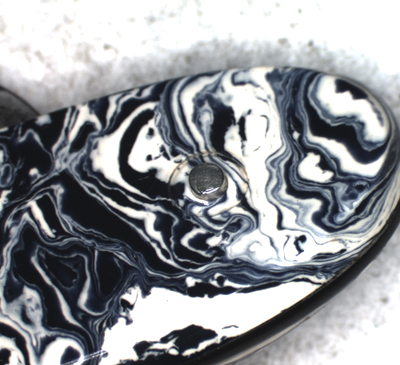
There seemed to be a little bit of interest in seeing a sanding/finish progression on the tortoise kirinite I'm working with for my Packwood. I decided to mask off areas of the leftover material and sanded the sections to 400, 600, 1000, 1500, 2000, and 2500. Then I hand polished one with simichrome followed by maas. I hope the different finishes are somewhat clear, the lighting was really messing with me. The differences are much clearer in the hand. My hope is this would help someone get an idea of what type of finish they want to go with if working with this material in the future, but the lighting/photography might limit it.
Top piece is without polish. Bottom piece is with polish. 400 on the left, 2500 on the right.
Attachment 305925
First pic is light through the 2500 end, second pic is light through the 400 end.
Attachment 305924 Attachment 305923
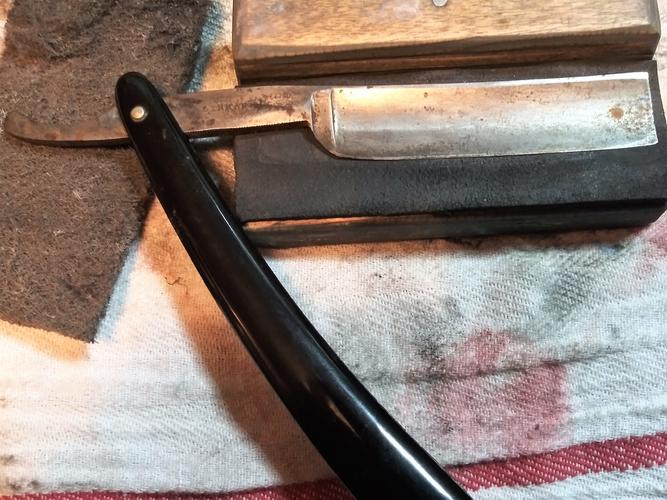
I had an hour before I could think about going to bed so I dug this razor out. Washington Cutlery Co. King of Whiskers. German blade, full hollow. Same shape as all my Imperials. I started on the face but then thought I'd better grab a couple of pics. Hone wear, rust, heavy patina, hooked stabilizer. I'm going to put it up for this week but I will need to unpin it to clean out the pivot area and get the gunk out of the inside of the scales. Should clean up but still have some battle scars, and end up as a decent shaver. It said King, so I had to have it. 12 bucks shipped on eBay. :y
Attachment 305932Attachment 305933
This is after an hour working on the face, tang, and spine.
Attachment 305934
You can see the tail is still rusty.
And found a few warts. The no re-pinning plan might be changing.
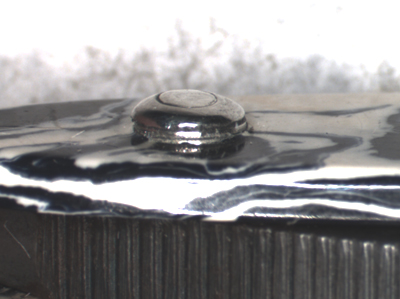
So I was doing a bit of light clean up on the Geneva I posted in Show and tell and noticed one of the collars was missing on the wedge end. I started looking closer and I'm not sure what kind of pins/collar set up this has. The opposite wedge pin has one collar that looks like it's part of the pin. One pivot pin is the same as the wedge pin with the collar and one looks like it has a washer and collar. On closer inspection today, there is a little space on the wedge side with the missing collar that I can close with finger pressure. Any info on this type of pin/collar set up. I think I need to at least re-pin the wedge and I really don't want to mess up the scales. Could I slip another collar over the pin and peen it down? Not sure how the collar even went missing. It definitely had one, you can see the dent in the scale. I also suspect there is a bit of rust on the tang around the pivot, combined with the different collar set up has me really considering a full disassemble and get the collars matching.
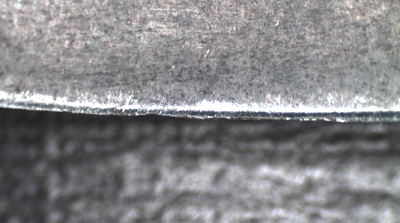
I also checked the edge with a microscope and noticed the heel end is rolled over, so it'll need a bevel re-do.
One additional little thing I noticed that shouldn't affect the performance, but I find a little interesting. Not sure how to describe this...the stabilizer grind on the right side, at the tang, extends out away from the tang and is chipped out. It's like the stabilizer didn't get finished all the way to the back of the blade.
Ok, I've got a bunch of pics I hope clear up some of my probably less than clear descriptions.
First is the missing collar, second is the remaining collar on the wedge, last is the washer/collar on one side of the pivot
Attachment 305965 Attachment 305964 Attachment 305963
Damaged edge at the heel (8X and 16X)
Attachment 305962 Attachment 305961
The missed grind area at the stabilizer
Attachment 305960
And in less razor related working on things, I've gotten to 1000 pages in this thread. I will catch up to this monster...
Nice! Looks like it's going to clean up really well.Quote:
Originally Posted by Gasman
What is the material on your razor holding block? Leather? I'm planning on making one and am deciding on materials. I've got some red oak left over from a shelving project and was trying to decide if I should leave it wood only or put some kind of pad/cover on the surface. Leather came to mind as I've got some of that left over from some other projects as well.
Yes you generous man you gave me a set. Once again, Thank You.Quote:
Originally Posted by sharptonn
You are most welcome, Tom!
If it's sitting around, better use for it! :)
I seem to have worked on piles of razors with these....
Getting 'threadbare'? Still working! :D
Attachment 305981
Tom, have you found an easy way to get those nuts threaded? I’m always fumbling with mine, I keep thinking I should get the coupling nuts as they seem like they would be easier to thread onto the rod.
I operate on thick paper-towels. If it falls, it usually sticks.
Yes-fumbling.
You must understand that I fumble with hardware for a living! :)
As they get worn they fall into place better.
I don't make scales, but use vintage stuff.
It was hard to see what I was accomplishing (or not!) with the big ones.
I tighten them with large tweezers....
The material on my jig is craft foam. Its about 1/16" thick and with the magnets underneath it pulls the edge down into the foam. Just a little extra protection for my fingers. I had a piece glued down but had to change it once. Not i just sit a piece on it and it stays good enough. A buck or two at wally world and you got enough for a long time.
Tom, i dropped the bolts and nuts in the mail on Monday. So you should see them by this weekend. Happy to help. You have done so much more for me. Im happy i can finally help you. Even if its just a little. This time.
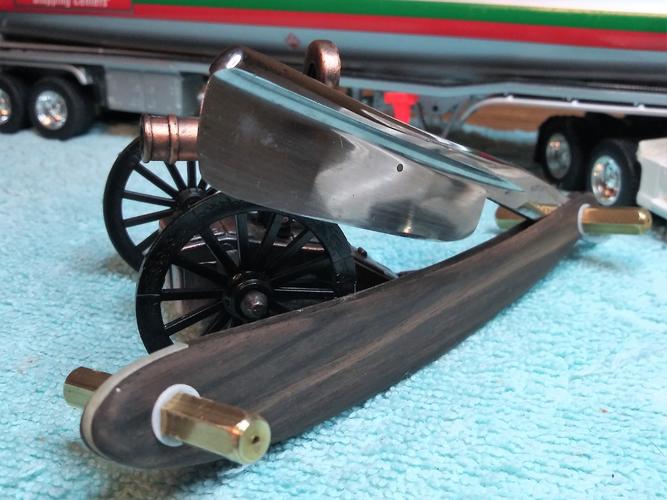
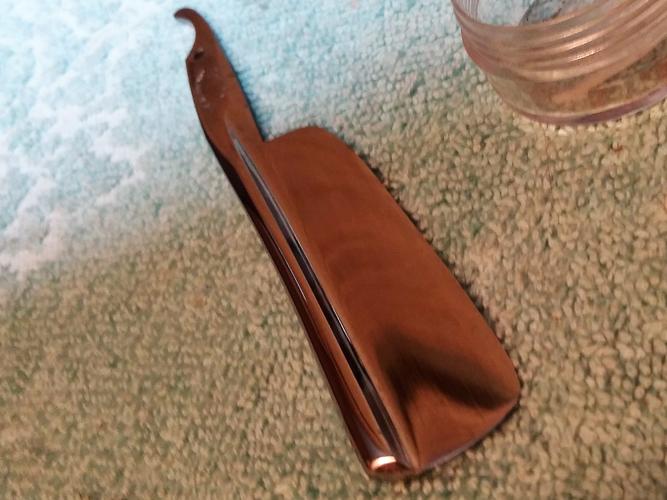
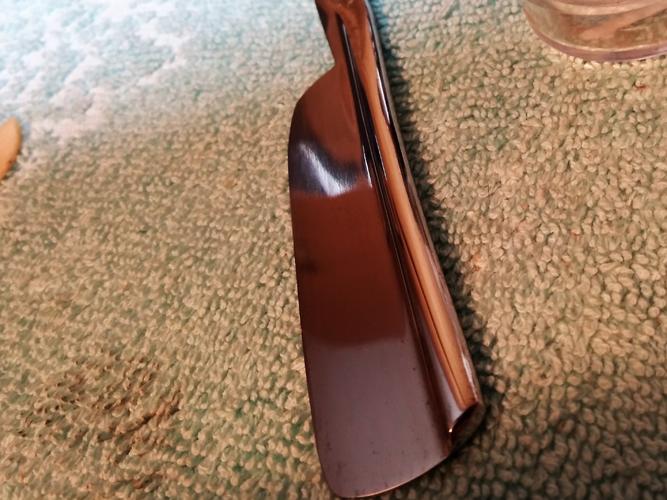
Just about finished with my second set of scales.
I was a bit worried about breaking the scales when I pinned it. My son and I are fans of the Forged in Fire show on the history channel. I've seen kirinite break several times when contestants pinned it. Granted they were using 1/4 inch rod and 3 pound hammers, but still made me a bit worried. I test pinned a piece of scrap with no collars and really beat the snot out of the pins - not even a hint of breaking.
I'm not super happy with the wedge. I really like the look of the brass/lead sandwich (first time I've tried this), but it's barely a wedge and the taper is uneven from top to bottom. The scales do open up when closing, so it seems to be functional. I also wish I'd made the wedge and scales a tad longer to add more weight to get the balance closer to the pivot. The balance point right now is about at the W in the Packwood tang stamp. The position of the collar would also look better farther from the end. In the future I'll be making my scales longer than I think they should be and sand them to final length after fitting the wedge.
The scale thickness is a little uneven from side to side in a couple of spots, so room for improvement there. I really liked the look of this kirinite with the full polish, but it didn't work for me with this blade. I went with a 2000 grit no polish finish and am pleased with the overall look.
Next is honing, finish polish the pins, and get them closer to the collars. I want to wait on the pins in case it loosens up during the honing. I haven't honed a near wedge yet, so I'm expecting a bit of an adventure. The really handy honing angle spread sheet I found on one of the threads is giving me an angle of 18.1 degrees with one layer of my tape and 18.7 degrees with two layers. I'm thinking of starting with two layers and moving to one. Does this sound like a good plan?
Attachment 306107Attachment 306106
Attachment 306109Attachment 306108
Attachment 306105Attachment 306104
IMO, a slight tapper from top to bottom on a wedge is a good thing. I agree about the pin location on the wedge. Father in would be better looking but I've done some very far out, close to the edge so as long as they sit right. Starting with 2 or evan 3 layers of tape to get the bevel set is normal. Helps to work the edge and not as much steel. Than move to less and a wider bevel. The perfect angle on a near wedge can also mean a wide bevel so keep that in mind. Nothing wrong with an 18 or 19 degree bevel. Sure it will shave differently but its a big chunk of steel. You don't want a 1/2" wide bevel just so you can have 17.5 degrees.
We are our own worst critics when it comes to restoring. I think you did a great job!
How does the taper of your wedge compare to the taper of the tang?
It seems to me that there is a strong relationship there.
I would see how you like the shave with two layers of tape, and of course how even the bevel is will show how even the thickness of the blade is along the edge.
The tang taper and wedge taper are pretty similar to my eye. The tang might have just a bit more taper than the wedge. The tips of the scales ride along the tang when opening with the center of the scales pinching slightly together when the blade is in stropping position. The opening and closing movement of the scales is pretty similar to other razors I have. Not sure I worded all of that in the clearest way, hope it's at least understandable.Quote:
Originally Posted by RezDog
This is my first wedge, so I'm really looking forward to seeing how it shaves. I think my biggest fight will not rushing things. Good idea of trying the shave with two layers and then deciding. I think I'll at least give it a test pass after two layers.
The establishing the initial complete apex is the key in every honing job. Without it you have nothing. A loupe is how I decide if it is complete or not. If you are uncertain of that let me know because there are threads with very good visuals to set you straight.
I've got a 10X loupe and have been using it frequently with my honing. The JaNorton challenge thread really helped me improve my honing. The micro-chipping thread was also really helpful. I actually got the bevel set this afternoon. Two layers of tape was the ticket, it came in right on the bevel that was already on the blade. After I thought I had it set, I went a bit further just to make extra sure I was good to move on. I'll work up through the stones over the next couple of days. Thanks for the help.