
Results 11 to 19 of 19
 11Likes
Thread: First Restoration Project
 LinkBack URL
 About LinkBacks
-
01-25-2014, 12:42 AM #11Senior Member


- Join Date
- Feb 2013
- Location
- Haida Gwaii, British Columbia, Canada
- Posts
- 14,444
Thanked: 4828
wet sanding will help get the scratches out some and then if I want a mirror finish I will start with polish and steel wool. You can use steel wool or the synthetic they both produce the same thing, and after progressing through the steel wool go to straight polish with a micro fiber cloth, If you want a satin finish polish with the steel wool and then go back to 2000 and slide the paper lightly over the surface in one direction and avoid any up and down. Spine to edge and it will become matte quite fast.
scotishcavalir likes this.It's not what you know, it's who you take fishing!
-
The Following User Says Thank You to RezDog For This Useful Post:
Hart (01-25-2014)
-
01-25-2014, 12:55 AM #12Senior Member


- Join Date
- May 2011
- Location
- Ipswich, Australia
- Posts
- 481
Thanked: 64
This razor is looking like it will be a nice restore when finished. Congrats on what you have achieved to this point.
The fine lines look like lower grit sanding lines that need to come out to get that true mirror finish. This finish is quite difficult to get right if that is what you're looking for.
I think you will need to go back a couple of grits in the sanding to get rid of those lines. The general rule of thumb is to only change grit when all the lines from the previous grit are gone.
Other restorers with better knowledge/experience will soon come in and advise you on this.
Good luck and keep us posted, this will be a fine razor in the end.S4m likes this.RickyB
-
The Following User Says Thank You to RickyBeeroun222 For This Useful Post:
Hart (01-25-2014)
-
01-25-2014, 02:20 AM #13
It is looking really nice!
I sure HOPE it takes an edge...
You did check to see if would BEFORE you did all this hard work right?
I ask this because I have done it before...
-
The Following User Says Thank You to Chevhead For This Useful Post:
Hart (01-25-2014)
-
01-25-2014, 03:03 AM #14Shave This

- Join Date
- Jan 2014
- Location
- Pickering, Ontario
- Posts
- 1,036
Thanked: 183
Hehehe, I did but not until after I had done two grit levels of sanding did I think of it. I ran a few strokes across the DMT I use for lapping and the bevel showed up well against the scratches and looked even on both sides. I'm thinking of taking off some of the blade width towards the toe, it's wider there as is and it would balance the smile a bit. Not much, and it would follow the spine a little more. Originally Posted by Chevhead
 Chevhead likes this.
-
01-26-2014, 02:25 AM #15Shave This
- Join Date
- Jan 2014
- Location
- Pickering, Ontario
- Posts
- 1,036
Thanked: 183
What grade of steel wool? I tried 00 and it just skated around without doing anything good or bad Originally Posted by RezDog

-
01-26-2014, 02:46 AM #16Senior Member

- Join Date
- Feb 2012
- Location
- Menominee,MI
- Posts
- 1,624
Thanked: 325
Usually at about the 1k level I start sanding dry and finish each grit with WD40. Usually at about 1500 it is getting hard to see the scratches maybe you didn't remove the scratches from the previous grits. but at 2k I would try using a metal polish and a rag. A few minutes with that will tell you what else needs to be done fast. If it looks good when you give it a few minutes with the polish then I would continue with the polish for awhile. If there are still deep scratches the polish won't remove them and you will be able to see them alot easier. Good luck and keep us posted. Also is that a crack in the blade in the 2nd picture or just a thread from the background?
-
The Following User Says Thank You to JSmith1983 For This Useful Post:
Hart (01-26-2014)
-
01-26-2014, 04:33 AM #17the deepest roots


- Join Date
- Feb 2011
- Location
- Seattle
- Posts
- 1,221
Thanked: 169
I've got almost the same exact razor. I haven't restored it yet, but my front side scale is completely gone. Broken off at the pivot side and somehow punched through the wedge side because of the issue you've found on yours. You'll have to tell us how it shaves!
-
01-26-2014, 05:49 AM #18Senior Member
- Join Date
- Feb 2013
- Location
- Haida Gwaii, British Columbia, Canada
- Posts
- 14,444
Thanked: 4828
I use the synthetic and couldn't tell you the numbers. I use the white first and then the blue. I never bother with the green because its about the same as 2000 grit. I use Mothers polish and the synthetic together, and then just the Mothers. Makes for a nice polish. You can go straight to Mothers and get the same results it just takes a little more elbow grease.
IndependenceRazor1 likes this.It's not what you know, it's who you take fishing!
-
The Following User Says Thank You to RezDog For This Useful Post:
Hart (01-26-2014)
-
02-24-2014, 06:49 PM #19Shave This
- Join Date
- Jan 2014
- Location
- Pickering, Ontario
- Posts
- 1,036
Thanked: 183
What it might have looked like:\
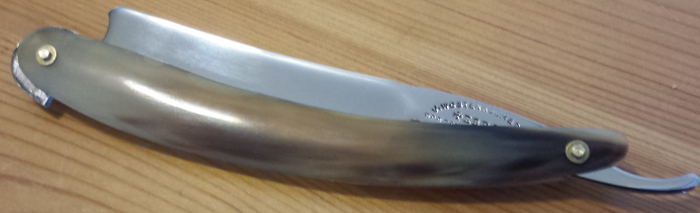
Do to a lot of delamination and some warping I'm not going to use these scales. I wanted an idea of what it might have looked like, so I put the old wedge in with some screws. The delamination was not apparent until later in the shaping of the scales, maybe that allowed the horn to open up. I decided to finish them up any way, for the sake of experience. I took the picture from the best angle to hide the delamination, the other side is much worse. Too bad, these pieces had a lot of character. The scales and the blade are shinier than the slightly fuzzy pic suggests.


 Reply With Quote

