Results 1 to 10 of 14
Thread: My first razor clean-up attempt
-
05-20-2014, 08:56 PM #1
 My first razor clean-up attempt
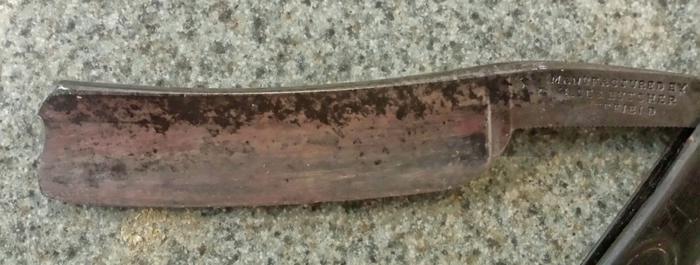
Well, it's high time for me to stop being a wuss, so I girded my loins, took a deep breath, and got to work. I selected this W&B to be my first victim...uhh...patient:

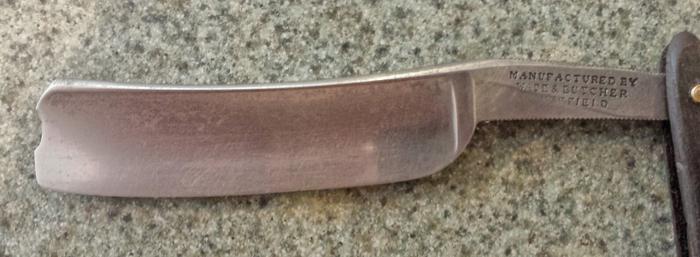
And after a surprisingly short time, I had this:

I'm pretty pleased, though it doesn't compare with the work I've been inspired by here on SRP.
I left some of the pitting toward the spine because I was afraid of messing up the geometry. Will that be a rust problem, so long as I keep the blade dry and oiled? And I wanted to leave the stabilizers and imprint as crisp as possible, so I didn't hit those areas as much as the blade faces and spine. I didn't remove the scales even though they will have to come off because of a crack at the pivot, so the jimps and tail aren't polished. Oh, speaking of polish: I haven't used any yet, but I have some Flitz that I'll use next.
Thanks to ultrasoundguy2003 for his encouragement and advice!Last edited by Dzanda; 05-20-2014 at 09:33 PM.
When you are dead, you don't know that you are dead. It's difficult only for the others.
It's the same when you are stupid.
-
05-20-2014, 09:12 PM #2

It appears that your loins are well girded....
How do the scales look?
What are you using for an abrasive?
Looking forward to seeing your progress.
Smooth Shaving...Support Movember!
Movember https://mobro.co/markcastellana?mc=1
SRP Team USA https://moteam.co/srp-usa?mc=1
-
05-20-2014, 09:48 PM #3

Thanks!
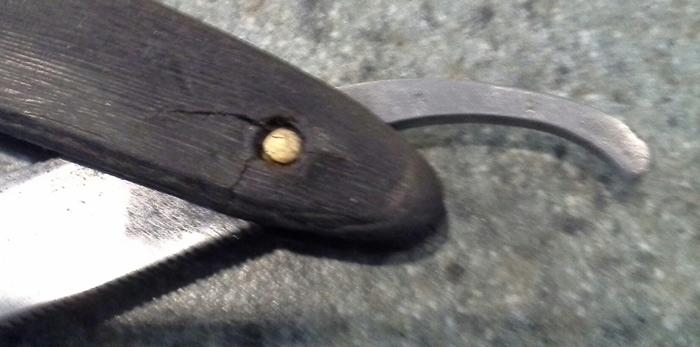
Here are the scales after several days soaking in pure neatsfoot oil; they were dry as a bone, and the crack was inconspicuous at first...that's NOT a crack in the first photo. It seems that the pivot was pulled partway through the back scale, and the damage is more of a longitudinal split than a through and through crack (I couldn't get a shot that shows what I mean):


I used what seems to be a fairly standard abrasive schedule: I started with wet/dry sandpaper, 220/400/800/1200/2000, but I used the 1200/2000 dry then with WD40. Then I switched to steel wool and WD40, 0/00/000/0000.Last edited by Dzanda; 05-20-2014 at 09:56 PM.
When you are dead, you don't know that you are dead. It's difficult only for the others.
It's the same when you are stupid.
-
05-20-2014, 10:03 PM #4Senior Member


- Join Date
- Jun 2013
- Location
- Pompano Beach, FL
- Posts
- 4,049
Thanked: 636
Not bad work. Those spots near spine should not be a problem as long as you dry it we'll. As for the finish it looks good. It is personal preference as to leave some patina of polish it the a shine. Can't see the crack at the pivot poi t. You may want to tea some epoxy or super glue for now. Good luck.
-
05-20-2014, 10:21 PM #5

Dude you rock. I am proud of you. You should be proud of you. Remember this looks really good. Now think about this, You are only going to get better, faster and have more confidence with your next project. Also you will have a better idea of how much work is involved when you look at other razors in similar condition.
Kudos and good work, Now share with others so that the art wont be lost.
-
05-21-2014, 01:01 AM #6

Thanks!
Yeah...I usually prefer a satin finish over a mirror finish. And I think that preserving some of the blemishes sometimes gives the razor character that is ablated by a mirror-like shine. What I really don't like is a blade who's edges, etching, etc. are soft and blurred from buffing. Don't get me wrong, though...I've seem some ultra-shiny restorations that leave me slack-jawed and drooling!
I'm sorry that you can't see the crack...it's readily apparent on my screens.When you are dead, you don't know that you are dead. It's difficult only for the others.
It's the same when you are stupid.
-
05-21-2014, 01:11 AM #7

I think you did great,
if that area at the pivot is not through and through you could possibly stabilize it after removal.
Then re-pin with washers large enough to span the hole after filling and re-drilling.It is just Whisker Whacking
Relax and Enjoy!
-
The Following User Says Thank You to pfries For This Useful Post:
Dzanda (05-21-2014)
-
05-21-2014, 01:13 AM #8

Looks very nice great work.
RogerHave a great shave.
Roger
-
05-21-2014, 09:38 PM #9
 STUPID SUNLIGHT!
I took the razor outside after hitting it with some Flitz to see how it looks in natural light. BIG mistake! The good light revealed lots of super fine scratches!!
So, what's my next step?
- More work with the 0000 steel wool?
- More Flitz?
- Rubbing compound?
- Stop taking razors outside?
When you are dead, you don't know that you are dead. It's difficult only for the others.
It's the same when you are stupid.
-
05-22-2014, 03:44 AM #10

Yeah about that.... I had to go to powertools. Specifically a dremmel . Nothing fancy.10pups told me to go to Home Depot. Check online first for your store they will give you isle and bin spot so that you can go straight to it. You want polishing compound the variety set start with the black, then go through each color. Put polish stick inside a coffee can and apply it to the dremmel.(cuts do on spatter)Dont park in on one spot too long. Scratches disappear. Wipe off and then use flitz. Wipe down with either denatured alcohol or I just use 91% rubbing alcohol.
Big boys use buffing wheels, I am not there yet.
Oh and change your felt wheel with each compound change. No cross contamination. I save the felt disc with the appropriate polishing compound in a snack size ziplock baggie so they stay together,for you next project.
Lastly be careful near the edges, and watch which direction wheel is spinning so it doesnt yank the blade out of your hand.
The cervix is dilated and the head is crowning, one last push, you can do this.


 33Likes
 LinkBack URL
 About LinkBacks


 Reply With Quote


