
Results 1 to 10 of 10
 27Likes

Thread: A really simple setup for photographing razors.
 LinkBack URL
 About LinkBacks
-
08-28-2014, 09:02 PM #1Captain ARAD.


- Join Date
- May 2011
- Location
- Pacifica, CA
- Posts
- 2,474
Thanked: 2227 A really simple setup for photographing razors.
This thread is intended to be a place for tips and setups that help to get better pictures.
Initially, I'm going to just post the relatively simple setup I've made. Later I'll go into why it works and what it's doing. Hopefully, people more knowledgeable than I will also chime in.
For now though, here's my setup:

It's very simple. Some lumber, wood screws, cardboard and heavy brown paper.

That's a side-view.
I screwed the lumber together, glued cardboard over the gaps to form a semi-sturdy base, then glued an attractive, thick paper over top of that. Originally I thought I'd use just the paper, but later on I thought it'd look better if I put a sheet of plexiglass on top. From there I've kept modifying it. until I arrived at my current setup.

Here's the basic shape of what I'm currently using.
The surface is a sheet of plexiglass that I bent, then used an orbital sander on the back-side of. That gives it the milky-but-still reflective look.
The steel rods are to support a cloth draped over the whole thing, like so.

The binder clips pinch the fabric around the rods so they don't leave black lines in the reflections. The plexi on top is so I can set the lights on it.

I'm using cheap clip-on lamps and 800 lumen, 6500k balanced LED bulbs. The bulbs are a bit more expensive than a CFL, but they'll last a LOT longer and they don't get even as warm as that. If you're going to follow what I've done, I highly recommend CFL bulbs at a bare minimum, because otherwise the lights will melt that plastic.
Here's the whole setup powered on:

And here's a couple of razors inside there, photographed with my cellphone (an Iphone 5, but any modern smartphone should be in this general ballpark).

(Note, I actually had the lamps more side-by-side than lined up when I took that picture).
The idea behind all this is to control two main things:
- The lights! When I take pictures, I turn off all the other lights in the garage so that all light is coming from the setup.
- What's reflected. The 'stage' is what you directly see, but the draped fabric (a $9 yard of linen I grabbed at Joanne Fabric, but anything white'll do) is what is reflected.
Having a contrast between what's behind the subject and what is reflected on the subject is what makes the picture interesting, and it's primarily the lights that do that.
There are zillions of setups for lighting products. Many of the razors I've photographed, I've photographed purely by pulling the blinds in my office and letting the east-facing SoCal afternoon be my light source. As a general rule though, diffused lighting is better.
When I get a chance I'll try and go over some of the theory on all this and why what works, works.-Zak Jarvis. Writer. Artist. Bon vivant.
-
The Following 13 Users Say Thank You to Voidmonster For This Useful Post:
Baxxer (08-28-2014), carrolljc (08-30-2014), ErieSurfer (12-05-2016), Geezer (01-10-2015), HARRYWALLY (08-29-2014), JimmyHAD (08-29-2014), jmercer (01-10-2015), Neil Miller (08-29-2014), nipper (08-29-2014), RezDog (08-28-2014), sharptonn (08-29-2014), spazola (08-28-2014), Wolfpack34 (08-29-2014)
-
08-28-2014, 11:23 PM #2No that's not me in the picture

- Join Date
- May 2013
- Location
- Los Angeles South Bay
- Posts
- 1,340
Thanked: 284
Thanks Zak. I've recently just been using afternoon light like you've said, mainly cause I'm too lazy to set the light box back up.
But one thing I noticed with my CFLs is I would get what I assume is 60 Hz lines on my screen and in the picture. But sometimes it wouldn't. Not sure if it's a faulty lamp or not. I'm using ones like yours.Voidmonster likes this.I love living in the past...
-
08-29-2014, 12:16 AM #3Captain ARAD.
- Join Date
- May 2011
- Location
- Pacifica, CA
- Posts
- 2,474
Thanked: 2227
In theory, CFLs shouldn't be subject to AC frequency noise. I'm pretty sure the phosphor coating inside the bulb doesn't have a really sharp on/off state -- they fade in and out (for values of fade that are fractions of a second). Originally Posted by RoyalCake

LED bulbs are definitely instant on, instant off -- to the point where most are dimmed not by varying voltage but by cycling the power up over 100khz.
Got any pictures that show the banding you're talking about?-Zak Jarvis. Writer. Artist. Bon vivant.
-
08-29-2014, 12:22 AM #4No that's not me in the picture
- Join Date
- May 2013
- Location
- Los Angeles South Bay
- Posts
- 1,340
Thanked: 284
Thanks. I'm definitely not a sparky so I have no idea. Originally Posted by Voidmonster
I don't have any pictures right now but I'll try to snap one...I love living in the past...
-
08-29-2014, 12:24 AM #5Captain ARAD.
- Join Date
- May 2011
- Location
- Pacifica, CA
- Posts
- 2,474
Thanked: 2227
I'm just taking quasi-educated guesses here. Originally Posted by RoyalCake
 RoyalCake likes this.-Zak Jarvis. Writer. Artist. Bon vivant.
-
08-29-2014, 12:42 AM #6Senior Member

- Join Date
- Mar 2014
- Location
- Finger Lakes region of New York State
- Posts
- 532
Thanked: 49
I apologize for being of topic, but I'm quite taken with that rosemary razor. Is rosemary the name of the company or the model? A quick forum/internet search turned up nothing for me. It's a very good looking razor.
Voidmonster likes this.“To be fair, I did have a couple of gadgets which he probably didn’t, like a teaspoon and an open mind.”
-The Doctor
-
08-29-2014, 12:48 AM #7Captain ARAD.
- Join Date
- May 2011
- Location
- Pacifica, CA
- Posts
- 2,474
Thanked: 2227
It's a 1920's or 30's era Solingen-made razor. I don't really know much about the brand (which was presumably 'Rosemary'), but this particular one is a bit mangled. The picture doesn't show the extent of the rust and pitting. Plus, the scales are outgassing celluloid, and I've been too lazy to rescale it. Originally Posted by tedh75
That basic blade style, with the worked spine, was (I'm pretty sure) a blank that many Solingen companies used. I've definitely seen the exact same floral design on the spine of many other razors from the era.
However, if you ever find one that's in good shape, they're nice shavers and very attractive. I got this one to be a beater I could haul around on vacations without worrying too much about losing it.32t likes this.-Zak Jarvis. Writer. Artist. Bon vivant.
-
The Following User Says Thank You to Voidmonster For This Useful Post:
tedh75 (08-29-2014)
-
08-29-2014, 02:27 AM #8Senior Member


- Join Date
- Apr 2008
- Location
- Essex, UK
- Posts
- 3,816
Thanked: 3164
Flourescent lights are a big no-no for this sort of subject, and for photography in general - at least that was the case when I earned a crust from full-time photography! Originally Posted by RoyalCake
The reason is because they do not cover the full wavelength, mostly. In practical terms that means that there are 'gaps' in the spectrum of visible light they emit. The cycles per second (hertz) are not constantly the same, so you cannot determine where a gap is going to be, so in some frames you get banding or blackout while other frames are evenly illuminated.
A long shutter speed generally took care of this, but then you invited the phenomenon of 'reciprocity failure' to mess things up... meaning that a very slow shutter speed coupled with a very small f stop is not the same as a very short shutter speed at a very wide f stop, even though the two theoretically let in the same amount of light.
Another reason was that if you had two or more striplights lighting a scene, then the flickering (cycles per second) would not match, and light drop outs and banding affected even more frames. Using a light meter didnt help much either- it either measured when there was not a period of drop outs and when you set the camera and took the picture a drop out occurred, or vice versa and you got a very overexposed frame.
The last reason was the awful colour cast they gave, usually greenish yellow, great fr zombie pics but not flattering for humans...
All this in the days of film cameras and strip light flourescents ratber than digital and compact flourescent lights. I doubt that the Laws of Physics have changed, though...!
The simplest way was to get a few old hotshoe flashes with decent guidenumbers, and either bounce the light of white boards or slabs of polystyrene to diffuse the light, or use a light tent like Zak's, if you dont mind a little less diffusion (you can always double up the netting to get a bit more diffusion).
If one flash has a slave setting so much th better, you will then only need a cord to fire off one flash while the slave sensor fires the other. Get flashes that match the synch setting of your camera, and you are ready to go, you dont even have to make any adjustments for colour temp as flash is daylight balanced.
I have always used pro flash heads on stands, one bounced off a white board and one shot at the scene through a translucent white brolley. You get some modelling from the diect light this way. If you need more modelling just move the direct flash a bit closer.
If you did not have a flashmeter then it was a bit of a chore working out the camera settings. The guide numbers and distance of flash from object help for direct flash, but as we use indirect and diffused heads a roll of film shot at various settings was necessary.
Its a piece of cake nowadays with digital as you see the results immediately, then you just erase the duff shots.
Regards,
Neil
-
The Following 5 Users Say Thank You to Neil Miller For This Useful Post:
Crawler (10-17-2016), ErieSurfer (12-05-2016), RoyalCake (08-29-2014), tedh75 (08-29-2014), Voidmonster (08-29-2014)
-
08-29-2014, 02:43 AM #9No that's not me in the picture
- Join Date
- May 2013
- Location
- Los Angeles South Bay
- Posts
- 1,340
Thanked: 284
Thanks Neil - that's a wealth of info!
I know nothing about photography except that when people that do know about it, the pictures are amazing.
But I've been told many times that you've got to have good light and quality optics.I love living in the past...
-
08-29-2014, 05:20 AM #10Captain ARAD.
- Join Date
- May 2011
- Location
- Pacifica, CA
- Posts
- 2,474
Thanked: 2227
I was really hoping you'd have something to say here, Neil!
An earlier version of the setup I have here just had pieces of paper towels held onto the lamp shades with binder clips.
I took this picture with that version of the lighting rig:
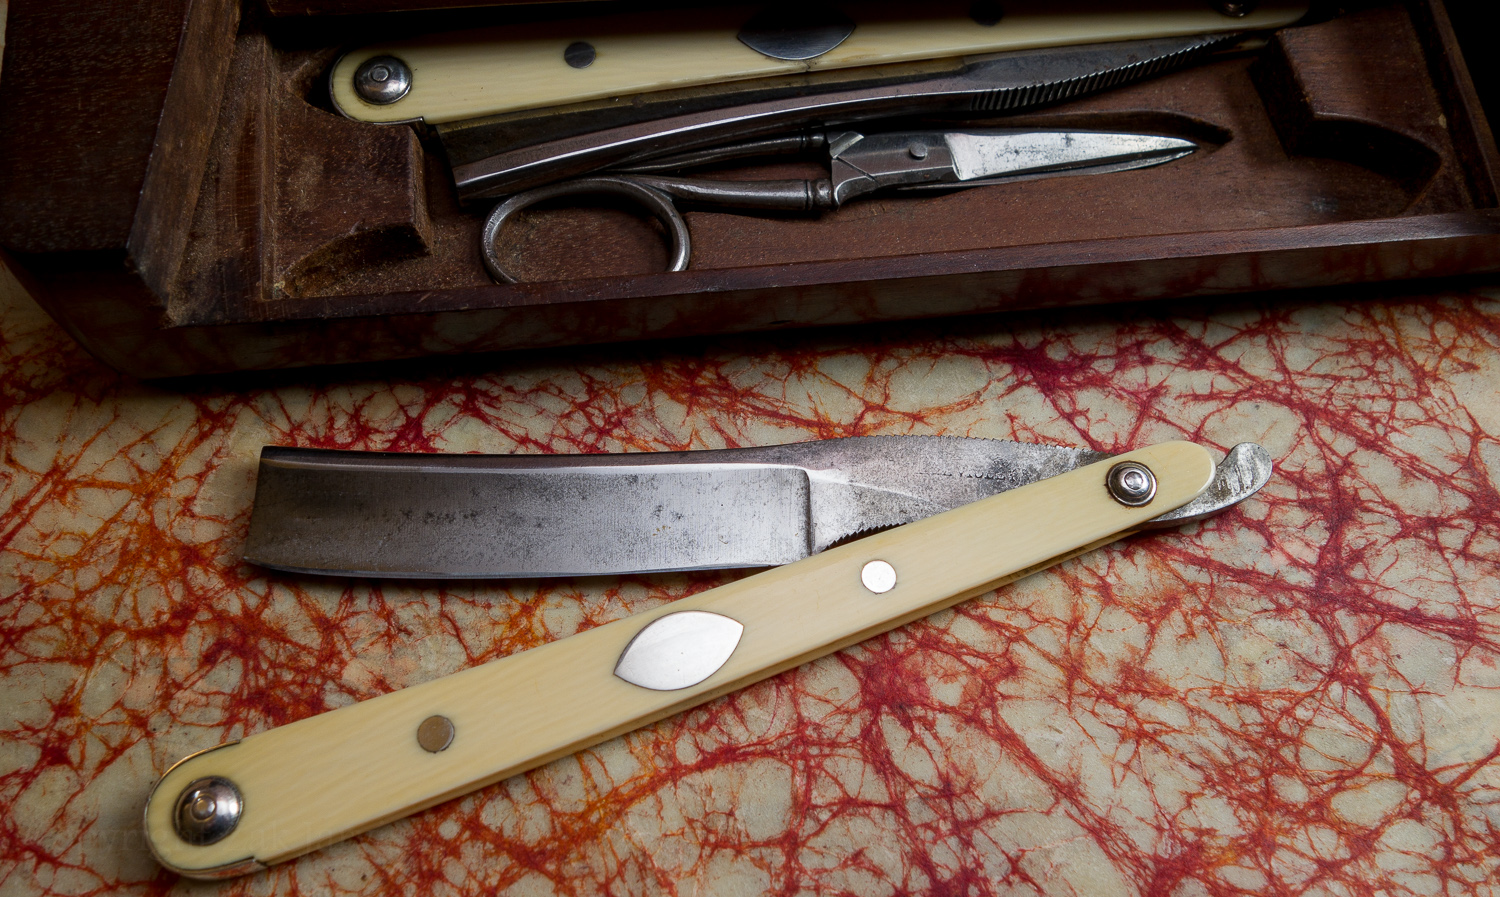
The stage is a piece of handcrafted paper I bought from an art-supply store. It was a fancier camera, but up to a point, the lighting setup makes a bigger difference than the quality of the camera + lens. At least for web-sized images.
Print is a different animal entirely.
I've experimented with a variety of diffusers, but Neil's suggestion of bouncing the light off white cards is excellent! You'll maybe need more powerful lights for that, but it should make really lovely diffuse light.
The goal of the lighting depends a lot on what kind of effect you want.
Photographing etches is a little bit different, because you want to have something heavily contrasted to what's in front of the camera for the bright parts of the etch to reflect. It should be very uniform.
If I get a chance tomorrow I'll try and set up something to demonstrate.-Zak Jarvis. Writer. Artist. Bon vivant.
-
The Following 2 Users Say Thank You to Voidmonster For This Useful Post:
ErieSurfer (12-05-2016), tedh75 (08-29-2014)


 Reply With Quote