
Results 1 to 10 of 14
 22Likes
 LinkBack URL
 About LinkBacks
-
12-23-2014, 02:02 AM #1Senior Member


- Join Date
- Sep 2014
- Location
- Connecticut
- Posts
- 173
Thanked: 43 Secret to cleaning ridges on tang?
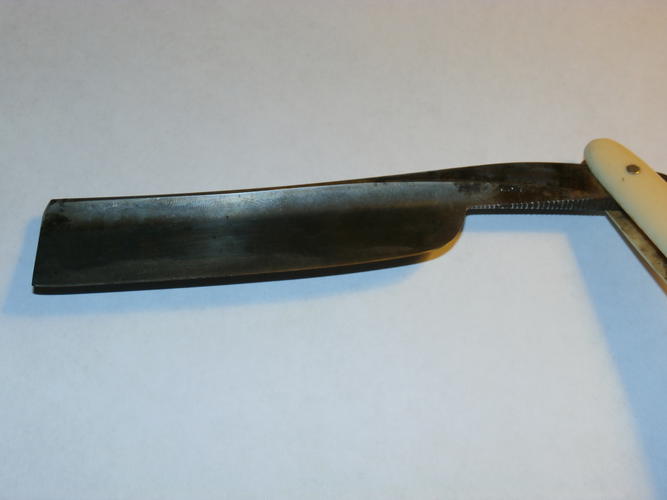
So, title pretty much says it. Bonus pic of my latest project, 13/16 electric company and the rust in the ridges of the tang.
 sharptonn likes this.
-
12-23-2014, 02:18 AM #2At this point in time...


- Join Date
- Jun 2007
- Location
- North Idaho Redoubt
- Posts
- 27,037
- Blog Entries
- 1
Thanked: 13249
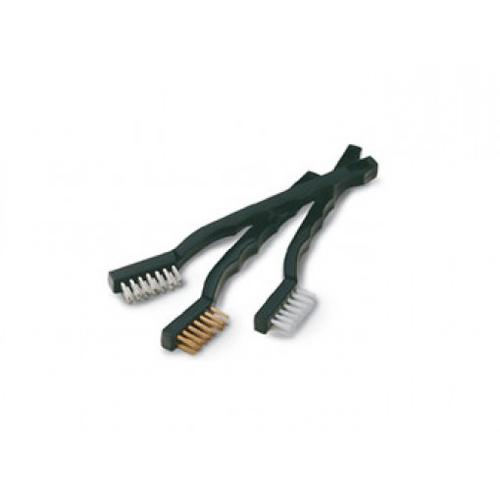
A Brass and/or a SS gun cleaning brush works for me
These
Last edited by gssixgun; 12-23-2014 at 02:20 AM.
-
The Following 3 Users Say Thank You to gssixgun For This Useful Post:
57vert (12-23-2014), DoughBoy68 (12-23-2014), sharptonn (12-23-2014)
-
12-23-2014, 02:28 AM #3Razor Vulture


- Join Date
- Oct 2010
- Location
- Lone Star State
- Posts
- 26,121
Thanked: 8612
Yep. Keep the dremel wire brush off the area near the blade! (don't ask me how I know!) and use a combination of those brass brushes and a toothbrush with polish, even Comet. By hand is best. The dremel wire brush wears the jimps down.
Brass is best!
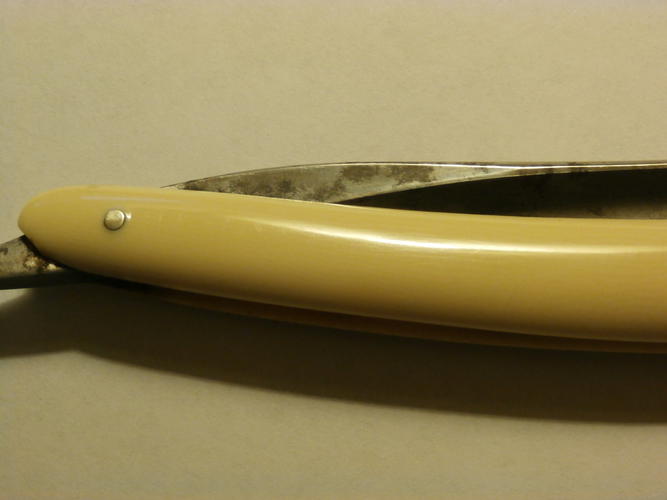
Oh! That is a VERY nice blade there! Bone?Last edited by sharptonn; 12-23-2014 at 02:32 AM.
"Don't be stubborn. You are missing out."
I rest my case.
-
The Following User Says Thank You to sharptonn For This Useful Post:
57vert (12-23-2014)
-
12-23-2014, 03:21 AM #4Senior Member
- Join Date
- Sep 2014
- Location
- Connecticut
- Posts
- 173
Thanked: 43
No the blade is steel, not bone. Haha... ok.... I'm not sure of the material of the scales. Here's hopefully a better picture of the scales. No washers are used with the pin, and also the wedge end is not pinned but glued? The wedge end does have a wedge and is not solid. Would this indicate that the scales are a faux bone or ivory? I think they are to thick to be ivory. Originally Posted by sharptonn

From my research the tang has new york stamped on it which would put the blade I believe pre 1890. Would this be a rescale?
-
12-23-2014, 03:30 AM #5Razor Vulture
- Join Date
- Oct 2010
- Location
- Lone Star State
- Posts
- 26,121
Thanked: 8612
Looking at it now, I think yellow celluloid/faux ivory. Electric did lots of different things with scales. I think original.
I think unpinning will have to be done to do a proper job on the tang. Either that, or lots of tedious work.
Nice blade. Electrics are very good and 6/8+ is sorta rare, I think.Geezer likes this."Don't be stubborn. You are missing out."
I rest my case.
-
The Following User Says Thank You to sharptonn For This Useful Post:
57vert (12-23-2014)
-
12-23-2014, 03:37 AM #6Senior Member
- Join Date
- Sep 2014
- Location
- Connecticut
- Posts
- 173
Thanked: 43
I think celluloid too, there are no pores as on my other razors with bone scales. Originally Posted by sharptonn
To clean it up properly it will need to be unpinned. I'm pretty new to the restoration game. I'm currently working on my blade polishing and honing skills. So for now I will do what I can with the blade keeping it pinned. I've got a few razors with cracked scales I am going to practice unpinning and pinning with before I try on a razor I want to save the scales on!
Thanks for your help guys, this is such a great community!sharptonn likes this.
-
12-23-2014, 03:44 AM #7Razor Vulture
- Join Date
- Oct 2010
- Location
- Lone Star State
- Posts
- 26,121
Thanked: 8612
Good decision. Getting it apart and back together collarless and proper takes some tools and skills. Still, a challenge. Originally Posted by 57vert
Get some flossies and polish. Go at the pivot!"Don't be stubborn. You are missing out."
I rest my case.
-
The Following User Says Thank You to sharptonn For This Useful Post:
57vert (12-23-2014)
-
12-23-2014, 03:56 AM #8
Agree with gssixgun. But do not use the brass brush with any acidic solution. Vinegar etcetra. It will all of a sudden brass plate your steel!
And watch out for bits of bristle getting onto your chair...don't ask!
Have fun the journey has bumps but the destination is worth the ride.
~RichardBe yourself; everyone else is already taken.
- Oscar Wilde
-
The Following User Says Thank You to Geezer For This Useful Post:
57vert (12-23-2014)
-
12-28-2014, 05:29 PM #9Senior Member

- Join Date
- Apr 2012
- Location
- Diamond Bar, CA
- Posts
- 6,553
Thanked: 3215
I too use the stainless steel brush, for the first go but to make them shine the best thing is a worn 600 greaseless wheel.
Hit the jimps with a wheel with half or more of the greaseless worn off will make them shine like new.
I have been experimenting with using a Dremel with a cloth wheel and a small chunk of 600 greasless works pretty good, but not as good as on the buffer.
If you are doing it by hand I have used the stainless brush, then a bamboo pointed skewer dipped in some 600 and or metal polish works well also, takes some time but works.sharptonn likes this.
-
The Following User Says Thank You to Euclid440 For This Useful Post:
57vert (12-28-2014)
-
12-28-2014, 05:34 PM #10Razor Vulture
- Join Date
- Oct 2010
- Location
- Lone Star State
- Posts
- 26,121
Thanked: 8612
I think the key to jimps is getting down in between them. Certainly it is easy to polish off the tops, but getting down in there where it is difficult to reach without degrading or dulling the tops takes time. I am speaking of the tight, file jimps usually seen on the bottom of the tang. Now, the wide, rounded ones like we see on the top of some tangs are easily polished.
"Don't be stubborn. You are missing out."
I rest my case.
-
The Following User Says Thank You to sharptonn For This Useful Post:
57vert (12-28-2014)


 Reply With Quote
