
Results 11 to 20 of 27
 49Likes
 LinkBack URL
 About LinkBacks
-
01-18-2015, 04:23 PM #11Senior Member


- Join Date
- Apr 2012
- Location
- Diamond Bar, CA
- Posts
- 6,553
Thanked: 3215
As said, start at the beginning, look at the razor… before you take it apart to see how it fit in the old scales… then at the blade once you have it apart.
When the razor has the old scales on it, is a good time to experiment moving the blade from side to side or look for potential problems with the blade.
Mock-up will tell you a lot about how it will go together. Making the pin holes a bit larger will give you some wiggle room, use a hand held pin vise.
-
01-18-2015, 04:47 PM #12Senior Member
- Join Date
- Jan 2011
- Location
- Roseville,Kali
- Posts
- 10,432
Thanked: 2027
All good info above,many ways to polish pins but with carefull peening alone you can get close to a near perfect end result.
My method is to use use two layers of masking tape,than use micromesh to polish.
 CAUTION
Dangerous within 1 Mile
-
01-18-2015, 05:27 PM #13Senior Member

- Join Date
- Feb 2014
- Location
- Florida panhandle, near Ft. Walton Bch.
- Posts
- 247
Thanked: 23
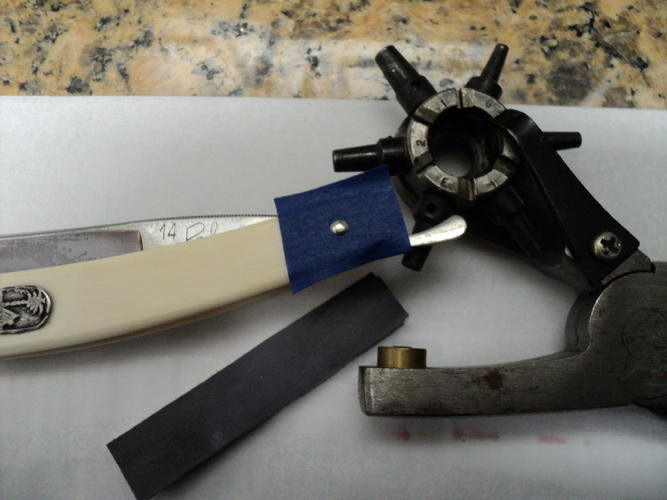
Thanks for the help guys. Here is how I did the pinning on this razor.
First I used a pair of vise grips to hold the pin to peen the first end. .

Then I slide the excess pin through a hole in my work table to peen the end. I grind the end flat before peening.

As you might imagine this marrs the pin. Next time I'll use something to protect the pin. That may or may not help.

Then I put the pin through washer, scale, washer, tang, washer, scale. I clip the pin with dykes. Then I grind the clipped end flat. Then I put the other outside washer on the pin.
I use this hammer and vise to peen the other end.

I understand about bent pins. Here is my first attempt.

I'm in the process of setting up a new workshop. I have very limited access to my workbench, bench vise, etc. Right now I have to pick up and place my belt sander or drill press or whatever and work on this little table I built. This situation should improve in the next couple of weeks to a month.
Again, thanks for the help as well as for any other tips and info.
Jack
-
01-18-2015, 06:04 PM #14Razor Vulture

- Join Date
- Oct 2010
- Location
- Lone Star State
- Posts
- 26,180
Thanked: 8619
The tapping technique seems to work if the pinholes are slightly enlarged, say 5/64, before beginning. By tapping a pin one way and the other side the other, you need to be slightly sliding the collars over if it is to work. Also, wedge end alignment and bent pins down there have a direct effect on the pivot. Assembling with microfasteners and test-fitting will show the way. I am not immune to using 2 thin spacers on one side and one on the other to compensate for a wonky tang although some may call it cheating. Makers did it quite often. I have also found that replacing the spacers with smaller diameter spacers will nullify some of the effect of slightly different tang angles.
One test I always do is to pin the bottom, push a length of rod through both top holes, hold it out and see if the rod is level. If it is tilting in the scales, sawing on the pivot holes simultaneously, pushing up on one side and down on the other with a bit in a pin vise lines them up. Helps to get an even start. YMMVLast edited by sharptonn; 01-18-2015 at 06:53 PM.
"Don't be stubborn. You are missing out."
I rest my case.
-
01-18-2015, 08:02 PM #15Senior Member
- Join Date
- Feb 2014
- Location
- Florida panhandle, near Ft. Walton Bch.
- Posts
- 247
Thanked: 23
The razor I just made this handle for had a huge hole in the tang. Possibly 1/8" in diameter. The pin is 1/16". I used a 5/64" bit. I have a set of wire gauge bits so I can get the holes a lot closer to any size I want if that might help.
I'd like to learn the ways to get the handle and blade to fit together. The easiest way to do that so far has been to put the pivot together and get it snug. I have then glued the other end of the handle having clamped it where the blade is dead center. If I didn't want to use glue, maybe I could have the handle end clamped and then drill the pin hole to the exact size of the pin.
Another thing I did wrong was I sanded and somewhat polished the side of the end wedge that would end up inside the handle BEFORE I sanded the side creating a slight angle. Now I can see that the inside of the wedge is not perpindicular with the handle. This is cosmetic and not a big deal for me on this handle. But it's something I'm now aware of and will correct next time. It does makes me wonder about how you guys make the wedges. I just eye-balled the angle. The angle did make the pivot end of the handle have a gap inside the scales about twice as wide as the tang and inside washers. When I pinned the handle end the wedge was much bigger (not shaped). I then shaped and polished the end. Both scales and the wedge were kirinite so abrasion was the same. In the videos I've watched the wedges have been shaped before assembly. I mention this because there are sometimes reasons why people do things and the reasons aren't mentioned. One question I have is why aren't screws and pins used instead of pins that require peening? Adjusting pivot tension would be easier with a screw (for anyone). Disassembly for cleaning/repair would be easier. I saw Lynn in a video making a point of wiping the razor after rinsing it when shaving. The goal was to keep water out of the pivot, especially on more valuable razors to prevent corrosion. I think that was the idea. If there were a screw at the pivot the razor could easily be disassembled, cleaned and re-assembled it seems. So what are the reasons pins and peening seem to be the norm? I'm more curious than anything. I will probably be the only one using the razors I work on. So it doesn't matter what I do. But there are probably reasons I'm unaware of.
Jack
-
01-18-2015, 08:43 PM #16Senior Member
- Join Date
- Jan 2011
- Location
- Roseville,Kali
- Posts
- 10,432
Thanked: 2027
Pinning Vintage blades is traditional and should remain so IMO.In reality one should never get water in the pivot.
CAUTION
Dangerous within 1 Mile
-
01-18-2015, 09:36 PM #17
I've tried screws. So have several other customs makers and scale makers I know.
Like most if not all of them, I've gone back to pins and washers. That is just the best option.
And not just for the vintage look. A peened pin will stay put forever, unchanging.Til shade is gone, til water is gone, Into the shadow with teeth bared, screaming defiance with the last breath.
To spit in Sightblinders eye on the Last Day
-
01-18-2015, 10:39 PM #18Senior Member
- Join Date
- Nov 2013
- Location
- Loughborough UK
- Posts
- 395
Thanked: 129
I've found that although you could argue that using screws is easier you're forever tightening them to stop the blade flapping about. Peening looks better and is easier than you think, just be patient with that hammer.
One of the greatest gifts is to impart wisdom through experience.
-
01-18-2015, 11:07 PM #19Senior Member
- Join Date
- Feb 2014
- Location
- Florida panhandle, near Ft. Walton Bch.
- Posts
- 247
Thanked: 23
Ok guys. The screws vs peening revolution has been put down.
I would agree 100% about vintage razors. A well peened pin looks classier than a screw head. I'm proud of my last peening job. Much better than my first attempt. The immediate improvement is due to the help I've gotten on this forum. Thanks again and for the future I'm sure.
Jack
-
01-19-2015, 01:01 PM #20Senior Member

- Join Date
- Feb 2012
- Location
- West Midlands, UK
- Posts
- 1,263
Thanked: 360
Going back to the OPs question on wedges - it's useful to explain why a wdge is considered necessary, as opposed to just a spacer.
If you take a look at traditional razor design, you see that the tang tapers towards the tail - therefore, peening at the pivot pin gets the scales tight but they then have to accommodate the tang at a wider point. This is where the wedge comes in - by designing the wedge so that the angle is about the same as the taper at the tang end, you will create a bow in the scales that should accommodate the blade at it's widest part without rubbing the scales.
Most restorers pin the wedge end before the pivot - it's always a good idea to test the whole set up with small screws beforehand.
Incidentally, a lot of custom makers do use screws instead of peened rod - they overcome the loosening problem by using products like Loctite Blue. The reason screws are not used so much on old blades is because the pivot hole needs to be re-drilled to accommodate the screw - this is not always easy on tempered steel - re-pinning is a much easier solution.Last edited by UKRob; 01-19-2015 at 01:03 PM.
Euclid440 likes this.My service is good, fast and cheap. Select any two and discount the third.


 Reply With Quote


