
Results 1 to 10 of 17
 16Likes
 LinkBack URL
 About LinkBacks
-
10-07-2015, 11:24 PM #1Senior Member


- Join Date
- Jul 2015
- Location
- Colorado
- Posts
- 540
Thanked: 79 What would you do with this restoration?
I'm going to try a different approach on this, I know what I think I'm going to do to this blade... I just want to see if everyone has the same kind of idea as me... Outcome I hope that I am accurate with restoration and maybe even get more ideas on what to do... Even good types of scale materials that go good with this razor would be cool to see everyone's creative input. I'm also thinking like what grit greaseless to start With just those kinda things
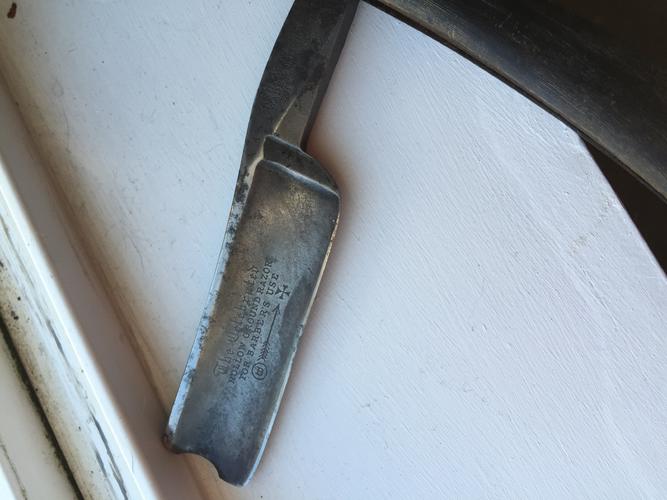
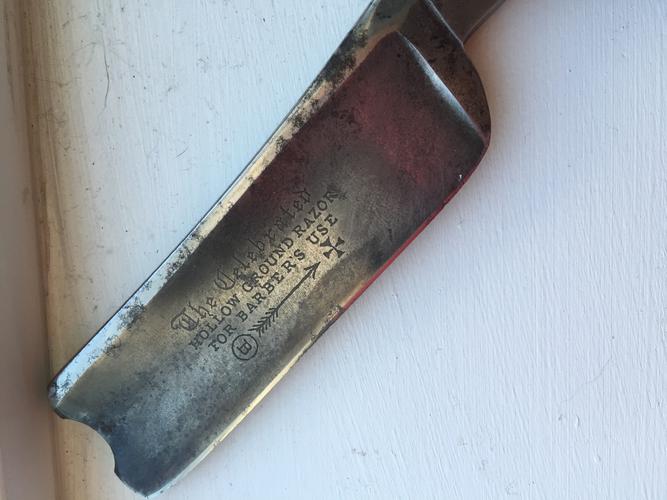
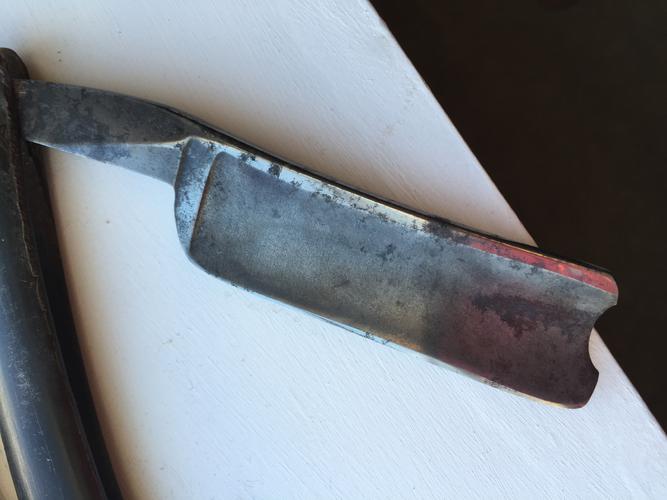
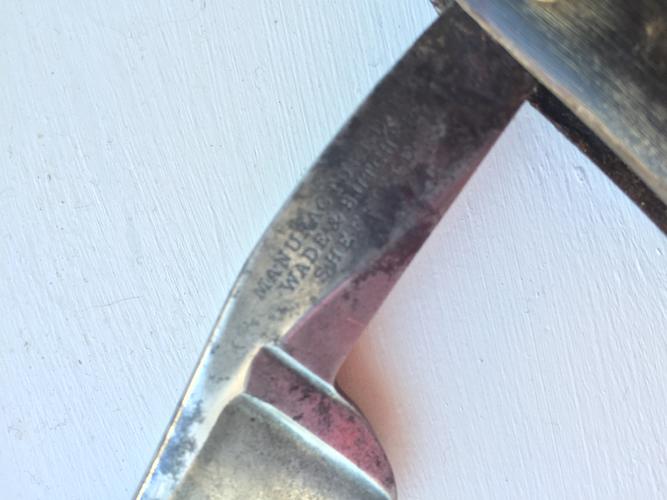
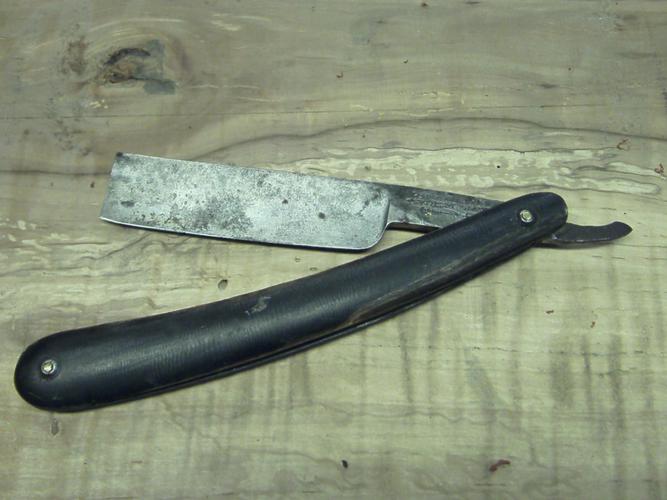
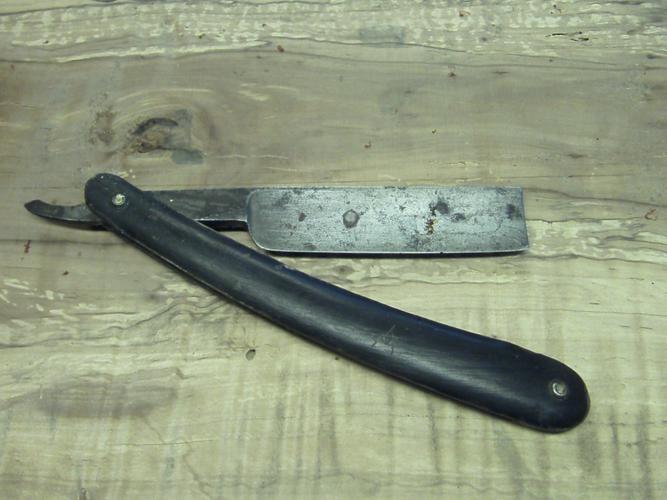
so so the razor is the elusive WB Barbers use, I call it elusive because I've been trying to get it for some time now... I won it on eBay for $120 a couple days ago and now it's here... I want to make her have a mirror shine and have never worked on this type of butcher don't know how deep these markings are... I know originally they have black in them, If you go too deep you lose some of that... Is that something that decreases value or is there even a way to refill the black in them... Just thoughts... As always guys I look forward to a fun thread and can't wait for your replies...
thanks,
Fonz

 Substance and ChopperDave like this.
-
10-07-2015, 11:55 PM #2'with that said'


- Join Date
- Aug 2010
- Location
- Walla Walla in WA State USA
- Posts
- 11,254
Thanked: 4238
First and Foremost, looks can be deceiving,
Here's what my Great Grandfather's W&B looked like before Glen worked on it;
Looks pretty good! Hardly any rust, pits etc!
Here's what it looked like after all of the years of abuse were removed;
Looks very nice, but notice that the deep pits wouldn't have been removed without a re-grind
You'll also notice that Glen used a stain finish, I do belive that it's close to the original, the 'mirror' finish usually doesn't seem to be the 'Norm' from the factory.
Have fun, but remember that it takes time and patience!
Good luck and keep us posted on the progress MJC likes this.Our house is as Neil left it- an Aladdins cave of 'stuff'.
Kim X
-
10-08-2015, 12:09 AM #3Senior Member

- Join Date
- Apr 2015
- Location
- paris
- Posts
- 449
Thanked: 13
That's very nice blade. Don't go so hard with it. I think 800 or 1000 grit of SP will be ok to cleaned then some polish. Keep it original!
Geezer and Dafonz6987 like this.
-
10-08-2015, 12:12 AM #4Senior Member

- Join Date
- Feb 2012
- Location
- Menominee,MI
- Posts
- 1,624
Thanked: 325
One of the first things I do with a restore is use some metal polish and a rag to see what I am working with. You would be surprised at what just alittle polishing can do. It will help remove build up from years of sitting and it can reveal if there is some pitting or other defects. I would have the horn scales soaking in some neatsfoot oil if they are salvageable while I decided what I wanted to do with the blade. Once you see what you are working with then you can decide what level of restoration you want to do. A mirrorish finish would take some sanding or buffing depending on your equipment. That dark spot near the barbers notch I am guessing is hiding some pitting. You have to be careful with hollow ground razors when removing pitting since there isn't a whole lot of material there that can be removed before you end up with a flimsy razor. The more material there is the more that can be removed safely. Good luck.
ChopperDave and Dafonz6987 like this.
-
10-08-2015, 12:15 AM #5Senior Member
- Join Date
- Jul 2015
- Location
- Colorado
- Posts
- 540
Thanked: 79
I did learn this on another blade, tried using the 600 and realized that I needed to go lower because of all the pitting... Now re grinding is something I am not familiar with and if this razor requires a re-grind I will end up waiting on her and regrinding another less valuable razor... Originally Posted by cudarunner

I was thinking about going with black horn with white streaks on this razor and maybe getting some bullseye collars for her too... With wades is it more common for people to want the satin finish or have a mirror finish? One mans treasure can be another mans trash... So I always think about doing things that are common but then that's not my style, I like things that are different and unique... It's tough to think of the consumers perspective... Hence he thread
-
10-08-2015, 12:16 AM #6Senior Member

- Join Date
- Apr 2012
- Location
- Diamond Bar, CA
- Posts
- 6,553
Thanked: 3215
Mirror, Greaseless and Etch are not words that often go together well. One of the words needs to be left out.
Hose it down with WD40 and scrub with 000 steel wool, then re-evaluate. If no major pitting, I would hand sand with 600 and try to keep as much of etch as possible. 600 does not cut deep, polishes out easily and will remove most of the black tarnish and rust. It also will not remove much of the etch, but do use lite pressure on the etch and a soft backer. A 600,1K, 2K wet & dry progression, followed by a Chrome Oxide buffing and hand polish would be near mirror, or you could then hit it with some fine Crocus Cloth, for a nice even satin finish.
It does not look too pitted, from the photos. What do the scales look like and does it have the original collars? If the scales are not broken or too bug bitten, try to repair or make new horn scales, re-using original hardware.
Once finished, you can darken the etch with Cold Gun Bluing, there are several post on doing that.
Personally I do not like to uber polish old Sheffield blades, and think they look best with horn scales, as original as possible, but then I am not a fan of T buckets either.
Bottom line if you want the etch, hand sand.
Nice find. Do post your results.
-
The Following User Says Thank You to Euclid440 For This Useful Post:
cudarunner (10-08-2015)
-
10-08-2015, 12:41 AM #7Senior Member
- Join Date
- Jul 2015
- Location
- Colorado
- Posts
- 540
Thanked: 79
U
Thanks! I always wondered if there was a way to darken the etch and now I know! Very useful tool there my friend... Originally Posted by Euclid440
The restoration process works for me because I currently do not have my greaseless... So hand sand it is.im going to have to search this crocus cloth to know what that is so I have research to do! Thank you Euclid!
-
10-08-2015, 02:04 AM #8I used Nakayamas for my house


- Join Date
- Aug 2009
- Location
- Des Moines
- Posts
- 8,664
- Blog Entries
- 1
Thanked: 2591
Your razor is hollow ground, I am not sure a regrind is an option. Just do a progression of sandpaper and clean it up. Originally Posted by Dafonz6987
Mephisto likes this.Stefan
-
10-08-2015, 03:16 AM #9Senior Member
- Join Date
- Jul 2015
- Location
- Colorado
- Posts
- 540
Thanked: 79
Very true! Originally Posted by mainaman
-
10-08-2015, 03:26 AM #10Senior Member
- Join Date
- Apr 2012
- Location
- Diamond Bar, CA
- Posts
- 6,553
Thanked: 3215
Better (Old School) Ace Hardware stores carry it in sheets and in rolls. I think I paid 2 bucks a sheet, cut into 3 X3 in squares, a piece lasts a long time.
Look in the Workshop Forum, Geezer made a good post about a year ago on how to do it with photos. Even a sharpie and some 1k wet & dry works pretty well.


 Reply With Quote