
Results 1 to 10 of 36
 114Likes
Thread: Crawler & His ERN.
 LinkBack URL
 About LinkBacks
Hybrid View
-
01-26-2016, 02:57 PM #1Senior Member


- Join Date
- Feb 2013
- Location
- Haida Gwaii, British Columbia, Canada
- Posts
- 14,401
Thanked: 4822
Looking good so far. I agree that when you resend that you have a chance at recovering the undercut.
Crawler likes this.It's not what you know, it's who you take fishing!
-
The Following User Says Thank You to RezDog For This Useful Post:
Crawler (01-26-2016)
-
01-26-2016, 10:35 PM #2Senior Member


- Join Date
- Jan 2015
- Location
- N.E. Indiana
- Posts
- 970
Thanked: 134 Safety First, Kids!!!
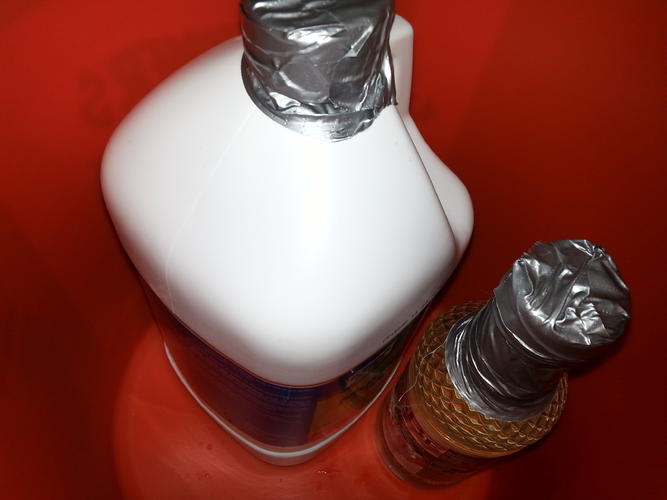
I forgot to post pics of my efforts to contain possible hazards... (i.e.: to at least slow down leakage of corrosive gas.)
"But wait, there's more!!!..."
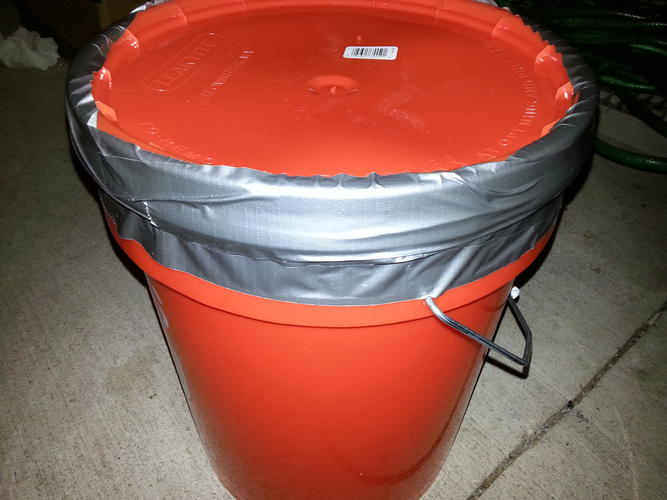
The bucket is being stored outside. Hcl has a freezing point of something in the neighborhood of -50 to -100 degrees Fahrenheit, so that is a non-issue for me in the Midwest.
I didn't end up using the dust mask or safety goggles I had brought with me, not that the dust mask would have been much help protecting my lungs anyway lol. Nitrile gloves were used ("heavy duty" from HF). I took special efforts when pouring the acid, making sure to be very steady & careful. Again, I pour acid INTO water (common hydrogen peroxide [97% water] ). I ran a small test batch (junk metal in disposable cup) with a similar ratio to what was about to be used in the main run, just so I knew what to expect (first-hand) from combining these materials.
The wife expressed concern
 over the use of these chemicals in the house. I could tell by her tone that it didn't matter what precautions had been taken, her stance wouldn't change. Her friend a block away is having issues with their garage door, and are parking outside of it. Permission for an hour or two of use for this project was easily acquired. So the chemicals were mixed outside of the garage, with the wind to my back & side, and I brought the milk jug in, hooked it all up, and babysitting began. I would say the muriatic acid was only slightly more viscous that water; some might not notice a difference.
I resisted my natural curiosity & did NOT try to get a "sample whiff" of the acid . With the modest precautions I took, I never caught a hint of any harsh fumes (one of the few things my dull sense of smell can easily detect). Once or twice, my face was even within 4" of (but not directly over it) the open milk jug.
I had snipped off a bristle or three from the two brushes (a tile & grout detailing scrub brush, and a polyester fiber painting brush), as well as a but of the hot glue stick used to attach the airator I made, but didn't have time to test those materials in the etchant solution. I was confident (not to mention also correct) that there would not be any problems from the use of these items, but still wanted to test them for peace of mind . The scrub brush was the only one that was unknown. The bristles were described as "poly-bristles" when I dug up info on it, but they were very similar (IMO) to nylon bristles found on virtually all other cleaning brushes. So I didn't use that one.
I know it feels like I'm on safety with this. This is mostly due to my methods of self education & practical application of untried stuff. On new things that I teach myself, I do a lot of recon, followed by cautious & somewhat slow first attempts. Rather, this is at least the case when there is a risk of mortal danger. Also, because of mild dyslexia, preparations "for me, by me" tend to err on the side of "idiot-proof"... because I might skip a step without knowing it
  . So though I've mentioned safety thoroughly, it has done at least twice the number of laps in my own head!
Last edited by Crawler; 01-26-2016 at 10:40 PM. Reason: Picky pic protocol problem.
Decades away from full-beard growing abilities.
-
The Following User Says Thank You to Crawler For This Useful Post:
Geezer (01-27-2016)
-
01-26-2016, 10:59 PM #3Str8Faced Gent.


- Join Date
- Aug 2013
- Location
- Orangeville, Ontario
- Posts
- 8,391
- Blog Entries
- 1
Thanked: 4200
Great walk through and experiment crawler.
You never notice when you take too many precautions, but you sure find out quick when you don't do enough.
Good job."Depression is just anger,, without the enthusiasm."
Steven Wright
https://mobro.co/michaelbolton65?mc=5
-
The Following User Says Thank You to MikeB52 For This Useful Post:
Crawler (01-26-2016)
-
01-26-2016, 11:26 PM #4Senior Member

- Join Date
- Jun 2013
- Location
- archbold ohio
- Posts
- 2,365
Thanked: 545
yes, thank you. A humorous note about acid: i made some home made circuit board etching acid (sounds like about the same recipe)and stored it in a glass jar with a metal lid. months later i opened the cupboard and noticed that all the metal tools and copper wire i had stored in there were rusty and green. who would have thought acid would eat through a lid without being in direct contact with it ?

-
01-27-2016, 06:08 AM #5Senior Member
- Join Date
- Jan 2015
- Location
- N.E. Indiana
- Posts
- 970
Thanked: 134 We All Have To Learn Somehow.
I will now try to detail my mistakes, and what I'd do differently.
First & foremost: I left it to etch for too long. Most of the sources I read on this particular method & mix for etching generally encouraged multiple runs in the etchant, at 5 to 15 minutes each. This was more for consistency, and especially for those etching artistic designs rather than circuit boards.
It took me soo long to dig out the resist that I wanted to do this in one shot, if possible! I don't think it needed 45 minutes, even spread across several dips. But reports from others using similar recipes were yielding inconsistent results based on standard timing intervals (likely due to not-fresh ingredients). My hope is that with future attempts, proficiency & efficiency will increase, making the thought of successive applications of resist less dreadful!
The initial resist was a solid orange because, of the four colors given to me by SWMBO, it blended with the metal tone of the razor the least. Two had glitter, which I suspected would be a bad idea for a resist fue to the likelihood of it being metallic in nature. The secondary coat I applied to fix some of my boo-boo's was one of these glittery shades. It seems this resisted the acid less than the orange color. Lesson learned.
Another hypothesis: my self taught technique for digging out the resist was flawed in the final stages. The tolerances I was trying to correct to for finishing the lines were such that I was afraid trying to even chip it away minutely with my needle (tip refined on a 15k Sharpton) would remove too much material. So I figured out the polish was just malleable enough to push it aside slightly (very carefully!). What I couldn't see: this caused the resist to lift & separate from the razor, expediting the undercutting effect. another lesson learned: don't push the polish!
The container I used was effective for repurposed trash, but could have been better. I poured the etchant into an empty 20 oz. bottle (cleaned), and it came to just under 20 oz. Food for thought. Anyway, ideally, I'd like some sort of container that can be sealed (or at least closed tightly). Good dimension would be around 2"x7"x3", or maybe 3"x8"x3" just for added wiggle room. I can MaCGyver a harness for suspension, and a hole for the air lines.
Well, that's about all I can think of right now. Despite how thorough I've been, I feel like I'm leaving something out .
.
If y'all have any questions, please feel free to ask! Got my trainee again tomorrow

 .
Decades away from full-beard growing abilities.
.
Decades away from full-beard growing abilities.
-
-
01-27-2016, 08:42 PM #6Senior Member
- Join Date
- Jan 2015
- Location
- N.E. Indiana
- Posts
- 970
Thanked: 134 Minor Changes For Next Time.
I finally remembered what else I wanted to mention for things I'd do differently. They are mostly regarding the polish.
I used cotton string to hang the razor while the polish dried. Not the worst thing, but I don't know if the etchant would eat that, exposing the pivot hole previously sealed by means of polish around the string. I snipped it & soaked it real good with polish to resist the acid. That worked, but I'll use a polyester string next time.
Speaking of the pivot hole... originally, I had planned to use a micro fastener to plug it, & cover that with resist as well. I figured getting the polish out of the tiny threads would be a PITA, so that was out. Getting the polish itself out of the pivot wasn't effortless, however. Next time: I will either plug it with a bit of the wife's crafting polymer clay, or an appropriately sized piece of dowel rod. (Still cover plug with resist.)
One last thing about the polish. It was quite a task to remove it in the spots that I had put two or three moderate-to-thick coats. Next time: I will use thin, but adequate coats, limit two, of non-glittery/metallic polish. Outside of that, I'll probably still use a different color to ensure there is no accidental voids in the resist.
Ah, one thing I held as a "high priority item" for resist coverage was the edge! "Yaarrh, matey! Fluid dynamics be a fickle mistress!!" Liquids act funny on acute angles, so I made sure to give that several! coats.
Always feels good to remember pertinent information that slipped my mind .
.
Now to continue sanding until it's time for a finishing session of etching. Any questions or comments?? Feel free to ask!Decades away from full-beard growing abilities.
-
The Following User Says Thank You to Crawler For This Useful Post:
Geezer (01-27-2016)
-
01-27-2016, 09:51 PM #7
A great job of trying a process and passing information forward! Thank you!
More for information, there is some further information about etching products at this address:
Etching-products
and here are some more links available:
Grounds+for+etching
~Richard
PS. I have used the asphaltum varnish ground in college.Be yourself; everyone else is already taken.
- Oscar Wilde
-
The Following User Says Thank You to Geezer For This Useful Post:
Crawler (01-28-2016)
-
01-26-2016, 11:21 PM #8Senior Member
- Join Date
- Jan 2015
- Location
- N.E. Indiana
- Posts
- 970
Thanked: 134 Process & Recipe.
So here is the rough recipe of what I did.
3 parts hydrogen peroxide poured into milk jug, followed by 1 part muriatic acid.
The razor was allowed to hang in the etchant for 45 minutes.
After that time, I swirled the razor in the cup of water & baking soda I had at the ready, for a couple minutes, switching which end I held.
Remaining baking soda & water mix was used to flush air lines, as well as rub/brush down the outside of anything that might have been touched while I was wearing gloves to neutralize any secondary trace transfer.
Afterwards, everything was packed up & taken home, where I thoroughly rinsed with water, then used nail polish remover to take the resist off the blade.
A few things I learned from my research:
Bubbles and/or loose microscopic debri forms on the bare metal, which can result in inconsistent etching.
Counter this through agitation of the mixture, I learned a fish tank air pump can automate this part, saving your arms.
I still occasionally lightly flicked the side of the "vat" in order to dislodge any Klingon bubbles.
More dilution means more time (slower etch process). It also, apparently, creates deeper differences in depth between materials on Damascus blades when one of the steels has a higher resistance to corrosion (i.e. more nickel).
I think that's a good "nutshell" of the How.Last edited by Crawler; 01-27-2016 at 03:59 AM. Reason: Had a redundant "deeper" in last paragraph.
Decades away from full-beard growing abilities.
-


 Reply With Quote
