
Results 1 to 8 of 8
 15Likes
Thread: Wedgy spacer..
 LinkBack URL
 About LinkBacks
-
03-19-2016, 01:59 PM #1Matt


- Join Date
- Dec 2015
- Location
- Albany, NY
- Posts
- 971
Thanked: 260 Wedgy spacer..
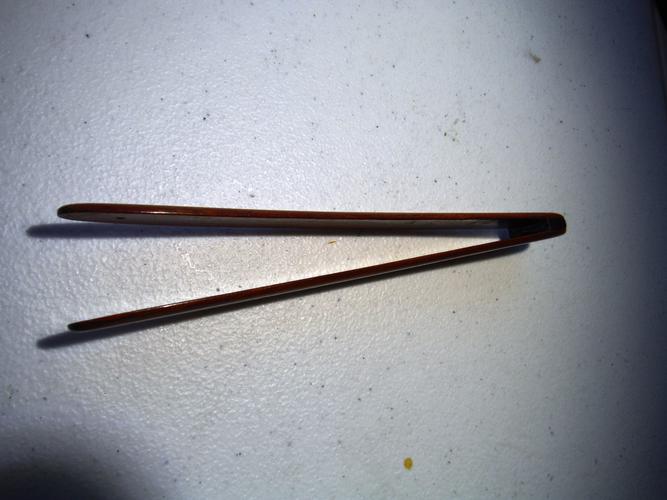
Firstly i apologize for the picture quality on these. Im out the door to hit the antique shops but i was hoping to generate some answers to this before tomorrow. Takin' pics on the run with my celly..
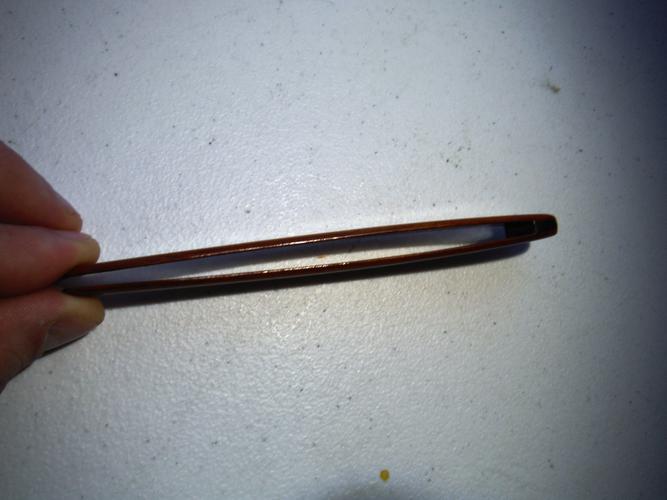
I made the mistake of creating a very wide 'wedge' for a set of scales i recently made. I can tell from pinching them at the pivot end they are going to bow out a bit more then i like after they are pinned.
I used CA glue to glue the wedge in place and it has a few coats of button lac over it. I would like to somehow thin this wedge down to make a better fit so the razor doesn't sit as low in the scales when closed.
Right now i am imagining i can used debonder and a razor blade to get one side unattached, then sand it down and reglue. Seems simple enough but usually when i think that something goes wrong.
Let me know what you think guys. Should i mess with it? Is there a better way?
I can honestly say ive never been misinformed here so im looking forward to any replies.
Have a good day sirs.
-
03-19-2016, 02:15 PM #2Senior Member


- Join Date
- Feb 2013
- Location
- Haida Gwaii, British Columbia, Canada
- Posts
- 14,458
Thanked: 4830
Well really I only see two choices, remove the wedge or try to reshape it in place. If you are careful reshaping it in place will allow you to thin the wedge. The taper should match the taper of the tang on the razors. It does not have to be perfect but reasonably close. On the bright side with it attached to the scale you have a handy handle already glued in. The scales look thin and flexible. It will be nice to see the finished project. I haven't used button lac in forever. Just ads to the intrigue now.
It's not what you know, it's who you take fishing!
-
The Following User Says Thank You to RezDog For This Useful Post:
MW76 (03-20-2016)
-
03-19-2016, 03:07 PM #3
This is why you should get some hardware to pre assemble!
You can find any "mistakes" before final assembly.
I for one never glue my wedges... At least not yet anyways...

Ed
-
The Following User Says Thank You to Chevhead For This Useful Post:
MW76 (03-20-2016)
-
03-19-2016, 06:21 PM #4Senior Member

- Join Date
- Mar 2014
- Posts
- 333
Thanked: 65
Before you tear it apart. Dry fit the blade with a micro nut and bolt fastener. See how it looks. You may not need to do anything at all.
Then if you still need to, the only option is figuring out how to get it back apart and sand the wedge down a bit. Use a razor blade and go SLOW. Restoring scales and blades is a tumultuous experience and thats always when more damage is incurred.
FWIW I've learned to only glue one side of the wedge to the scales just for cases like this and any future repairs/restores.MW76 likes this."The production of to many usefull things results in too many useless people."
Karl Marx
-
The Following User Says Thank You to Suticat For This Useful Post:
MW76 (03-20-2016)
-
03-20-2016, 12:07 AM #5the deepest roots


- Join Date
- Feb 2011
- Location
- Seattle
- Posts
- 1,221
Thanked: 169
you may be able to just break the seal of the glue apart.
I've shaped wedges at too wide of an angle before, and what happened was one side at the wedge would snap loose after pinning the pivot. This wasn't just some white elmers either, it was gorilla glue!
-
The Following User Says Thank You to TwistedOak For This Useful Post:
MW76 (03-20-2016)
-
03-20-2016, 12:27 AM #6Matt
- Join Date
- Dec 2015
- Location
- Albany, NY
- Posts
- 971
Thanked: 260
Thanks for the advice all.
I did mock these up and the widest part of the razors spine just catches the edge of the scales. Its not right. In the future I need to remember to do a mock up before i break out the glue.
When i have some time i will try to remove one side and sand it down in place. Next set i make ill have a few guidelines to go by after reading a few threads on how to size a wedge.
Thanks again guys. Ill post an update when i get to this.
-
03-20-2016, 06:37 PM #7Matt
- Join Date
- Dec 2015
- Location
- Albany, NY
- Posts
- 971
Thanked: 260
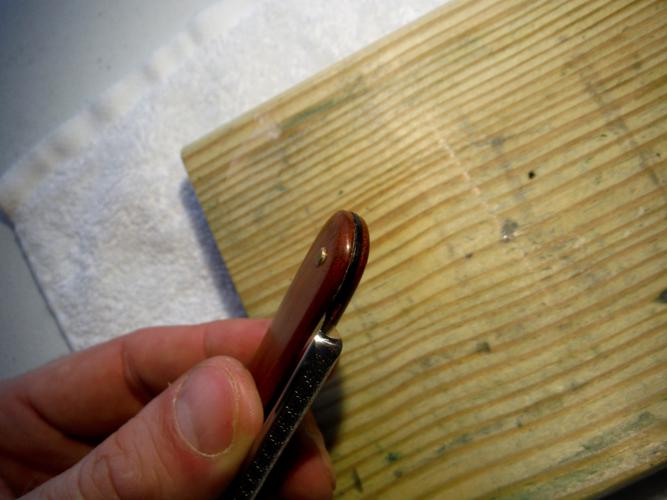
Just a follow up.
It took me about 10 minutes with a razor blade and some debonder to pop one side of the wedge off. In the end, it was just the pressure from the razor that broke the glue bond. The debonder just helped me get the razor into the corner at the front of the wedge.
I sanded it down and made a proper spacer.


Thanks for the help everyone!!
-
03-20-2016, 08:33 PM #8
That looks MUCH BETTER!!!!!!!!!!!
-
The Following User Says Thank You to Chevhead For This Useful Post:
MW76 (03-20-2016)


 Reply With Quote


