
Results 21 to 30 of 194
 846Likes
Thread: Vacuum&pressure pot experiments
 LinkBack URL
 About LinkBacks
-
11-24-2016, 12:15 AM #21Senior Member


- Join Date
- Feb 2013
- Location
- Haida Gwaii, British Columbia, Canada
- Posts
- 14,457
Thanked: 4830
Very interesting and promising.
It's not what you know, it's who you take fishing!
-
12-09-2016, 09:13 PM #22Str8Faced Gent.


- Join Date
- Aug 2013
- Location
- Orangeville, Ontario
- Posts
- 8,467
- Blog Entries
- 1
Thanked: 4207
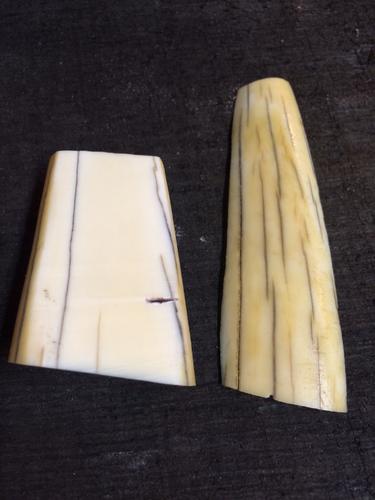
Today I turned the vacuum pot to a different project.
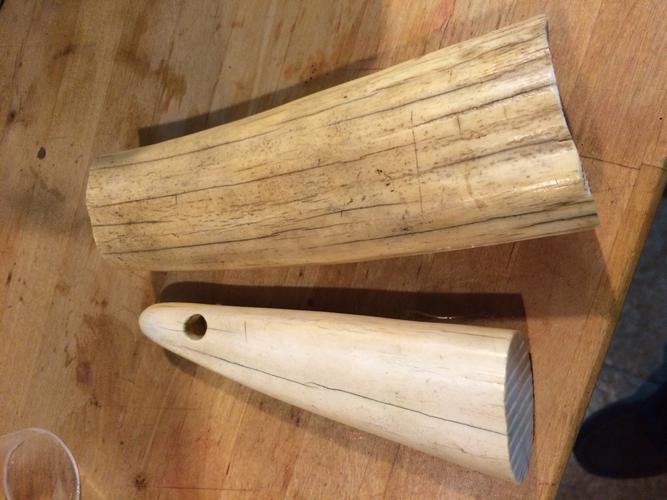
Want to carve up some old tusk and saved the main mid section for the actual 6" slices I hope to get. So I had the tip to work into wedges and basically learn on .
So I bleached it in some strong peroxide a while. Shown beside the main hunk, still untouched.
After drying post H2O2 soak and water neutralizing, I then put it in the vacuum chamber in mineral oil and let her go for a solid hour.
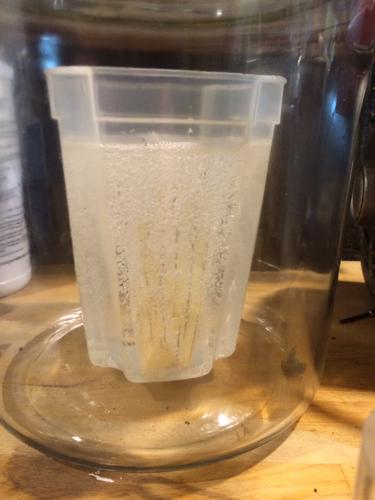
After an hr at 29" of pull, I had virtually no more air coming out so shut her down and left the tusk to soak.
Will leave it in there till later and try some slices for split and integrity testing.
Cheers gents."Depression is just anger,, without the enthusiasm."
Steven Wright
https://mobro.co/michaelbolton65?mc=5
-
The Following 5 Users Say Thank You to MikeB52 For This Useful Post:
cudarunner (12-09-2016), Dieseld (12-31-2016), Geezer (12-09-2016), Hirlau (12-13-2016), TrilliumLT (12-10-2016)
-
12-09-2016, 09:23 PM #23'with that said'


- Join Date
- Aug 2010
- Location
- Walla Walla in WA State USA
- Posts
- 11,260
Thanked: 4238
Mike did you need to 'sneak' up to the final vacuum? Also when you 'shut it down' did you leave the tusk under vacuum or did you evacuate the chamber? Just wondering
 Our house is as Neil left it- an Aladdins cave of 'stuff'.
Kim X
-
12-09-2016, 09:52 PM #24Str8Faced Gent.
- Join Date
- Aug 2013
- Location
- Orangeville, Ontario
- Posts
- 8,467
- Blog Entries
- 1
Thanked: 4207
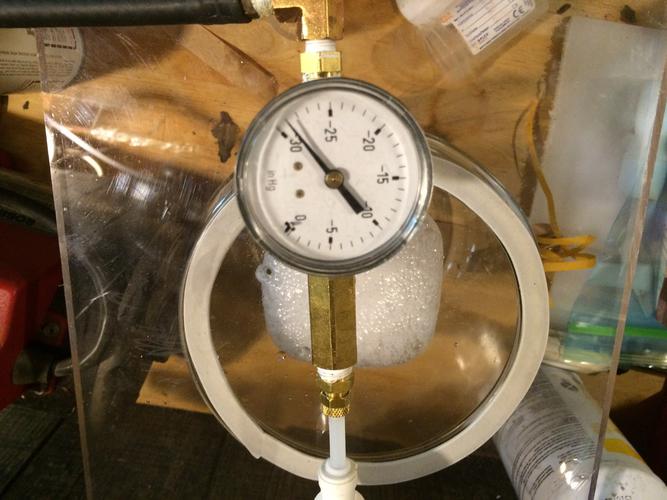
I had to throttle the relief Vv for the first twenty minutes or so to control the bubble 'head' from overflowing the container so yes I did sneak up on final vacuum.
Dancing around 20-25" until the 20 minute mark or so. Then I was able to just lock it down and let it pull.
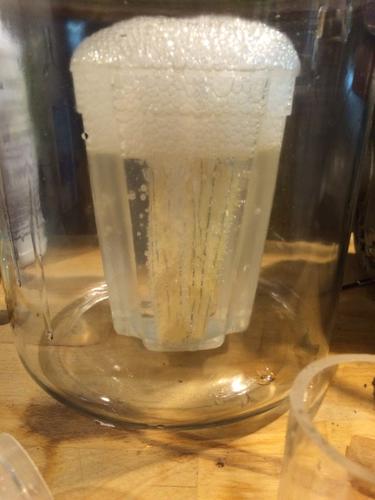
After the completion I saw no need to hold as the evacuation was complete. Plus I don't like leaving things under vacuum un-running, as it tends to wick vacuum oil through the shut Vv's and back into the pot over time.
I do leave the item fully submerged for at least as long as the pull, as suggested by HarryWally. Makes sure only solution gets drawn back in, not air.
I meant to weigh the piece before and after, but forget. Will do that on the main piece to see what we gain in oil weight."Depression is just anger,, without the enthusiasm."
Steven Wright
https://mobro.co/michaelbolton65?mc=5
-
The Following 3 Users Say Thank You to MikeB52 For This Useful Post:
cudarunner (12-09-2016), Dieseld (12-31-2016), Geezer (12-09-2016)
-
12-10-2016, 02:42 AM #25Senior Member

- Join Date
- Oct 2010
- Location
- Everett, Ontario
- Posts
- 1,554
Thanked: 309
Wow that project is really coming along. The tip cleaned up well with the proxide.
-
The Following User Says Thank You to TrilliumLT For This Useful Post:
MikeB52 (12-10-2016)
-
12-10-2016, 03:49 AM #26Str8Faced Gent.
- Join Date
- Aug 2013
- Location
- Orangeville, Ontario
- Posts
- 8,467
- Blog Entries
- 1
Thanked: 4207
Thanks Colin. Yes, the peroxide did a terrific job @35% strength. And didn't seem to make anything more brittle.
Going to try to make some length wise slices to test strength as well as make some wedges before I commit to the oil bath for the main piece.
Was sort of concerned about pulling the vacuum possibly shattering the cell structure inside the tusk due to its age and brittleness. Once the test cuts are made and flex tested I will be confidant to try to make actual scale blanks. Then it's about maximizing the material around the splits and seeing how many sets I can actually make.
If I can get 4 complete sets, that'd be awesome! Might only be two though once I get into it.. Those splits and their depth and affect on the blanks, that's the big unknown.
Fun to try though, so thanks for the challenge buddy!
 "Depression is just anger,, without the enthusiasm."
Steven Wright
https://mobro.co/michaelbolton65?mc=5
-
The Following User Says Thank You to MikeB52 For This Useful Post:
TrilliumLT (12-10-2016)
-
12-13-2016, 04:55 AM #27Str8Faced Gent.
- Join Date
- Aug 2013
- Location
- Orangeville, Ontario
- Posts
- 8,467
- Blog Entries
- 1
Thanked: 4207
Evening gents.
Took my test piece to the saw tonight with good results.
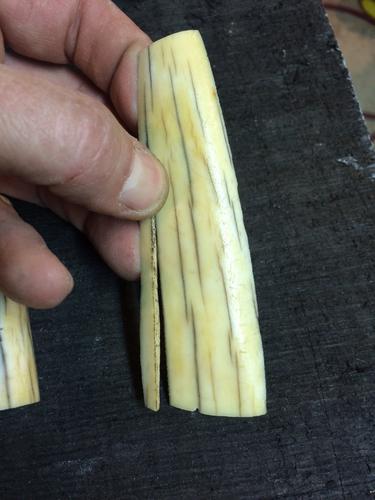
As I sort of expected, where the splits run, there are splits into the interior of the tusk.
So definitely some good wedge material from the tip.
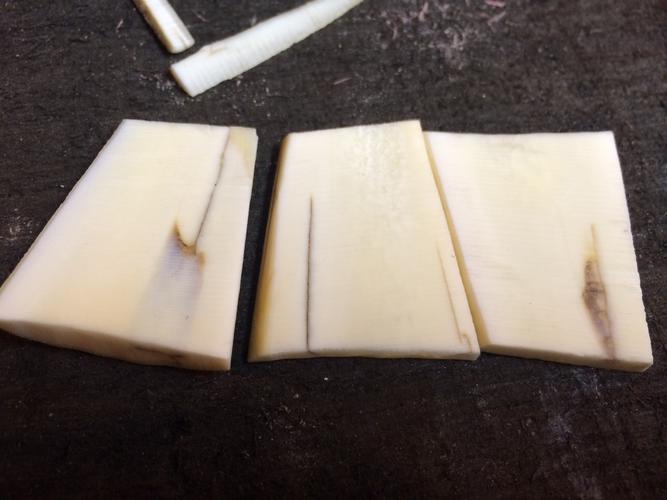

I was quite pleased with the straightness of cuts this 3/8 x 18tpi Bosch blade provided and think that 3/16 is the target slice thickness for the main hunk.
Need to come up with a jig to ensure I keep it nice and square during the cuts, and keep the dust collector running! Damn smelly stuff this.
Cheers."Depression is just anger,, without the enthusiasm."
Steven Wright
https://mobro.co/michaelbolton65?mc=5
-
The Following 2 Users Say Thank You to MikeB52 For This Useful Post:
cudarunner (12-13-2016), TrilliumLT (12-13-2016)
-
12-13-2016, 06:02 AM #28Senior Member
- Join Date
- Feb 2013
- Location
- Haida Gwaii, British Columbia, Canada
- Posts
- 14,457
Thanked: 4830
Dust control is important. I am a little put off by our cold weather, because my dust collector is outside my work shop it takes about three minutes for the inside temperature to drop to match the outside temperature.
It's not what you know, it's who you take fishing!
-
12-13-2016, 06:36 PM #29Senior Member
- Join Date
- Oct 2010
- Location
- Everett, Ontario
- Posts
- 1,554
Thanked: 309
Looks great there Mike. Seems to look solid enough
MikeB52 likes this.
-
12-15-2016, 03:33 AM #30Senior Member

- Join Date
- Oct 2010
- Location
- 50 miles west of randydance
- Posts
- 9,699
Thanked: 1355
I have not done this but this post got me thinking. Would it be worth trying to get a flexible duct for outside fresh air intake that could be put near the saw/dust collector inlet so that when the cold outside air was drawn in it would be exhausted right back out again rather than the heated air? Originally Posted by RezDog


 Reply With Quote