
Results 11 to 20 of 20
 33Likes
 LinkBack URL
 About LinkBacks
-
05-15-2017, 04:15 AM #11Senior Member


- Join Date
- Apr 2012
- Location
- Diamond Bar, CA
- Posts
- 6,553
Thanked: 3215
Sand with 600 and go easy over the etch. 600 will polish nicely with 1k and you can polish 1k with a good metal polish, or go to 2k then polish. The stamp side does not look too bad, try some 1k first and drop down if needed.
More importantly 600 will tell you how much more work is needed for deep pitting and if you need to drop to 400 or lower.
The back side will take lower grit to get the pitting out, but 600 will let you know if you really want to go deeper or live with some pitting. I try to sand with the highest grit that will remove the damage and create the shallowest scratch pattern.
600 is also a nice satin finish if you decide, not to go for a mirror. Sand with a wine cork wrapped with a 3x3 inch piece of 6mm craft foam. Sand edge to spine until you get an even stria pattern then sand heel to toe, removing the previous pattern. Keep alternating until you get an even finish.
If you want a satin finish, take it to 1k, then sand with 600 in a single direction, with new clean paper wet, to lay down an even satin finish.
I usually begin any hand sanding with 600 and evaluate, unless the blade just needs brightening, in which case I begin with 1k. 1k and Green greased compound on a buffer will make as blade pop, if it is not scratched or pitted.
I sand dry until the finish paper. Then with WD40, Simple Green or Windex. Fresh, clean paper and even pressure, is the key to a good final finish.
-
The Following User Says Thank You to Euclid440 For This Useful Post:
jseitz (05-15-2017)
-
05-15-2017, 01:29 PM #12Skeptical Member


- Join Date
- Nov 2016
- Location
- Colorado Springs
- Posts
- 10,548
Thanked: 2194
Thats the ticket. Go with euclids advice. He has helped me and know sanding better than me. I need to write this info down myself!
It's just Sharpening, right?
Jerry...
-
05-15-2017, 08:22 PM #13Senior Member
- Join Date
- Apr 2012
- Location
- Diamond Bar, CA
- Posts
- 6,553
Thanked: 3215
One of the things that I do, when doing on line research, is copy the information, from a thread, document or other posting and paste, into a Word Document,
Title the document and make an appropriate file, on the desktop so you can find and review it at will.
Saves having to search for it when you need it.Last edited by Euclid440; 05-16-2017 at 01:29 AM.
-
05-15-2017, 08:33 PM #14Senior Member
- Join Date
- May 2016
- Location
- Yakima, WA
- Posts
- 177
Thanked: 89
Thanks for this advice. I decided that I needed another razor, you know, for "practice," so I picked up another W&B that doesn't have the etching so I can work on my sanding skills, so I'll be giving this a go now Originally Posted by Euclid440

 ejmolitor37 likes this.
-
05-15-2017, 08:35 PM #15Senior Member
- Join Date
- May 2016
- Location
- Yakima, WA
- Posts
- 177
Thanked: 89
That's the one I've been studying up on--I have scraper on the way! Originally Posted by sqzbxr
ejmolitor37 likes this.
-
05-15-2017, 09:27 PM #16Senior Member

- Join Date
- Oct 2015
- Location
- Knoxville,IA
- Posts
- 2,368
Thanked: 762
That's the way to do it. I did mine by hand sanding and it sucked. Plus I had blanks .250 thick that I got down to like .114 thick. Lots of sanding. Originally Posted by jseitz
Nothing is fool proof, to a sufficiently talented fool...
-
05-15-2017, 10:21 PM #17Senior Member
- Join Date
- May 2016
- Location
- Yakima, WA
- Posts
- 177
Thanked: 89
I opted for the 1/8" blanks at Masecraft. I'm hoping those work by being thin enough to shape, but not so thick as to require loads of sanding. Originally Posted by ejmolitor37
RezDog and ejmolitor37 like this.
-
05-15-2017, 10:40 PM #18Skeptical Member
- Join Date
- Nov 2016
- Location
- Colorado Springs
- Posts
- 10,548
Thanked: 2194
1/8 inch is still a bit thick. Finish the scales around .100 inches and you will be good to go. Good luck.
ejmolitor37 likes this.It's just Sharpening, right?
Jerry...
-
The Following User Says Thank You to Gasman For This Useful Post:
jseitz (05-15-2017)
-
05-24-2017, 06:41 AM #19Senior Member
- Join Date
- May 2016
- Location
- Yakima, WA
- Posts
- 177
Thanked: 89
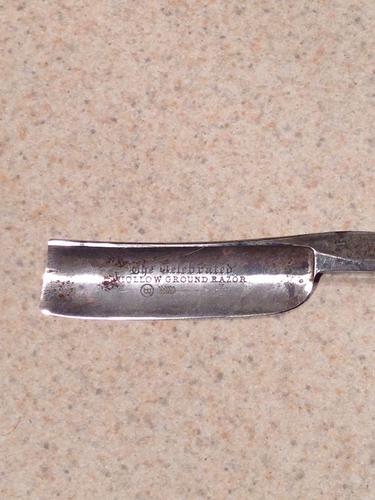
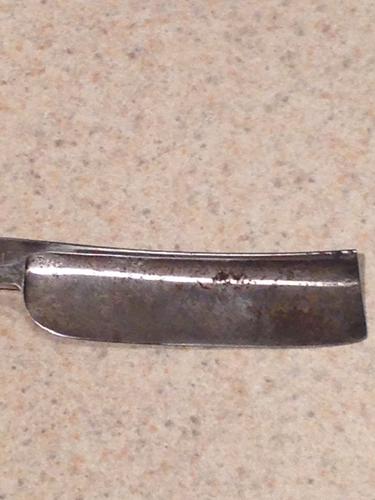
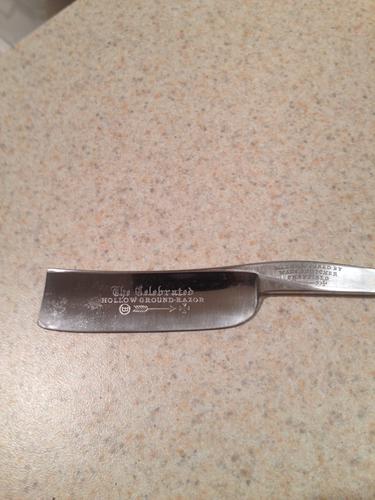
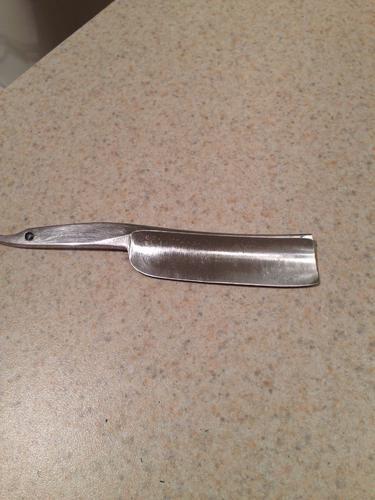
Thanks everyone, especially Euclid440. Before and after pictures (600 up through 1200 grit and a good Mother's polishing)
-
05-28-2017, 04:28 PM #20Senior Member

- Join Date
- Mar 2015
- Location
- Akron, Ohio
- Posts
- 12,090
Thanked: 4312
You did very well, I'm glad you were able to restrain yourself from total destruction, and keep it simple. [emoji482]
ejmolitor37 likes this.Mike


 Reply With Quote