
Results 1 to 10 of 20
 33Likes
 LinkBack URL
 About LinkBacks
-
05-13-2017, 05:10 PM #1Senior Member

- Join Date
- May 2016
- Location
- Yakima, WA
- Posts
- 177
Thanked: 89 First Restoration Help--Advice for Next Steps
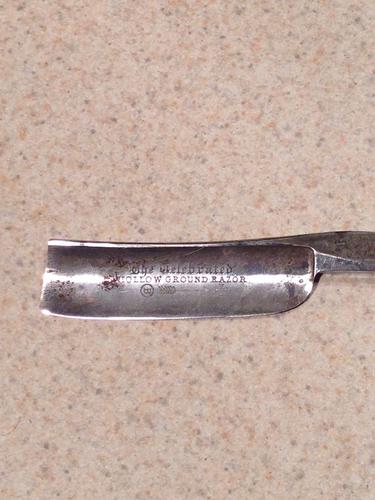
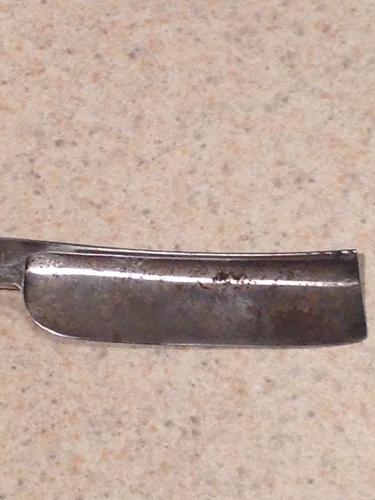
Trying my first restoration. Here are the before pics:
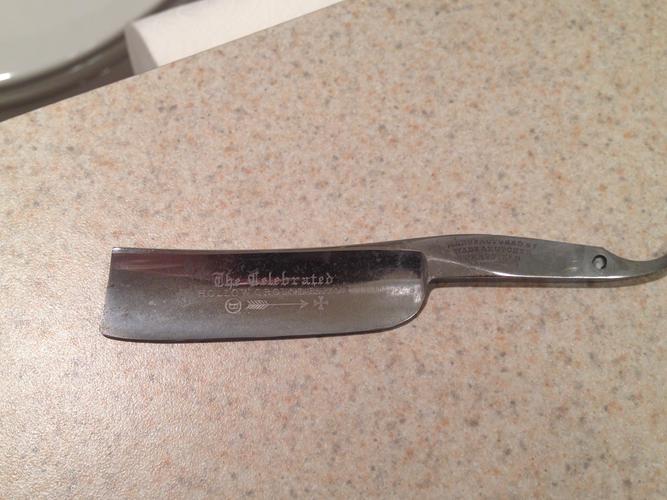
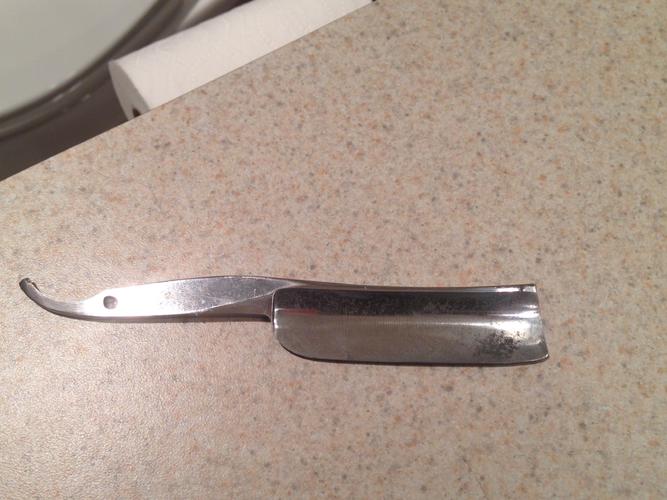
After some initial advice, I've got the blade cleaned up from the rust after an Evapo Rust soak, followed by some 0000 steel wool, and then some Mother's polish. It's definitely an improvement:
I'd like to take it a bit further, but I don't want to lose the etching. The blade is relatively smooth, so the stained portions, I fear may be devil's spit (especially the large discoloration on the backside of the blade near the toe). I really don't want to get into that, especially where it is located as I think that could wreck the blade if too much metal got removed.
I have a full range of wet/dry sandpaper and a can of WD 40. I haven't bought a buffer, but there's a HF in town so I could go get a cheap set up.
I don't want a mirror shine necessarily, but I'd like to get it a bit better looking than what it is. Looking to you blade savants for some guidance on the next steps. Thanks!
-
05-13-2017, 09:24 PM #2Skeptical Member


- Join Date
- Nov 2016
- Location
- Colorado Springs
- Posts
- 10,559
Thanked: 2197
Im not the most experianced in these things but i do know it dont take much to get into the etching. Id work it with some 2000grit carfully and then polish and pin. The little scars and marks show its age. Dress it in horn and you got a winner.
But dont do anything i say until someone else comments.ejmolitor37 and MW76 like this.It's just Sharpening, right?
Jerry...
-
The Following User Says Thank You to Gasman For This Useful Post:
jseitz (05-14-2017)
-
05-13-2017, 09:35 PM #3Matt

- Join Date
- Dec 2015
- Location
- Albany, NY
- Posts
- 971
Thanked: 260
If it were me id be done with the blade at this point. I am an advocate of letting the blade look its age. You did what I like to call a 'dirty polish'. The rust is cleaned up, shes kinda shiny. I say let it be.
Paul76 likes this.
-
05-13-2017, 09:35 PM #4Senior Member


- Join Date
- Oct 2015
- Location
- Knoxville,IA
- Posts
- 2,368
Thanked: 762
Jerry gives solid advice here, honestly that is one good looking W&B and they don't all have to be show queens. I personally don't really care for the full mirror look on old razors. If you don't like that dark spot on the back here is something that may help lessen it, 2000 grit wet/dry and wd40 on a wine cork. Start at the spine and go toward the edge. Not in a scrubbing motion just straight strokes down, then pick it up off the blade and spine to edge again full length of the blade. This is time consuming but 2k scratches will polish out by hand with Mothers mag polish.
Or scales and pin job then hone and shave if you have any questions holler and we will give the best advice we can to guide you along. A buffer is not needed IMO, I do everything by hand and yes it is time consuming but end results to me are just fine and I appreciate the work put in.
What scale material are you going with? Original or something wild ?Nothing is fool proof, to a sufficiently talented fool...
-
The Following User Says Thank You to ejmolitor37 For This Useful Post:
jseitz (05-14-2017)
-
05-15-2017, 12:03 AM #5Senior Member
- Join Date
- May 2016
- Location
- Yakima, WA
- Posts
- 177
Thanked: 89
I've got some black horn blanks on the way--studying up on that too! Originally Posted by ejmolitor37


-
05-15-2017, 02:25 AM #6Skeptical Member
- Join Date
- Nov 2016
- Location
- Colorado Springs
- Posts
- 10,559
Thanked: 2197
Nice choice. They should look good on it. I know there a great post somewhere here with detail instructions on how to make horn scales. Look around for it. Or someone put in a link. That beyond my abilities. Now where is that "ANY" button. Ha.
ejmolitor37 likes this.It's just Sharpening, right?
Jerry...
-
The Following User Says Thank You to Gasman For This Useful Post:
jseitz (05-15-2017)
-
05-15-2017, 02:30 AM #7KN4HJP

- Join Date
- Feb 2015
- Location
- Chesapeake, Virginia
- Posts
- 932
Thanked: 261"Every normal man must be tempted at times to spit on his hands, hoist the black flag, and begin to slit throats." -H. L. Mencken
-
05-15-2017, 02:31 AM #8Senior Member

- Join Date
- Feb 2013
- Location
- South Carolina, USA
- Posts
- 1,181
Thanked: 162
I believe you've done a great job as she is.
-
The Following User Says Thank You to Wayne1963 For This Useful Post:
jseitz (05-15-2017)
-
05-15-2017, 02:31 AM #9Senior Member
- Join Date
- Oct 2015
- Location
- Knoxville,IA
- Posts
- 2,368
Thanked: 762
Gasman is right there is a great tutorial around. Horn is surprisingly easy to work with. Shaping can be done easily with half a pair of scissors. Be sure to keep your scales stuck together while shaping. Makes life easier. I learnt that the hard way
Nothing is fool proof, to a sufficiently talented fool...
-
The Following User Says Thank You to ejmolitor37 For This Useful Post:
jseitz (05-15-2017)
-
05-15-2017, 02:34 AM #10Skeptical Member
- Join Date
- Nov 2016
- Location
- Colorado Springs
- Posts
- 10,559
Thanked: 2197
Yep! Thats the one I was talking about. It helped me! Originally Posted by sqzbxr
ejmolitor37 likes this.It's just Sharpening, right?
Jerry...
-
The Following User Says Thank You to Gasman For This Useful Post:
ejmolitor37 (05-15-2017)


 Reply With Quote