
Results 11 to 20 of 35
 140Likes
Thread: A method for pressing horn
 LinkBack URL
 About LinkBacks
-
04-17-2018, 01:52 PM #11Senior Member


- Join Date
- Feb 2015
- Location
- Duluth, GA - Atlanta OTP North
- Posts
- 2,546
- Blog Entries
- 1
Thanked: 315
Thanks for answering our questions. Im glad you got pictures of the work in progress. The scales you've made made look great and your still refining the process.
Just to clarify, I wasn't making any suggestions about chemicals. I was just curious about how it was done originally.
Seems like one of the biggest hurdles (for guys like me) would be the actual designing of the tooling, knowing who could make it, etc.
It would be amazing to see what some of you guys with design/engineering/machinist/forging experience could create if you were able to collaborate on a project together.


I always imagined them using an extremely hot press to make scales, so I'm not surprised you had to heat it up so much.
Didn't they originally use thinner more pliable cattle horn for scale making vs the thick blanks we buy now?
I don't remember reading about anyone boiling scales in neatsfoot oil instead of just soaking. Wish I could try that, especially if it makes the scales stronger.
Thanks for all the info!!MikeT likes this.
-
04-17-2018, 02:34 PM #12Senior Member

- Join Date
- Mar 2016
- Location
- Tennessee, USA
- Posts
- 118
Thanked: 112 I am hoping that others will refine the process and think of things that I haven't. There is a vast area of experimentation out there to try. One advantage the old guys had was that they had tons of horn to work with, and more importantly, screw up with. Delaminating off thinner pieces is another art, and band sawing requires blades with very thin kerfs that run very true. As far as other skills out there; someone with lost wax casting experience and equipment could make a very highly detailed, contoured cast brass die which could have a follow die for pressing old style contoured designs. Each day I think of new possibilities, and where there is a will, there is a way. I made the fixture with a drill press and a hand tap. Haven't done that in years.
 Originally Posted by JP5

For boiling horn, I use a $10 hot plate, an old frying pan, some tweezers and some 100% Neatsfoot. When I try a piece treated that way before heating and pressing, I'll surely report back. Should be interesting. One of the differences in oil boiling and water boiling is that oil doesn't make the horn revert to it's curved memory. Anther feature is that like the hot pressing, it's done as soon as it cools whereas water requires slow drying while clamped.
Keep cogitatin'
-
The Following 4 Users Say Thank You to Oldnick For This Useful Post:
Geezer (06-23-2018), MikeT (08-05-2018), randydance062449 (04-20-2018), sharptonn (04-17-2018)
-
04-17-2018, 03:08 PM #13At this point in time...


- Join Date
- Jun 2007
- Location
- North Idaho Redoubt
- Posts
- 27,167
- Blog Entries
- 1
Thanked: 13249
The late Neil Miller probably forgot more about the old processes than most of us know, he and I had a few discussions on here about Horn and Scale making
In fact, it was from one of those where I got the idea of using the hot oil, IIRC they were actually using Whale oil back then BUT you might take a look through some of Neil's old posts and see if there are more ideas for you in there. I know I gleaned quite a few i have used in the workshop over the years
https://straightrazorpalace.com/memb...il-miller.html"No amount of money spent on a Stone can ever replace the value of the time it takes learning to use it properly"
Very Respectfully - Glen
Proprietor - GemStar Custom Razors Honing/Restores/Regrinds Website
-
-
04-17-2018, 03:18 PM #14Senior Member
- Join Date
- Feb 2014
- Location
- Oklahoma City
- Posts
- 220
Thanked: 71
what an awesome setup looks fantastic, thanks for sharing. Originally Posted by Oldnick
-
The Following User Says Thank You to mlvallance For This Useful Post:
Oldnick (04-17-2018)
-
04-18-2018, 04:56 AM #15Senior Member

- Join Date
- May 2014
- Location
- Easley, SC, USA
- Posts
- 1,861
Thanked: 480
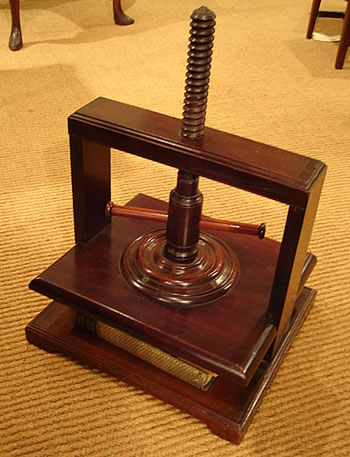
For those interested in the historical press. It was essentially a book press with a single large threaded rod into a flat plate. I've never measured the max pressure on one, but 50 psi can be reached easily (equivalent to about 3.5 tons), and I would guess that 3 or 4 times that pressure could be reached.
The old presses looked like the attached image:
 Some people never go crazy. What truly horrible lives they must lead - Charles Bukowski
-
04-18-2018, 10:31 PM #16Captain ARAD.


- Join Date
- May 2011
- Location
- Pacifica, CA
- Posts
- 2,474
Thanked: 2227
YESSSS! I am so glad you had a chance to post this, and I am so glad someone is doing this! Originally Posted by Oldnick
I had always planned on either CNC machining steel dies or finding someone to do iron cast molds. The Owosso magnesium dies is a fascinating option I never would have considered, and now you have me wondering about how I could get dies made that way and then use standard engraving techniques for more detail. Seems like itd mostly be a mental adjustment of how to do the design and where to leave material.
Have you thought about ways of making the mold do the cutout? The traditional ones had an interlocking lip that pressed the horn right out of the blank, like a cookie cutter.
Im also thinking that if I try this, Im going to make a getup so I can boil the entire press in neatsfoot oil. Which, I think, means something I can put on the burner of my grill so I can do it outside.-Zak Jarvis. Writer. Artist. Bon vivant.
-
The Following User Says Thank You to Voidmonster For This Useful Post:
MikeT (08-05-2018)
-
04-19-2018, 03:17 PM #17Senior Member
- Join Date
- Mar 2016
- Location
- Tennessee, USA
- Posts
- 118
Thanked: 112
Zak, you'll notice I titled the thread"A method...", it's certainly not, "THE method". Every day I find a new problem, or learn something that confounds me. I had thought CNC work, and Owosso does that if you can provide the proper files. I lost all my CAD programs when I retired and I'm not sure of how small of a tool they can use. I have also thought about how to have an etched die made that then would allow for engraved enhancement, but I ain't no engraver. The die for that would best be one of their copper dies. Originally Posted by Voidmonster
A cast mold would be very good, and I can do that out of brass, but that is way down the road. I have been having enough problems doing what I am currently doing. Yes, for engraved dies, you have to think and work in reverse, and then there is the problem of just how much you can deflect the horn into the die. Geezer has knowledge of cutting dies, but there would be a lot of trial and error in making a precision follow-die that would cleave the horn at the edges. Horn thickness would be a big variable. I have made dies that fall away from the design, but without a follow die, the deflection at that edge makes the horn want to delaminate at the edges of the stock.
I made some 1/32" thick backup plates for a pressing last night. The results were good, and interesting. I'll post some photos later today. The confounding thing was that I had taped the follow plates in position. The tape left an impression on the horn THROUGH the metal plates, and the plates have no impression of the tape???!!! I'm having a little trouble getting my head around that. But then there's this impression: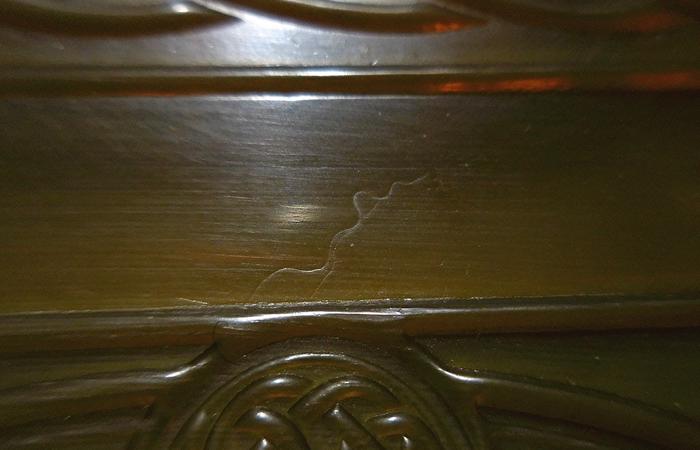
That's a dog hair!
There is MUCH to explore even using this jackleg method. I'm not too sure I'll be boiling the press though. . Anyway, I'm glad you are enjoying my explorations....jump in!
-
The Following User Says Thank You to Oldnick For This Useful Post:
MikeT (08-05-2018)
-
04-19-2018, 05:30 PM #18Captain ARAD.
- Join Date
- May 2011
- Location
- Pacifica, CA
- Posts
- 2,474
Thanked: 2227
One of my major problems in life is suffering from the delusion that I can pick up any skill I set my mind to, so I imagine I could learn to do die-engraving. This is probably quite far from true, but I'm willing to try. Originally Posted by Oldnick
My other problem is that I will cheerfully spend weeks making a faster method to do a thing that takes hours, so the CNC machined die is awfully appealing (and of course I'm sure I could figure out how to do that without having ever tried to do that).
You begin to see how I get in trouble.
I've got to think that one of the keys to getting the plates to cut as well as form is having the whole jig slathered in some kind of lube. I recall Neil saying they used tallow. There was that bit about the liquidized keratin dripping out of the molds.
But I'm also excited by the idea of boiling transparent horn in neatsfoot oil to improve its clarity -- that way lies some very good faux tortoise. I have everything I need for that experiment except blanks with good clarity. They're all streaky.
Whoa! That is a neat trick with the tape! Originally Posted by Oldnick
-Zak Jarvis. Writer. Artist. Bon vivant.
-
04-20-2018, 09:49 AM #19Senior Member
- Join Date
- Mar 2016
- Location
- Tennessee, USA
- Posts
- 118
Thanked: 112
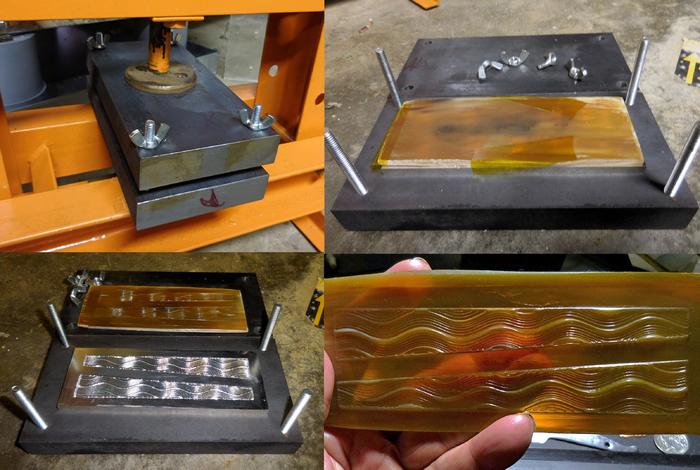
Xnay on the "boiling" horn. I heated a slab yesterday, and took it to a little higher heat and longer period. When the micro bubbling stopped, I took it out to find that it had shrunk badly. Flat surface on top had a sunken lagoon in the middle, other flat had developed waviness, the edges were concave, and the whole piece wanted to revert to its curved memory. Not good. Seems that only slight treatment at lower temperatures and times has any value whatsoever.
-
The Following 2 Users Say Thank You to Oldnick For This Useful Post:
Gasman (08-06-2018), Voidmonster (04-20-2018)
-
04-20-2018, 11:03 AM #20Hones & Honing

- Join Date
- May 2005
- Location
- Saint Paul, Minnesota, United States
- Posts
- 8,023
- Blog Entries
- 1
Thanked: 2209
Thank you for posting this!
It will inspire others to explore this lost art.
Keep us updated please.
Voidmonster and MikeT like this.Randolph Tuttle, a SRP Mentor for residents of Minnesota & western Wisconsin
-


 Reply With Quote