
Results 1 to 10 of 35
 140Likes
Thread: A method for pressing horn
 LinkBack URL
 About LinkBacks
-
04-15-2018, 03:43 PM #1Senior Member


- Join Date
- Mar 2016
- Location
- Tennessee, USA
- Posts
- 118
Thanked: 112 A method for pressing horn
Having read everything I could on the internet and other sources on the old methods of pressing horn, I finally, after much experimentation, have gotten to where I can at least produce a reasonable facsimile of the older work. Making the horn pliable can be achieved by boiling, flaming, baking, and heat lamps, but each of those methods has serious drawbacks when trying to align a piece of hot horn to a cold die, and then press it. The solution is to heat the horn and the die together as a unit. More experimentation (read as failures) based on that concept, led me to making this fixture.
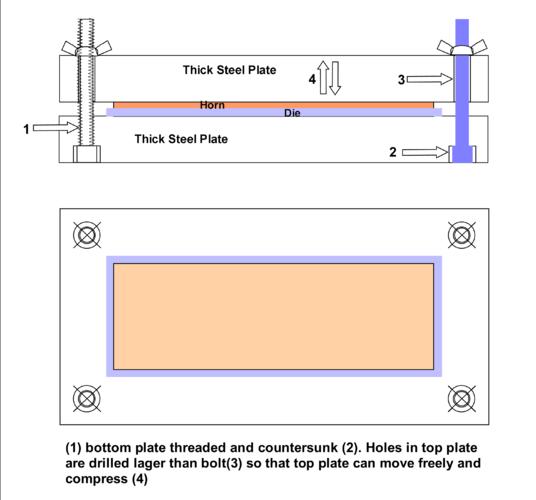
The top plate moves up and down freely, which allows for compression once the fixture is in the press. The wing nuts tighten the horn and die firmly together in the cold state. Keeping the horn and die aligned is very important, and high temperature tapes can be used to initially locate and fix the two until the top plate is affixed and tightened. Once tightened down, the unit can be handled without affecting the line-up, and that is a key feature. BTW this is heavy. If I had a better press, the weight could be lowered a bit.
I am still logging values for optimal temperatures and times, but my examples were made by heating the fixture to 450 degrees for about 45 minutes. The time is to make sure that the fixture and contents are all at temperature. I use the kitchen oven, and no, it doesnt smell. Its ready when a toothpick inserted into the middle comes out clean ..oh, wait a minute, thats a cake, never mind.
I dont have the perfect press, but I have an old arbor press fitted with a 12 ton jack. That it has a single point ram is not the best configuration, but I can get it to work by pressing different areas. The wing nuts on the fixture can be tightened once compression loosens them, so I can then move it around. A good press would be a heavy duty rectangle of steel with two jacks mounted side by side. 6 ton jacks would probably work. There is lots of experimentation and designing left for the reader to explore. I have had areas end up not being deep enough, and you can realign, reheat and repress.
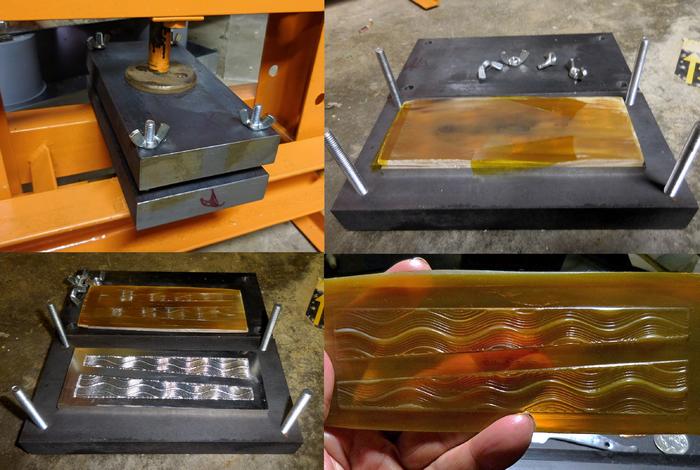
Once the horn has been pressed, the fixture is left under pressure until cool. You can speed that up with fans and laying aluminum bars on the fixture to act as heat sinks.
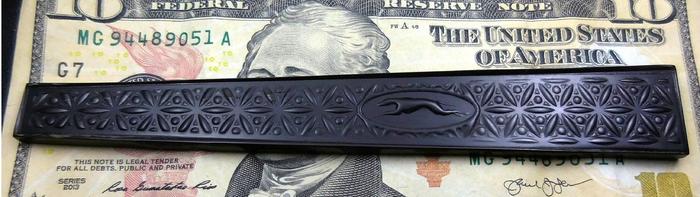
There is much to say about the dies, and the artwork for the dies, but to keep this from being overly long Ill answer questions about that as they are asked. In short, Im using photo etched magnesium alloy dies obtained from Owosso Engraving Company. I cant say enough good things about them. The dies generally cost around $50 for the 2-up size. They can even make hand engraved dies that could emulate the finely detailed work of the past, but they would be very expensive. The art used for making the dies needs to be black and white vector based artwork. I have been asking for a 3/32 depth, but may move back to 1/16. Whether something is right reading or wrong reading is also very important. I made a mistake on the greyhound die. I had just flipped it around to make the second image. I should have mirrored it. The greyhound is upside down on the read side of the razor @@##@#. The correct die is in the mail. Who knew a dog could be right or wrong reading?
Blank dies can also be made that slightly impress the back of the horn over the design area on the other side of the horn. These can be made from thin sheet metal, or you could order an etched one. Even a layer of thin tape will make an impression. A random pattern of bits and pieces could be pressed into and all over a whole piece of horn, and not require a die. There is very much to play with. Just remember that what is etched into the die will be raised on the horn. Get a good pair of oven mitts.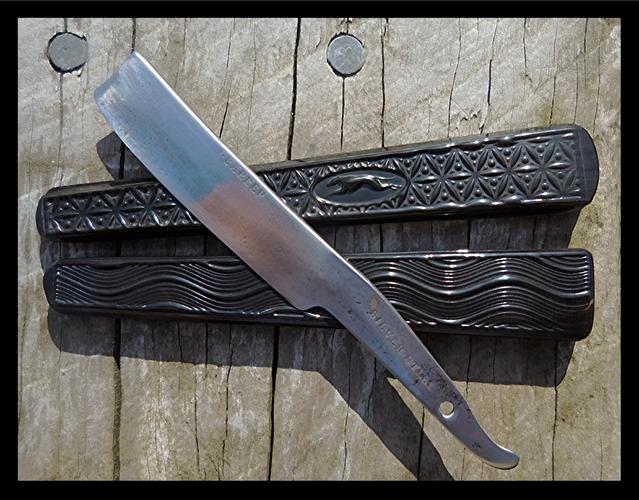
-
The Following 28 Users Say Thank You to Oldnick For This Useful Post:
32t (04-15-2018), ajkenne (04-16-2018), BobH (04-15-2018), criswilson10 (04-18-2018), dimab (04-15-2018), easyace (04-18-2018), evnpar (04-20-2018), Gasman (04-15-2018), Geezer (04-15-2018), JOB15 (04-15-2018), Johntoad57 (04-15-2018), karlej (04-20-2018), MedicineMan (04-15-2018), MikeT (08-05-2018), MisterClean (07-15-2018), mlvallance (04-17-2018), MrZ (04-17-2018), onimaru55 (04-15-2018), outback (04-18-2018), ovidiucotiga (04-19-2018), Pete123 (04-15-2018), randydance062449 (04-20-2018), RezDog (04-15-2018), sharptonn (04-15-2018), SRmanufacture (07-31-2018), tintin (04-15-2018), Utopian (04-19-2018), Voidmonster (04-18-2018)
-
04-15-2018, 03:51 PM #2Senior Member


- Join Date
- Feb 2013
- Location
- Haida Gwaii, British Columbia, Canada
- Posts
- 14,457
Thanked: 4830
you Have put a lot into this. I am impressed with the work and the results. Thanks for sharing.
It's not what you know, it's who you take fishing!
-
04-15-2018, 03:51 PM #3At this point in time...


- Join Date
- Jun 2007
- Location
- North Idaho Redoubt
- Posts
- 27,206
- Blog Entries
- 1
Thanked: 13250
I don't Press Horn per se
I only use a press, to Straighten it and relieve the tendency to twist
I have found that 375° and Hot Oil (Think French Fry machine) works best for me and it keeps the horn from drying out in the oven
That might give you some ideas
Really love what ou have done to revive an old art form"No amount of money spent on a Stone can ever replace the value of the time it takes learning to use it properly"
Very Respectfully - Glen
Proprietor - GemStar Custom Razors Honing/Restores/Regrinds Website
-
-
04-15-2018, 05:35 PM #4Senior Member

- Join Date
- Jun 2013
- Location
- archbold ohio
- Posts
- 2,379
Thanked: 546
That's great! thank you for sharing (and for your hard work). I'm wondering though what would be a practical way to do "one offs"? I'm thinking also that doing one scale at a time would allow less pressure if one doesn't have a hydrollic press.
What sort of press was used in the old days? Would C-clamps do the job?
-
04-15-2018, 05:47 PM #5Senior Member


- Join Date
- Feb 2016
- Location
- San Antonio, TX
- Posts
- 1,862
Thanked: 435
Outstanding! Thank you for posting!
Oldnick likes this.Semper Fi !
John
-
04-15-2018, 08:27 PM #6Senior Member

- Join Date
- Feb 2015
- Location
- Duluth, GA - Atlanta OTP North
- Posts
- 2,546
- Blog Entries
- 1
Thanked: 315
Thank you so much for posting this!!!!!

How difficult was it designing the dye and did you already have a background using similar programs?
Using anything to condition the horn before/during/after pressing?
Do you plan on trying to press scales with rounded faces?
I was thinking MAYBE you had used a different medium that could be molded on top of the horn, since pressing horn requires dies, heat, and a lot of pressure. But you did it!!!!
Someone please correct me if I'm wrong, but didn't they also use caustic chemicals in the pressing process back then?MikeT likes this.
-
04-15-2018, 08:37 PM #7www.edge-dynamics.com

- Join Date
- Feb 2013
- Location
- London
- Posts
- 3,066
Thanked: 512
-
04-15-2018, 09:51 PM #8Senior Member
- Join Date
- Mar 2016
- Location
- Tennessee, USA
- Posts
- 118
Thanked: 112
Yes, I have a strong graphic arts background. You're on your own, and please experiment and report back. My first experiments were with boiled horn and a vise. If you have a big vice, it will work, but the fixture is the key as far as alignment and ease of use is concerned. A gang cluster of LARGE clamps should give results, but the pressure is great, so you will really need to crank down with extensions on the handles. Some of the earliest pressed horn was probably executed using screw based clamping. You can find a really inexpensive bearing press on Craigslist or at a pawnshop. Mine was remaindered at an auction. One offs is how I started. Originally Posted by tintin

Last edited by Oldnick; 04-15-2018 at 10:02 PM.
-
The Following User Says Thank You to Oldnick For This Useful Post:
Geezer (06-23-2018)
-
04-15-2018, 09:59 PM #9Senior Member
- Join Date
- Mar 2016
- Location
- Tennessee, USA
- Posts
- 118
Thanked: 112
I have a strong graphic arts background. I used an inexpensive graphic convert to vectors program. Designing requires at leat a passing knowledge of graphics and the company I mention has very informative faqs and tips concerning artwork and diies. Yes, the whole secret has been to keep the dies as hot as the horn. As far as "doing it", can you say obsession? How exactly did they do this in the past? I really haven't found a reference that is more than cursory descriptions. Caustic chemicals affect the horn in a variety of ways, but none of them are particularly useful in pressing. Caustics tend to bleach the horn before making it pliable and others eat it. I am sure that there are probably useful pretreatments, but I haven't discovered any that don't cause other problems. After treatments are Neatsfoot soaking, and hot Neatsfoot does even more miracles. Originally Posted by JP5
Oh, yeah. Rounded faces is an entirely new box of worms, but given time and funds will probably be explored, but don't hold your breath.Last edited by Oldnick; 04-15-2018 at 10:28 PM.
-
The Following 3 Users Say Thank You to Oldnick For This Useful Post:
Geezer (06-23-2018), MikeT (08-06-2018), randydance062449 (04-20-2018)
-
04-15-2018, 10:21 PM #10Senior Member
- Join Date
- Mar 2016
- Location
- Tennessee, USA
- Posts
- 118
Thanked: 112
I have boiled the horn in Neatsfoot, and was amazed to watch micro bubbles escape the horn as the remaining moisture was replaced with oil. It is also interesting that the horn is immediately not oily as it would be in a cold soak, and hard and super translucent. I have yet to attempt pressing a boiled in oil piece, but it's on the list of things to experiment with. I'll report my findings when I do. Reviving the "lost" art was my obsessive purpose. I am extremely happy to have gotten it this far, and there are still doors to open. Originally Posted by gssixgun
-
The Following User Says Thank You to Oldnick For This Useful Post:
MikeT (08-06-2018)


 Reply With Quote