
Results 1 to 10 of 98
 318Likes
Thread: An idea for a contact grinder.
 LinkBack URL
 About LinkBacks
Hybrid View
-
03-15-2019, 07:50 PM #1Senior Member


- Join Date
- Jan 2015
- Location
- Pinole, ca
- Posts
- 1,526
Thanked: 339
You’re edge thickness should end up in the .005” area. I would think you could go slightly less than 2mm for ht.
You could set your drum sander up to do final sanding pretty easily I would think. A machinists vise with some flat stock and a series of spacers may work to keep from getting wavy. As you get close to final thickness free hand it to blend in anything around the shoulder since that may be a problem area with the swoop you’ll need to do to get the shoulder right.
I should be up and running in a month or two for heat treating so if you want to experiment with different thicknesses for heat treating we could probably get something figured out so you’re not spending all your time on finish grinding. Finish grinding is what took me the longest. There seems to generally be enough thickness to take care of any warping due to ht when grinding post ht. Smiling blades lend themselves to being slightly warped and still being able to maintain an even bevel and easy honing.Geezer and Voidmonster like this.
-
The Following User Says Thank You to jfk742 For This Useful Post:
Voidmonster (03-15-2019)
-
03-16-2019, 06:53 PM #2
If you can CNC, I'd not use the blanks, but start with flat bars that you can easily mount, and then cut the hollows etc, and only then profile them.
Til shade is gone, til water is gone, Into the shadow with teeth bared, screaming defiance with the last breath.
To spit in Sightblinders eye on the Last Day
-
The Following User Says Thank You to Bruno For This Useful Post:
Voidmonster (03-19-2019)
-
03-20-2019, 12:05 AM #3Captain ARAD.


- Join Date
- May 2011
- Location
- Pacifica, CA
- Posts
- 2,474
Thanked: 2227
Ironically, I have one of those Dremel drill presses. It was the very first tool I bought for working on razors, to try and drill out the pins. It was terrible at that... And would likely be perfect for pique work. The problem is that I have the stand, but not the correct Dremel tool anymore. I replaced it with a jewelery maker's rotary tool and a small, rechargeable Dremel. I don't *think* the rechargeable model would fit into the gantry on the press... However, the rechargeable is probably viable hand-held if I'm using my magnification visor. Originally Posted by 6cuda6

Yeah. That was exactly my thinking. I've got some 1084 that should be fine for that, in a couple different dimensions. I don't think I could get as many razors out of a piece using the CNC method, but I'm happy to sacrifice that in the name of laziness. Originally Posted by Bruno
If only I had access to one of those super fancy CNC machines that'll do hard machining. Then I could just get the steel blanks heat treated and cut from that!
Last edited by Voidmonster; 03-20-2019 at 03:18 AM.
Geezer likes this.-Zak Jarvis. Writer. Artist. Bon vivant.
-
04-15-2019, 11:48 PM #4Captain ARAD.
- Join Date
- May 2011
- Location
- Pacifica, CA
- Posts
- 2,474
Thanked: 2227
My project full of projects has come to a temporary major slowdown while I wait for the shop I buy time at to move to a new facility.
In the interim, some things Ive done:
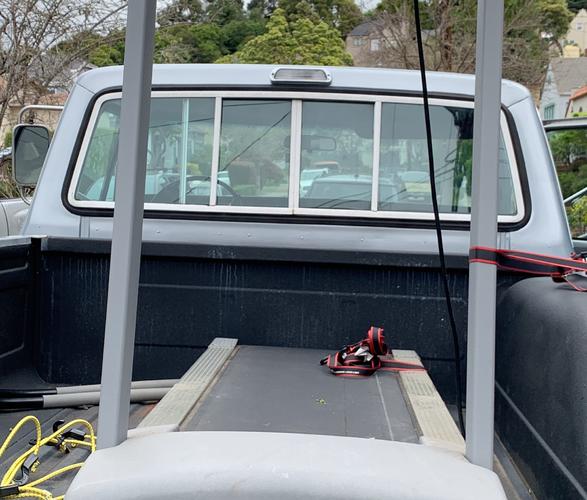
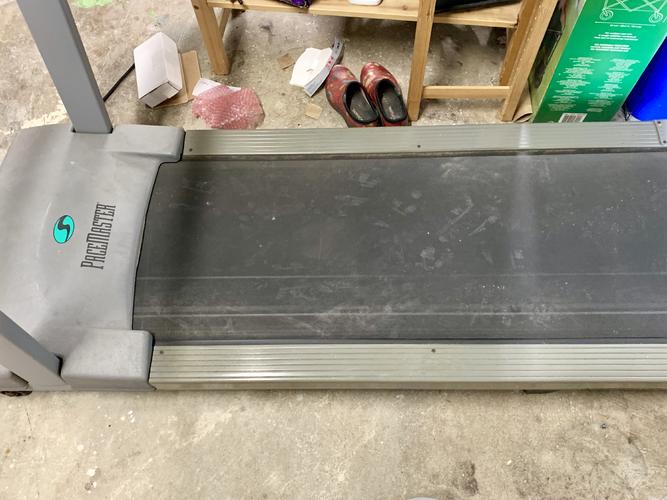
I borrowed my friend Brian and his truck to drive out to East Bay and get a free treadmill.
Why?
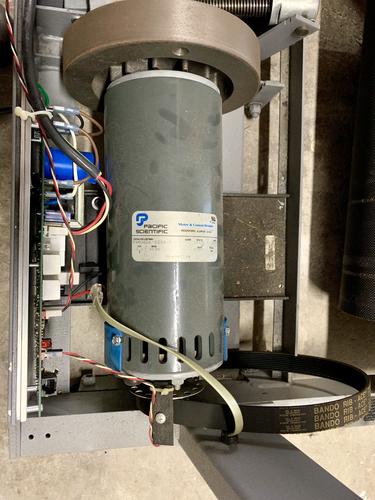
Inside it is a DELICIOUS MOTOR.
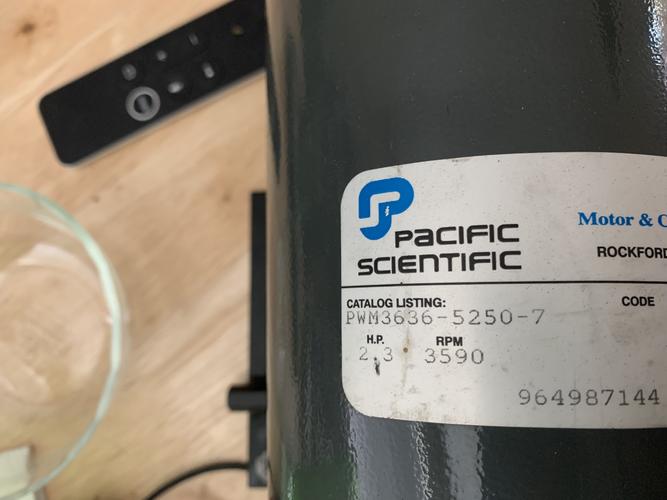
2.3HP, massive torque, DC so it can be easily run off a simple driver with a potentiometer. The driver circuitry will cost me about $15, and that will be the total cost for a motor with massive toque that runs at continuously variable speed.
When this popped up, Id already been talking to SRP member JFK742 to pool resources and make us both some nice contact grinders, so I abandoned the idea of modifying my poor little abused lathe and settled on making a dedicated thing. Thats all waiting on having access to the waterjet again.
Today I beat my head against trying to thread a part to use in a power punch to cut and shape washers. Moral to the story, I am not threading 7/16th 01 drill rod with a $20 Harbor Freight tap & die kit. So I spent the weekend hitting flea markets and thrift stores. Found some super neat stuff, but not the tool I was looking for.
And then theres my most important project of the day:
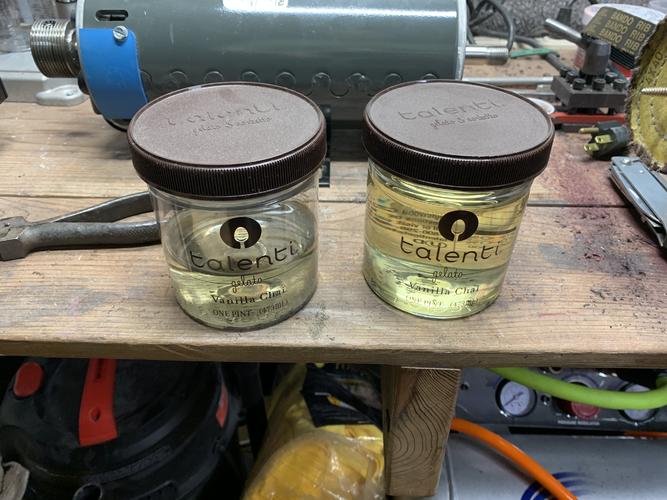
LABELING
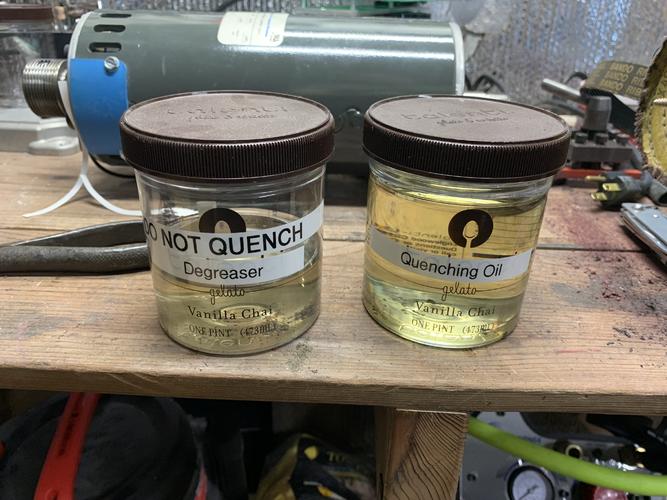
Thankfully only inspired by putting the quenching oil away after using it and noticing how incredibly similar it looked to the HIGHLY FLAMMABLE SOLVENT.
For all I know, the degreaser needs to be hotter than >1300 Fahrenheit before it combusts.
My desire to experiment doesnt extend that far.
Edited:
Naaah. Im leaving that typo. The motor DEFINITELY has a very large hat.Last edited by Voidmonster; 04-15-2019 at 11:50 PM.
-Zak Jarvis. Writer. Artist. Bon vivant.
-
04-15-2019, 11:50 PM #5Str8Faced Gent.


- Join Date
- Aug 2013
- Location
- Orangeville, Ontario
- Posts
- 8,463
- Blog Entries
- 1
Thanked: 4207
Nice score on the dc motor!
Look forward to seeing the build.
 Voidmonster likes this."Depression is just anger,, without the enthusiasm."
Steven Wright
https://mobro.co/michaelbolton65?mc=5
-
The Following User Says Thank You to MikeB52 For This Useful Post:
Voidmonster (04-16-2019)
-
04-16-2019, 12:06 AM #6Razor Vulture

- Join Date
- Oct 2010
- Location
- Lone Star State
- Posts
- 26,170
Thanked: 8618
Seems Cangooner built a grinder with a treadmill motor?

Maybe he can chime-in....Voidmonster likes this.
-
The Following User Says Thank You to sharptonn For This Useful Post:
Voidmonster (04-16-2019)
-
04-16-2019, 12:23 AM #7Captain ARAD.
- Join Date
- May 2011
- Location
- Pacifica, CA
- Posts
- 2,474
Thanked: 2227
I found a couple of youtube videos of folks building contact grinders, and a bunch more of all sorts of other things. Originally Posted by sharptonn
My plan is a little different than most.
The downside of these DC motors for grinders is that they're completely open and force air through the body of the motor.
The motor I got is a little unusual for a treadmill motor in that it's got two spindles. One of them is short, keyed and has a pulley wheel, the other is threaded, keyed and had the flywheel with an integrated fanblade.
I'm not going to use the flywheel, but I am going to make a small fan blade to go on there. The motor is just the right size for drier ducting to slip over it, so I'm going to duct out the end with the fanblade and put the other in a small mostly sealed box. There should be no vents that dust can get into, then I can run the ducting to well away from my work area and put a filter on it. VOILA! Clean motor!-Zak Jarvis. Writer. Artist. Bon vivant.
-
04-16-2019, 12:36 AM #8Incidere in dimidium


- Join Date
- Mar 2012
- Location
- Val des Monts, Quebec
- Posts
- 4,070
Thanked: 1440
That I did!
Mine was sourced from a free treadmill, and was a 1.9hp DC motor. When it worked, it worked perfectly. I more or less followed this video to wire up a controller for it:
The problem was that it pretty quickly died. I had shielded the hell out of it to protect from metal dust, but it still let the smoke out. One of the brushes completely burned out, taking the plastic end cap of the motor with it. I managed to find some cheap replacement parts for it, and it worked just fine again for a shorter while then let the smoke out again. But I think that was due to a faulty motor, and not dust getting in. Both times it died I opened the motor up, checked it closely and found nothing that should not have been there other than bits of brush. I.e. no visible dust, and I'd expect if it had got into the motor, the magnets should have kept at least some.
Then I bought a 3-phase 1.5hp motor from Automation Direct and a kbac 27d vfd to control it. Haven't looked back since.
So long story short, *with my motor* I should have just gone the vfd/3-phase motor route from the get go. However, I'm pretty sure that there was a fault in the motor itself and that its demise wasn't due to grinding dust. Even though it crapped out, I still ended up with a bunch of steel from the treadmill frame (useful for fabricating stuff in the shop - like my hammer rack), a bunch of electronic doodads I do not yet understand, and some copper ingots after tearing the motor apart and melting down the good stuff.
But when it worked, the treadmill motor along with the SCR/bridge rectifier controller really did work well. So hopefully yours will too, and last much longer than mine! Any questions, please feel free to shoot me a PM.
It was in original condition, faded red, well-worn, but nice.
This was and still is my favorite combination; beautiful, original, and worn.
-Neil Young
-
The Following 3 Users Say Thank You to Cangooner For This Useful Post:
Geezer (04-16-2019), sharptonn (04-16-2019), Voidmonster (04-16-2019)


 Reply With Quote
