
Results 31 to 40 of 82
 116Likes
 LinkBack URL
 About LinkBacks
-
09-07-2020, 08:06 PM #31Senior Member

- Join Date
- Sep 2020
- Location
- Austin, TX
- Posts
- 653
Thanked: 56
Holy cow everyone. So many replies here. Just in general, thank you. I have to start my bread before I can respond to everyone.
But let me just say one thing in response to Paul for everyone. I can be proud of myself and know that I suck at it. I got on here to learn from yall's expertise. In two days I've learned some very important things that I'd never figure out from YouTube. Even that my three fingers with 50-70 grams and my razors way less than 40g. Holy ****! So please, err on the side of harsh, rather than coddled.
Also, in my 12+ years on this planet I've learned this about forums. There are 100 weights to skin a... Umm... an airplane. I will listen to everyone giving those 100 ways and figure out the best one for me. I will debate and question each one of you as I try to figure out my way.
Also, I live primarily off of sarcasm and self depricating humor.outback likes this.
-
09-07-2020, 10:42 PM #32Senior Member
- Join Date
- Sep 2020
- Location
- Austin, TX
- Posts
- 653
Thanked: 56
Hi Onjmaru. I found that link the yesterday, and you're right. A lot of good stuff there. Got some good sanding techniques from there. Still gotta read some stuff about the scale repairs, it seems.
Hey Paul. And to be extra fair, I bought the shave ready razor and came home and stropped it. First every stropping, so it was probably less ready than it started. It took me a few stabs at it. I'd get it nice and razor sharp, but a few shaves later have to put it back on the stones. Then about 30-40 shaves ago I seemed to have done pretty OK and it hasn't seen a stone since. Every 5-10 (i don't really count), it'll start dragging a bit and I'll take it for a few laps on the rouged leather and it back topping arm hairs and feeling good. But, this will be the first time(s) I have to set a bevel, so that may need some help from a honemeister.
Now, with since I've only shaved with one razor, how to tell if the shave feels different because I have honed it poorly, removed too much material, or just different razors feel different. My first "restore" the first cheek felt pretty strange, kind of pulling, not getting that close. But, the rest of the shave seemed to go fine. Second shave felt good all the way through. But that razor is considerable lighter (33g vs 40g) than what I am used to. Also, the sharp toe vs the round toe is a bit of a twist.
I'm new here, but been lurking around about honing for long enough to plead the fifth on the taped spine thing. That seems to be the most controversial thing about straight razors. But the finger pressure is interesting. Gotta play around with that and see what I can do without them.
Hi OUtback. Even though I got your name wrong, you still come to help me out. Very kind of you . Since you do everything by hand as well, your's are certainly some of the posts I will seek out. I really need to check out that 3M marine stuff. It does an amazing job. I was really looking to play with refurbishing at the minimum investment ($10 in supplies so far), but I can't argue with that success. I mean, I bought this batch of razors knowing that full hollow are not good candidates and may never shave well, but figured they were good cheap practice. But, it looks like getting polish instead of sandpaper will drastically increase the chance of success.
And thanks for those pictures. It is very informative to see the steps in progression. You do some beautiful work.
Hey Sharptonn, I may have missed the boat on the "good blades", but the advice on finding good blades was a little vague. So, I tried more to find blades without chips and too much corrosion on the spine. Figured it would be a crime to destroy one of the cherished blades right out of the gate. But, apparently origin has is more important than any sort of brand name? I saw in the library here that the "name" may be some guy that did good work but never took off. Anyway, basically, if any of these are worth anything it is just dumb luck.
Homemade jigs...well, let's just say I ~MAY~ be able to pull off the scrap wood with a hole for knocking pins out. But, I'll figure something out. I am resourceful and very good with duck tape. Masking tape on the razor and duck tape over the masking tape and it ain't going nowhere.
Hi Mr. Z: That is good to know. I figured the scales are broken right next to wear the hammering was going to happen which would make that hard to fix. But once I get some pin kits I will look into that. Research Item #27 has been added to the list.
Thanks Again Everyone.
-
09-09-2020, 06:08 PM #33Senior Member
- Join Date
- Sep 2020
- Location
- Austin, TX
- Posts
- 653
Thanked: 56
I got some photos to share. The one with the yellow scales is an S. J. Zerbe and was the first one that I got and cleaned up. I spent a lot of time cleaning the rivets, so as Euclid pointed out, I will need to take them off. I am not looking forward to it because of the fancy metalwork on the scales. Anyway, this one is honed and I have used it twice and although I am still getting used to the weight, and I like the way it feels. I do have before photos of this one, but have not posted them yet. I can if it would be helpful or interesting.
The scaleless one is the #8 which is like a 1/2" blade with the crazy taper on it and the (now) broken scales. The before photos were posted before.
I did some shopping yesterday from yall's advice and have some 3M marine polish, some polishing compounds (crayons), popsickle sticks, and several other things coming.
In the mean time, I think should sit down with the dremmel and just remove all the scales. If it is not going well and I keep breaking or scratching them, then I will take them to the in-laws' drill press. But, I think I know what I did wrong last time (missed a step), so I am confident (ha).
Oh, and let me point out, that these photos are the first and third blades that I sanded. The small blade still needs the heel reshaped and I have no idea if I am going to try to do anything with the taper. But the next ones will be cleaned with solvents and polish and less aggressive sanding.Grazor and markbignosekelly like this.
-
09-12-2020, 01:35 PM #34Senior Member
- Join Date
- Sep 2020
- Location
- Austin, TX
- Posts
- 653
Thanked: 56
I think I'm getting better at unpinning. I found demonstration on here using a file to grind off the head. I put down a layer or two of tape to protect the scales. I found one razor that had no washers so I had to file right to the scale. Just kept replacing the tape as it wore away. Today I used scotch tape because it was handy, but masking tape is probably what I'll use because it'll be easier to see it wearing away. Also, WD40 seems to help.
Also I got the 3M Marine Metal Polish and a 6 pack of the Rouge type polish that I have rubbed on some small pieces of leather for cleaning the blades. I found an old thread from Euclid that described his progression. https://sharprazorpalace.com/worksho...ml#post1718171
-
09-12-2020, 06:34 PM #35Senior Member


- Join Date
- Mar 2015
- Location
- Akron, Ohio
- Posts
- 12,111
Thanked: 4314
You can also use a DE razor blade to protect the scales while using a file.
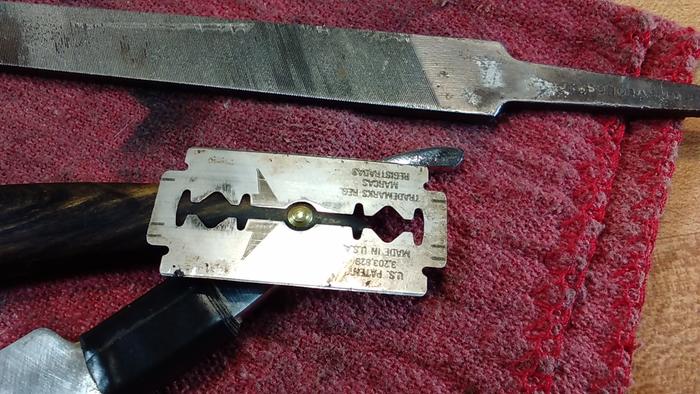
Mind you dull it, first.Mike
-
The Following User Says Thank You to outback For This Useful Post:
STF (09-12-2020)
-
09-12-2020, 07:22 PM #36Senior Member
- Join Date
- Sep 2020
- Location
- Austin, TX
- Posts
- 653
Thanked: 56
Thanks Outback, that is absolutely brilliant.
-
09-19-2020, 07:44 PM #37Senior Member
- Join Date
- Sep 2020
- Location
- Austin, TX
- Posts
- 653
Thanked: 56
I defeated my nemesis. It was a four hour grudge match, but there are three shaving blades with a satisfied "customer". After honing and honing on the 1000 there was a nice edge on much of it, but a 1" spot towards the heel that was just dull. Thinking about things I read here, I put the edge down on the stone and could see daylight in the dull area. There was like an "s" curve in the edge. So I bread knifed it until it got flat and got it sharp heel to toe. There will be legends told and songs sung to my victory. Originally Posted by JellyJar

-
09-19-2020, 07:52 PM #38Senior Member
- Join Date
- Sep 2020
- Location
- Austin, TX
- Posts
- 653
Thanked: 56
Stupid question: is it possible to apply to much pressure with the file when filing pin heads that you widen the pin head as you file.
Obvious answer: of course it is. I now have pins that are filed flush with the scales that are wider than the dome on the other side. Unfortunately, before I figured this out, I filed three of the four pins down flush. The good news is that it must be very thin, so I should be able to drill it off fairly easily (knock on wood).
I now have five fresh new scales to replace broken ones. I have five broken scales, four removed and in tact scales, and two more to remove. So I have to get these last two off without damage. Besides, these are two that I want to keep.
Edit. Maybe it is too fast and pushes material over the edge as opposed to smashing it with too much pressure. Either way, drilling did not turn out as easy as I hoped.Last edited by planeden; 09-19-2020 at 08:45 PM.
outback likes this.
-
09-22-2020, 04:55 AM #39Senior Member
- Join Date
- Sep 2020
- Location
- Austin, TX
- Posts
- 653
Thanked: 56
Apparently I went through a growth spurt. I got frustrated with the unpinning issue and, I stopped before I switched out my little hammer with the 2 lbs sledge to get the pins out. So, until I can get to the in laws drill press unpinning is on hold. I only have two left, the one that's sticks and the one with the fancy metal ends on the scales that I'm not excited about trying to take apart (and may not).
I've got several blades out to polish up. But since I've gotten the metal polish and steel wool I've had trouble figuring out whether I want to leave patina and pitting or try to take it down to more of a polish. It's dumb, I know. I have 10 blades to play with. What I will eventually be able to convince myself of is to do some both ways and figure it out. Besides, it's not like I can't use sandpaper and polish them up after I "finish" them.
Not really asking anything here, just in case anyone is following along I figured I'd say it may be a bit. Meanwhile, I've just been spending way too much time reading old threads and learning of controversies I never knew existed. So even though it's not in this thread, I'm still learning from all yall.
-
09-22-2020, 01:05 PM #40Senior Member

- Join Date
- Feb 2013
- Location
- Haida Gwaii, British Columbia, Canada
- Posts
- 14,455
Thanked: 4830
If you start by just removing the rust and give it a bit of polish, you can go back and remove any pits later. When you remove the black rust with steel wool and polish it will leave pits.
It's not what you know, it's who you take fishing!


 Reply With Quote