
Results 1 to 10 of 13
 38Likes
Thread: Making new pressed horn scales.
 LinkBack URL
 About LinkBacks
Hybrid View
-
08-04-2021, 06:56 PM #1Captain ARAD.


- Join Date
- May 2011
- Location
- Pacifica, CA
- Posts
- 2,474
Thanked: 2227 Making new pressed horn scales.
This is going to be a multi-part post because it represents about 8 months of work on my part. I'm going to start by describing what actually worked, then in additional parts I'll talk about what didn't and why I think it didn't.
Background:
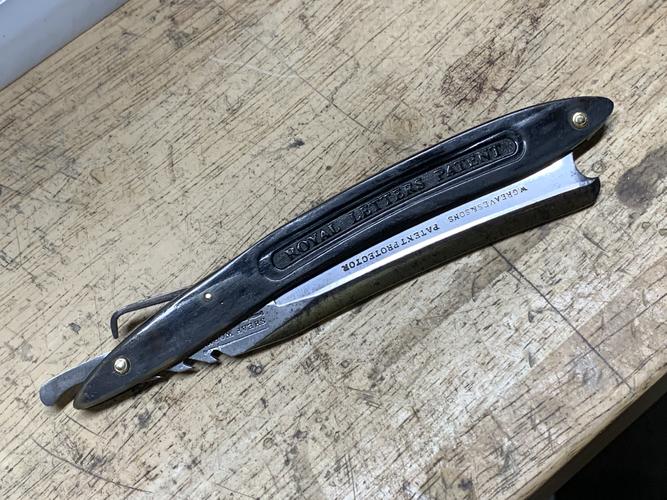
A friend asked me if I could somehow make new scales for his 1830's Greaves Patent Protector razor, for which he had only a blade. I had already been thinking about using my resin 3d printer to make scale molds, so I said yes unaware that I was about to set sail on a cursed Greek epic.
Process:
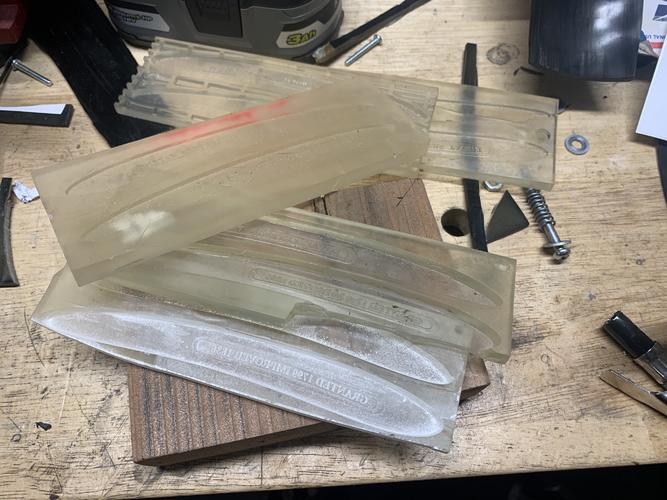
I already had 'high temperature resin', that is, it's measured heat deflection is about 320 Fahrenheit or 160 C. Specifically, Siraya Tech Sculpt.
I designed a 2 part press mold of a simple coin design, printed it on my Elegoo Saturn printer, clamped a small piece of old razor scales into it, and plopped the whole thing including a c-clamp holding it together into the toaster oven at 300 F for 30 minutes. Figuring it would smell better, I'd greased the mold with coconut oil.
The coin shape I cut didn't fit well into the mold and I didn't get particularly clear impression, but it was good enough that I decided to go full steam ahead.
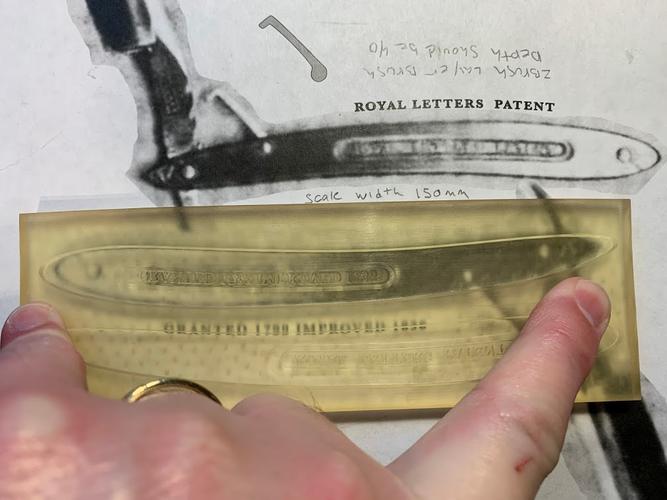
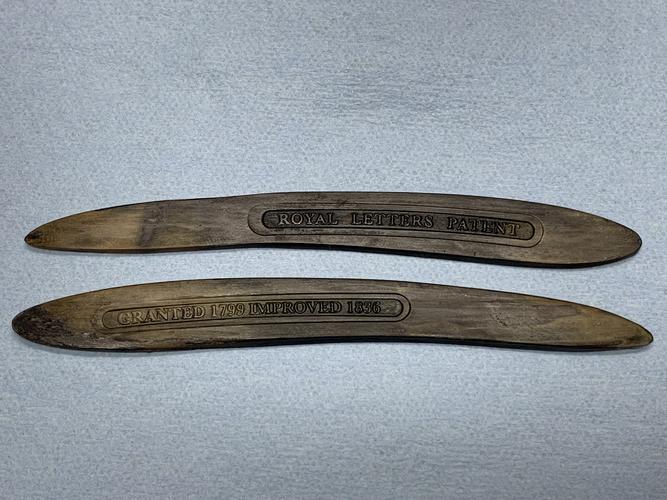
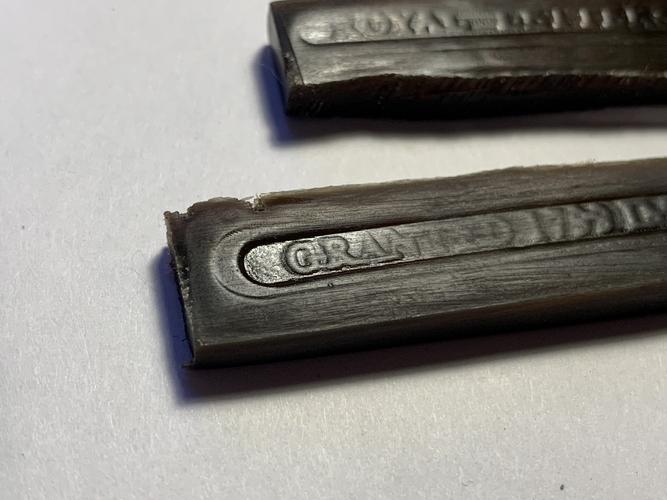
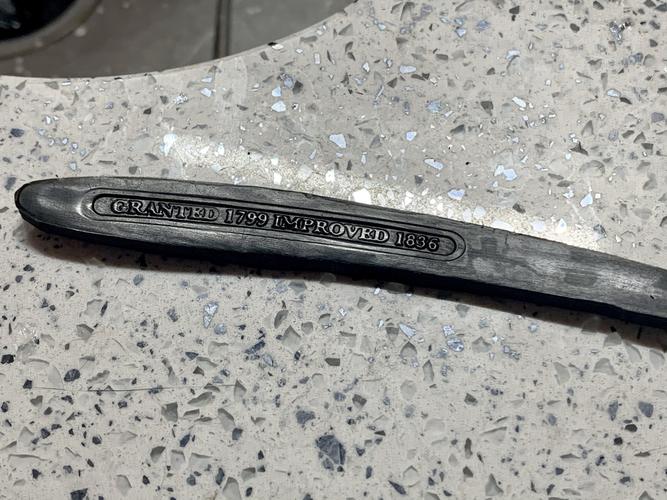
I got out Lummus' old article with the only extant picture of the 'modern' version of the Patent Protector and created digital versions of the front and back scales for the razor. Lummus didn't have closeups and the reproduction wasn't good, but he did at least say what the text was on both sides. I used other Greaves razors in my collection from the same time period to refine the details, spent a few days tracking typography (which is its own entire topic: I settled on Baskerville as the closest to the typeface Greaves used, but it's not an exact match, nor can I find one).

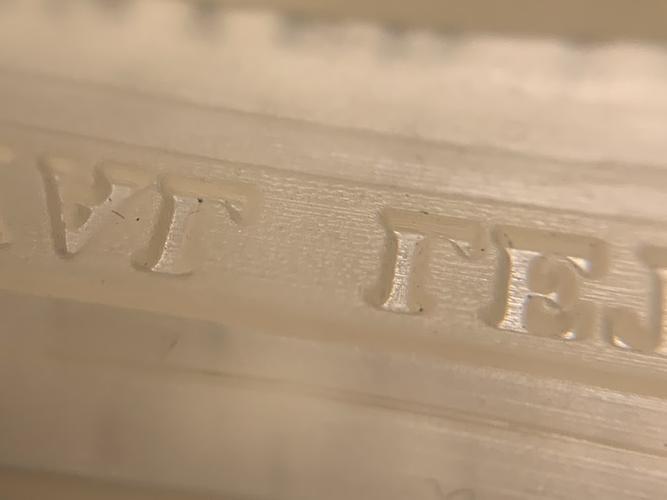
(My resin printer has quite good resolution)
With molds printed, I then spent 6 months profoundly failing to get anything to work, sometimes failing to do anything but ruin horn blanks.
FINALLY I stumbled on a process that worked.
The first step was thinning down the horn blank to about the final thickness of razor scales. The thicker the piece of horn, the less effective the technique.
Step 2 is soaking that horn in heated ammonia for 3 weeks.
Yeah. Just that.
When the ammonia was cold, it didn't work.
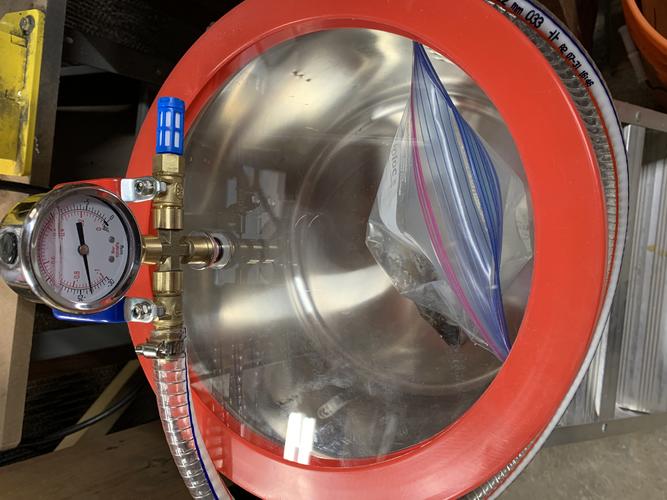
Getting to this point I'd bought a cheap vacuum pot, so I used that (which was really just a stainless steel kitchen stock pot with a fancy lid*). To heat it I used an under-tank heater for a reptile enclosure since they provide moderate heat at a reasonable power cost (about 60 watts draw, much better than my other option which was a 1200 watt space heater, which I'd learned from previous excursions is... not cheap to run for weeks at a time).
At 2 weeks, the horn was almost ready, but not quite. Longer than 3 weeks might possibly have been better, but I was running out of patience. At any rate, 3 weeks in and I could cut the horn blank with normal paper scissors. To get a cutting guide, I put the entire slab of horn into my mold, clamped it with c-clamps and cooked it at 280F for 15 minutes. That let me cut pretty precisely sized scale pieces.
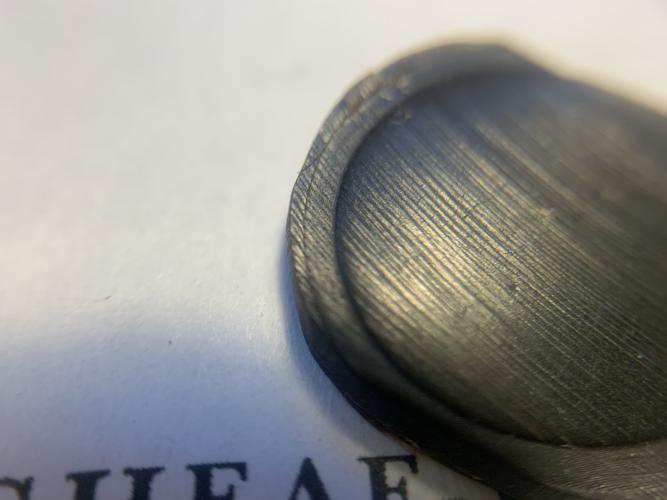
With the mold greased with coconut oil, I then cooked those scale pieces at 280F for an hour. It gave me quite good impressions, but I knew from previous experiments that the horn would take more time to re-harden after the ammonia bath, so I left the scales in the mold with the c-clamps for another month after which they were ready to fit up... With the caveat that by this point I'd gone through all my black horn blanks and had only translucent ones, and the process of chemically softening the horn added to chemically dyeing it black was not as successful as I wanted.
Further details:
Making the small metal latch arm was pretty straight forward metalworking, though I had to make a second one when the first turned out to be missing a vital feature hidden inside the scales in Lummus' picture. Fortunately, petercp4e shared pictures of his older model that clarified the latch.
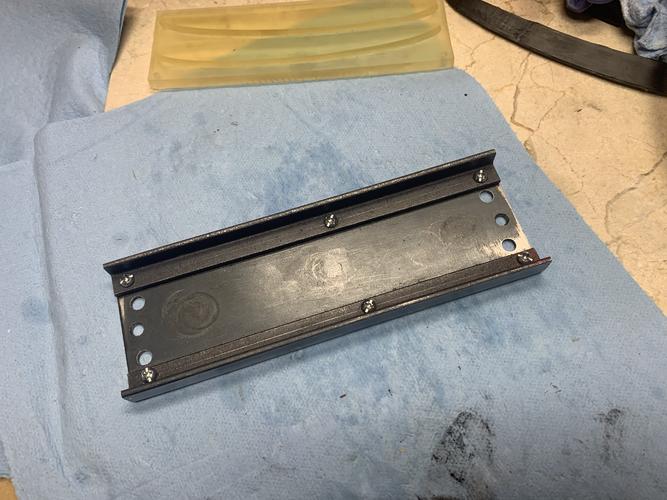
The molds I used, as printed, were not structurally sound enough for what I was doing. To get them to work, I modified the press I'd made to flatten old scales and gave the negative mold steel reinforcement so it didn't have room to deform under load and temperature.
In designing the molds I went through several iterations, including one which was a 1 part mold that relied on the steel back plate to push the horn in, but what ultimately worked was a 2 part mold designed to be self-registering. It's also worth noting that if you do this yourself, you need to design the scales with a draft angle so they can be removed from the mold. Unlike most every other part of the process, I didn't need to learn that by doing it wrong since there are good resources out there on mold design.
Next up: a catalog of failures
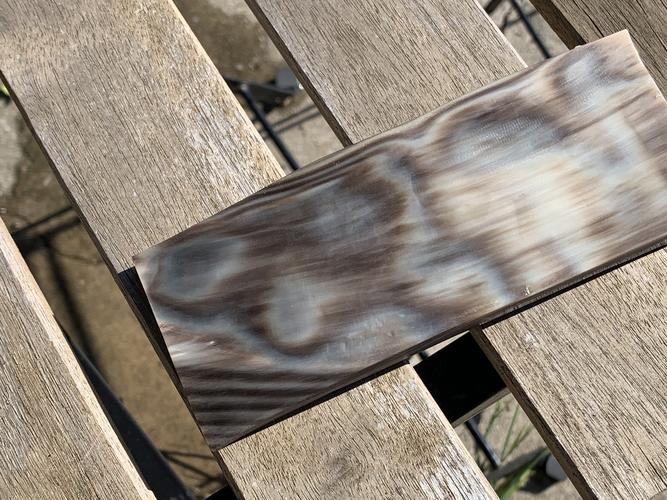
*The lid of the vacuum pot is a 1/2 thick piece of polycarbonate with a silicone gasket around the edge and some brass hardware with a vacuum gauge mounted in it. That's all fine for the vast majority of applications, but using heated ammonia in it threw me a curveball. Since the lid rested above the heated ammonia, it invariably condensed on the underside, so the brass nut and pipe going through the polycarbonate were effectively also soaking in ammonia. That leached copper salts out of the metal and dripped them back into the rest of the ammonia, creating a really slow dye. So the translucent horn I put in there came out black after 3 weeks. Which would have been great, except I needed to sand and trim it slightly to assemble the razor, leaving weird clear spots. Dying it a second time using normal hair dye stripped off the entire layer of dyed horn and left a rough, patchy surface with considerably less detail from the mold. I was able to fix that by just clamping it all tight and cooking it a couple of times, but it did not make me happy.-Zak Jarvis. Writer. Artist. Bon vivant.
-
The Following 4 Users Say Thank You to Voidmonster For This Useful Post:
JBHoren (08-04-2021), jfk742 (08-04-2021), markbignosekelly (08-04-2021), petercp4e (08-04-2021)
-
08-04-2021, 08:29 PM #2Captain ARAD.
- Join Date
- May 2011
- Location
- Pacifica, CA
- Posts
- 2,474
Thanked: 2227
The failures... Dear god, the failures.
I should start by saying that while I got usable scales out of the method I used, I don't really consider it a success because of how wildly impractical it is from the standpoint of time alone. I really would not recommend this as a way of making pressed horn scales.
There is a glimmer of hope that a modified version could change everything. The company that makes the resin I used has a new version, Sculpt Ultra, which is considerably tougher both in hardness and heat deflection. It's rated to 220 C (428 Fahrenheit). I strongly suspect it could be used in a much more traditionally Sheffieldy process.
But this is about all the ways I failed.
From the start I knew my resin molds would not be up to the task I wanted them to perform -- namely, high heat and high pressure on the unaltered horn. The preliminary tests I did with the small coin of horn cracked the molds, and cracking the molds would be a common event throughout the whole process. I didn't get the thickness of the mold and the support structure around it dialed in until the very end.
However, I knew that a lot of things had happened in the chemical science of manipulating keratin (which is what horn is made of) since the old Sheffield guys were pressing scales in molds.
Almost all of that chemical science has been in the cosmetics industry. For manipulating hair. Specifically, the permanent press style, or perm.
There are a zillion different ways of doing it with a whole spectrum of awful chemicals, but by the 1950's or so things had settled in to use either a strong base or a mild acid. In casting my net around, I found a group in the Pacific Northwest that had experimented with softening horn among the Tlingit and other groups that've lived there for thousands of years. They soaked the horn in ammonia for weeks.
So that got it soft, but the hair industry had settled largely on using hydrogen peroxide to re-set it. So armed with two easily purchased chemicals, some ziplock bags and a workshop I didn't have to stand around smelling, I set off.
My first test used a small piece of horn, a little too thick for scales, and definitely not long enough, but enough to see how all this worked.
After about 2 weeks in a bag of ammonia, the horn was outright rubbery. So I clamped it into my mold, baked it for 30-45 minutes (I have lost track of the times I used because they really don't appear to be particularly critical) and boom! A very promising result!
The next step was to soak the promising result in a bag of peroxide. I left that in for an hour, but I could feel the horn was still very rubbery, so I left it overnight. It was still rubbery. So I left it for that day. It was still rubbery. So I chalked it up as a failure of the purity of my peroxide and took it out. A day later, the piece was fully hard again.
Too hard.
Fragile, glassy, hard.
I went through a couple more cycles of this until I got this result:
It was clear I needed to modify the mold and figure out a better way of getting the blanks fitted to the mold, but the softening process was working great at this point:
So I made a 2 part version of my mold which had a deeper negative mold and a backing plate that fitted into it with shallow positive features to form the inside of the scales.
And this is when everything went to hell.
For months, I could get no other piece of horn to soften.
After two months in ammonia it had warped, swelled, and changed color. It was not appreciably softer.
After a few days, the color went back to normal, but the swelling and warping did not.
- I tried boiling for hours -- it worked, but didn't make the horn soft enough to press in the molds I had.
- I tried holding the horn in open flame (which is a traditional method) -- but without someone to guide me, the only thing I was going to do was scorch a bunch of horn blanks before finding the right technique.
- I got a vacuum pot and tried soaking the slab in ammonia under vacuum -- it did nothing.
Because of the times involved in those soaks, that represents about 4 months of flailing at this project before I realized what variable had changed.
When I began, I was still running the space heater I mentioned in my first post because the resin I was printing with needs to be about 25C to print properly and even in summer it rarely breaks 60 in my workshop (I love living in Pacifica).
All the failures started happening after I turned off the space heater (because of the power bill).
Heating the ammonia produced solidly better results, but even that wasn't quite enough to make the method workable. Though it had already turned my vacuum pot into a surreptitious dye vat.
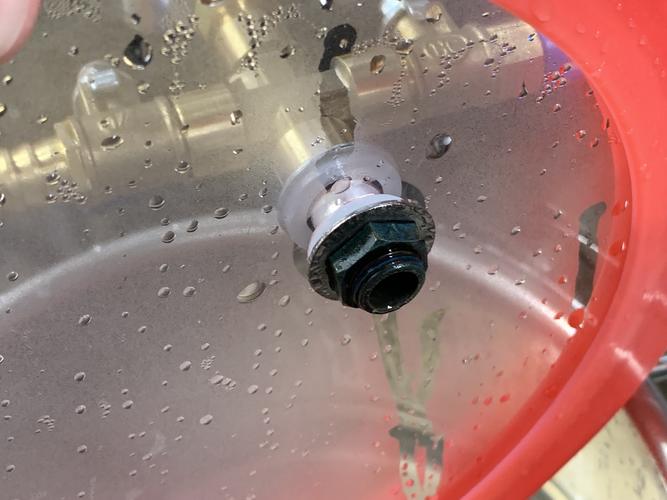
This is a brass fitting.
That's when I realized that the thickness of the horn was also important. Much thicker than typical razor scales, and it would never really get soft enough to work with. So I got a handheld planer, made a horribly janky jig to hold the horn, and planed it down to size. That, finally, did the trick.
By this point, I had little enough horn left I wasn't terribly inclined to experiment with the peroxide soaking method to make the horn harden up again, but I knew from all the scraps I had around that time would do that job too, and so I finally settled on what more or less worked. The amount of time it took to harden was excessive.
While cutting the scale shapes out using the press method I described in the first part works, it's very far from ideal. IDEALLY, the mold itself would do that job, just as the old Sheffield ones did. The shape has to be pretty precise to the mold or you get artifacts (which are visible on my final product), and cutting with scissors can't quite be precise enough because the horn isn't uniformly soft. Or at least it wasn't with the last piece I had.
There you have it. The ridiculous saga of making a new pair of pressed horn scales.
You can bet I'll be trying again when I get the new resin, and I can think of a couple of tricks that might get me where I want to go via other methods, but it was well and truly time to get that Greaves back to its proper owner.
Postscript
Opening and looking into a pot of 100F ammonia is exactly as awful as you'd expect.Last edited by Voidmonster; 08-04-2021 at 08:34 PM.
-Zak Jarvis. Writer. Artist. Bon vivant.
-
-
08-04-2021, 08:55 PM #3Senior Member

- Join Date
- Jan 2015
- Location
- Pinole, ca
- Posts
- 1,526
Thanked: 339
Zak, would a press cut out work? Making it would prove to be time consuming I’m sure but if you are able to print molds you could adjust the cad to match the die. Might get you a better fit.
Thanks for all this info and sharing everything. This seems like as big an undertaking as the Temperite scale project.Voidmonster and RezDog like this.
-
The Following User Says Thank You to jfk742 For This Useful Post:
Voidmonster (08-04-2021)
-
08-04-2021, 09:29 PM #4www.edge-dynamics.com

- Join Date
- Feb 2013
- Location
- London
- Posts
- 3,066
Thanked: 512
The red horn in my G Revil dip at toe thread was boiled at least 4 times. Each time it became gelatinous so much so that clamping it became an issue, involving grease proof paper, memory foam, to set them straight with no impressions.
I assume that 200 year old horn has had a structural breakdown that allows harsh treatments like boiling..
Very old horn could be an answer..
I do have a recipe for casting horn but I'm sure you have seen that one.. Also a recipe for moulding ivory..
Nice work by the way..
-
The Following User Says Thank You to JOB15 For This Useful Post:
Voidmonster (08-04-2021)
-
08-04-2021, 09:47 PM #5Captain ARAD.
- Join Date
- May 2011
- Location
- Pacifica, CA
- Posts
- 2,474
Thanked: 2227
Certainly the earlier experiments I did involving pieces of old (broken) scales getting the material soft was much easier. Originally Posted by JOB15

By the time I'd settled on horn only as thick as needed for the scales, I didn't think to go back and try boiling that. I have a strong suspicion it would've become much softer than the thick slabs the blanks start out as. Or at least most of them. I did have some horn blanks that weren't quite as thick as the more commonly available ones (which I think are close to 1/4" thick, where it should a tiny bit over 1/10th"
Were the recipes you found in Holtzapffel's book on machining? I've seen a lot of different methods for working with horn, but only the one for molding ivory, and that was his.jfk742 likes this.-Zak Jarvis. Writer. Artist. Bon vivant.
-
08-05-2021, 12:19 AM #6Senior Member


- Join Date
- Feb 2013
- Location
- Haida Gwaii, British Columbia, Canada
- Posts
- 14,457
Thanked: 4830
I have nothing to contribute but I have to say you are amazingly tenacious at problem solving.
JBHoren and Voidmonster like this.It's not what you know, it's who you take fishing!
-
The Following User Says Thank You to RezDog For This Useful Post:
Voidmonster (08-05-2021)
-
08-05-2021, 09:15 AM #7www.edge-dynamics.com
- Join Date
- Feb 2013
- Location
- London
- Posts
- 3,066
Thanked: 512
I don't think so, I will check when I get home, I am away until the weekend.. Originally Posted by Voidmonster
One other thought.. I have noticed some recipes talk about soaking as opposed to boiling.
Maybe soaking in cold water will soften without destroying the horn, would take a lot longer but I have this in my mind for future tests..
Long alum soaks pre dying.
-
08-04-2021, 09:40 PM #8Captain ARAD.
- Join Date
- May 2011
- Location
- Pacifica, CA
- Posts
- 2,474
Thanked: 2227
Heh. It ended up being a much larger project than the Temperite scales. Fortunately, it was also more successful! Originally Posted by jfk742
I've thought about doing steel cutouts on the mold parts to get a press cut -- and I may well ultimately go that route when I get the improved version of the resin I've got, but I think there's a non-zero chance that the resin alone will be tough enough (at a high enough temperature) to do the trick.
Adapting the mold files to a format usable for any kind of CNC cutting would be non-trivial though. I ended up using very non-CAD tools to make the mold. ZBrush, the program I used, is what gets typically used to sculpt monsters & stuff for film and TV, it's primarily an organic modeler and has zero functionality in it to do dimensionally precise work. I cheated that by using photographic reference and doing all the measurement by hand on paper, then just using the software that exports to the 3d printer to set dimensions. Then the printer is much simpler than the FDM printers that move an extruder head around. It just moves a plate up and down. The model is made by exposing successive layers of resin to UV light through an LCD screen. The object is built layer by layer, exposing the whole thing at once. So even the printer is working with pictures rather than any kind of measured data.jfk742 likes this.-Zak Jarvis. Writer. Artist. Bon vivant.
-
03-09-2024, 10:48 PM #9Senior Member
- Join Date
- Jan 2008
- Posts
- 108
Thanked: 4
This is extremely impressive, both the effort and result. I know this is an old thread but wanted to add this anyway photos of an original/complete 1838 Greaves Patent Protector.
https://imgur.com/a/uD1yqiA


 Reply With Quote