
Results 21 to 30 of 45
 95Likes
 LinkBack URL
 About LinkBacks
-
05-27-2022, 07:15 PM #21Senior Member


- Join Date
- Oct 2019
- Location
- Kingsville On, Canada
- Posts
- 2,435
Thanked: 207
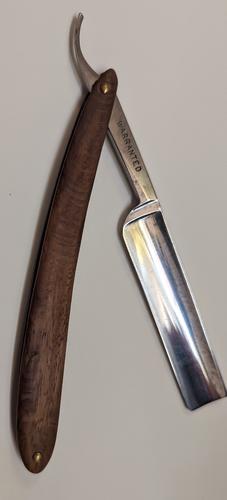
I can't find bone or horn scale blanks that don't cost an arm and a leg to Canada but I am thinking of getting some Walnut , Redwood or Black Palm. I don't want to spend big bucks yet because this will be my first scale making adventure.
Their all 6 x 2 x 1/8 and the price is per piece, I assume I would need two and I am guessing that there would be enough offcut to save for wedges (Maggards).
If I do decide to get some of those wood blanks, do I need to treat them somehow after I have made them and how do you shine them up?- - Steve
You never realize what you have until it's gone -- Toilet paper is a good example
-
05-27-2022, 08:21 PM #22Skeptical Member


- Join Date
- Nov 2016
- Location
- Colorado Springs
- Posts
- 10,554
Thanked: 2195
With wood i recommend a Tru-oil finish. But always do a CA finish on the insides. Just a couple coats to seal the wood. If your looking at walnut you can by it at big box hardware stores and cut it down. Or a second hand store and look at wood items. You can get big enough wood boxes to cut up.
Otherwise, 6x2x1/8 will.do ya fine. One for each side. Im going to try to do a couple sets myself this weekend. At 2 i ches you might have e ough to squeeze two scales out of one piece of wood. But the wood grain wont be matched. Grains running the same way on both scales keep flex and pressures the same. Its best.Last edited by Gasman; 05-27-2022 at 08:23 PM.
It's just Sharpening, right?
Jerry...
-
The Following User Says Thank You to Gasman For This Useful Post:
STF (05-27-2022)
-
05-28-2022, 12:19 AM #23Senior Member

- Join Date
- Dec 2018
- Location
- Gainesville, FL
- Posts
- 6,767
Thanked: 676
Truoil is good unless the wood is really dense.

This is the ancient tree skeleton Southern Live Oak I keep yammering about and it is beautiful, that's its natural color, but it won't absorb the truoil. It is also so hard you have a hard time working it. I wound up using gunstock wax and heating it in the sun. It still mostly wipes off when it is cool but at least it will make the water run off until it wears off.Last edited by PaulFLUS; 05-28-2022 at 12:23 AM.
Iron by iron is sharpened, And a man sharpens the face of his friend. PR 27:17
-
05-28-2022, 04:04 PM #24Senior Member
- Join Date
- Oct 2019
- Location
- Kingsville On, Canada
- Posts
- 2,435
Thanked: 207
OK then, I'm almost ready to make some pretty scales and shine up some blades.
How do I change my username, I was thinking something like Outback-2
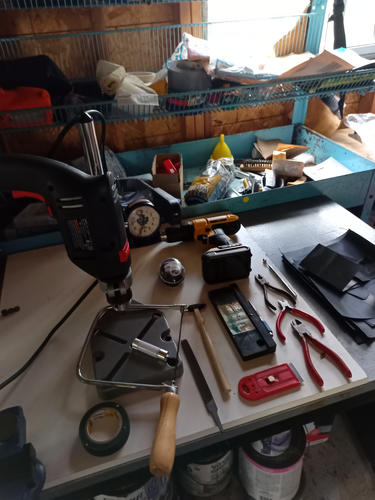
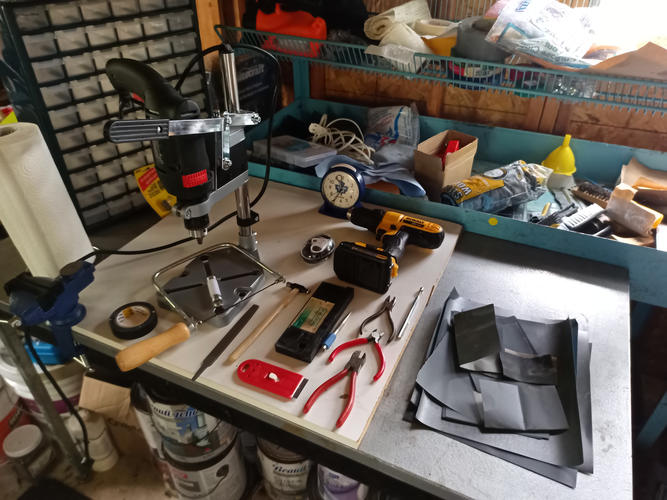
This is how my set up is coming on.
 - - Steve
You never realize what you have until it's gone -- Toilet paper is a good example
-
05-28-2022, 07:29 PM #25Skeptical Member
- Join Date
- Nov 2016
- Location
- Colorado Springs
- Posts
- 10,554
Thanked: 2195
I was going to makes scales.
I made outlines on some wood. Got ready to make 3 sets then the wife said I should clean the cars. I have recently painted areas on my Equinox where the paint was faded out. Turned Gray. Plastic parts. Now its satin black. Dont with shakey cans. Turned out really nice. Gives the car more of a manly look IMO. Ha.
After getting the cars cleaned then its time to rest and get the grill fired up. Maybe i can get the scales cut out tonight. Tomorrow is our 21 wedding aniversary. She already bought heself a neckless and i picked up a card for her. So thats about done.
Hope you get those scales started Steve. Maybe I can have something to show ready for finish by the end of the holiday.Last edited by Gasman; 05-28-2022 at 07:31 PM.
It's just Sharpening, right?
Jerry...
-
05-28-2022, 08:22 PM #26Senior Member
- Join Date
- Oct 2019
- Location
- Kingsville On, Canada
- Posts
- 2,435
Thanked: 207
Happy Anniversary to both of you for tomorrow Jerry. Originally Posted by Gasman
 - - Steve
You never realize what you have until it's gone -- Toilet paper is a good example
-
The Following User Says Thank You to STF For This Useful Post:
Gasman (05-28-2022)
-
05-28-2022, 10:59 PM #27Skeptical Member
- Join Date
- Nov 2016
- Location
- Colorado Springs
- Posts
- 10,554
Thanked: 2195
Thanks Steve
SWMBO and I were together for 5 years before we tied the knot. So its really a lot longer. Mean old bitch that she is. I still love herIt's just Sharpening, right?
Jerry...
-
05-28-2022, 11:41 PM #28Senior Member


- Join Date
- Mar 2015
- Location
- Akron, Ohio
- Posts
- 12,116
Thanked: 4315
Congrats, Jerry. ! The 26th of June, will be my 23.
I've been working on a set, lately.
A few tip's for Steve, cause I know he'll ask, how I do it.
Trace your blade onto a piece of paper.
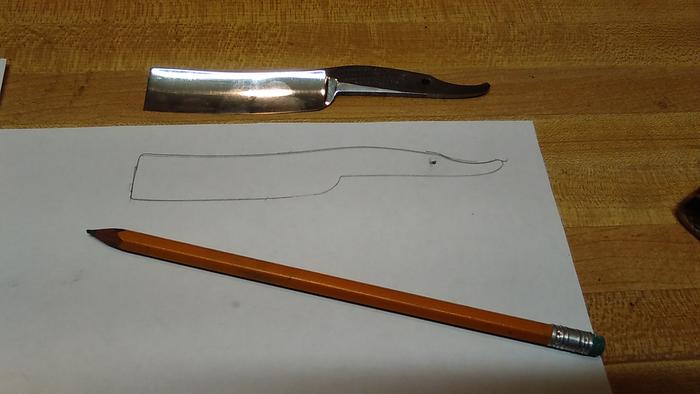
Then sketch your desired scale design.
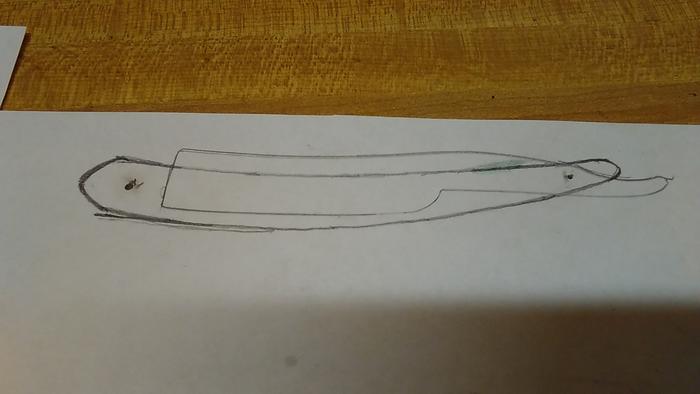
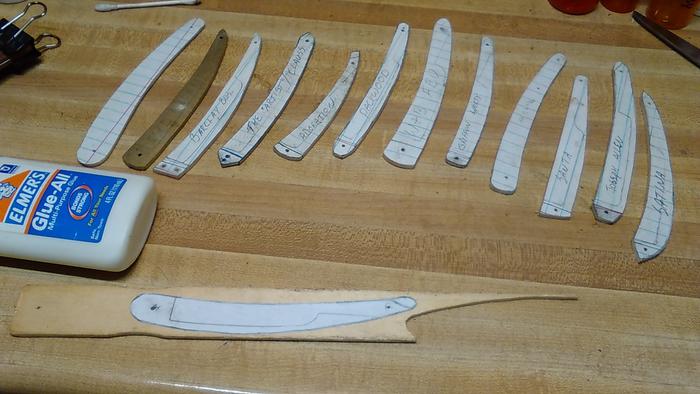
Cut the scale drawing from the paper, and glue to a wooden paint stick. Once dry, you can easily cut it out with your saw. Now you have a pattern for other scales.
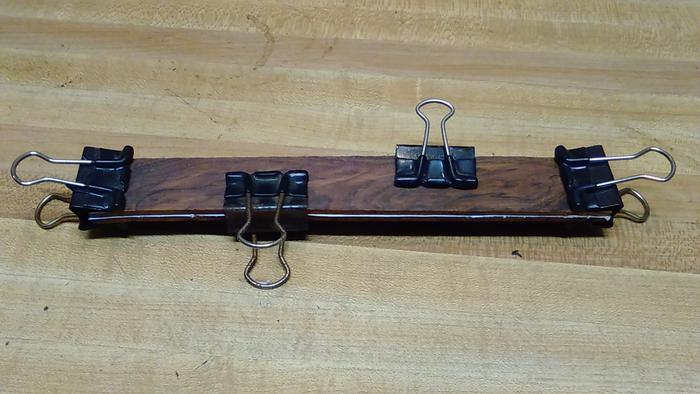
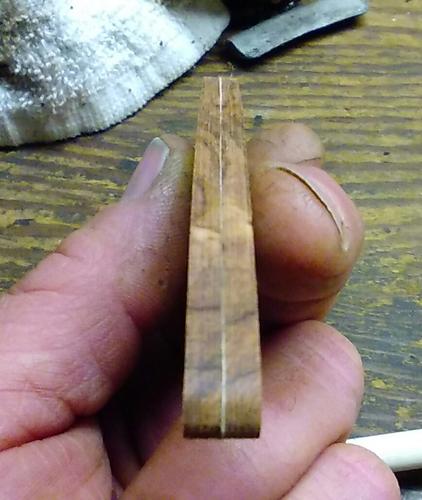
I prefer to glue a piece of white paper between my blanks, then clamp till dry.
I use regular Elmer's glue, because if I'm having a difficult time separating them with a SE razor blade, I can spritz them with water to loosen the glue. And all it takes, is a damp cloth to clean up the mess between the scales.

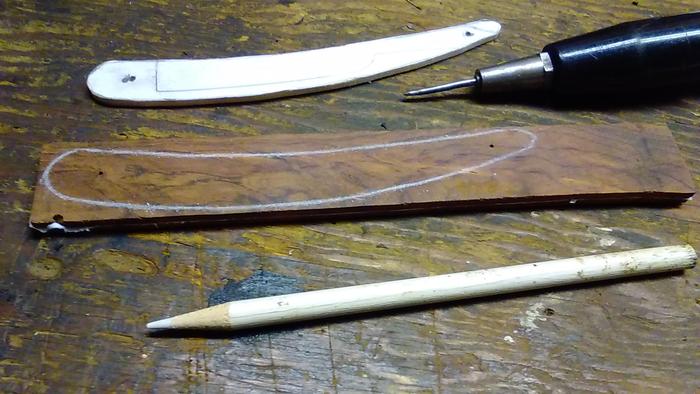
Once dry, remove the clamps, and trace your template, onto the blanks, and cut um free.
If ya got a drum sander, you could chuck it up in your drill, and sand the edges smooth and even.
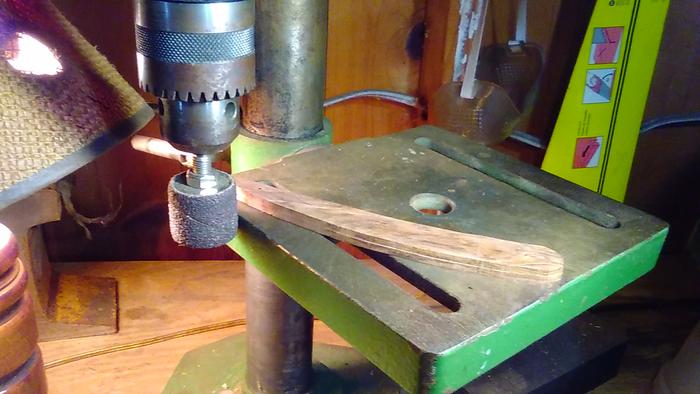
I keep them glued together while sanding and shaping my scales. That way I can keep them as close to possible, to the same thickness, shape, and taper. And I also cut my scales a little bigger, so to have some wiggle room for adjustments, on the toe and heel.
The paper works as a guide, for keeping tabs on shape and thickness, while your sanding, as well.
Hope this helps ya some, Steve.
Last edited by outback; 05-28-2022 at 11:54 PM.
Mike
-
The Following 2 Users Say Thank You to outback For This Useful Post:
randydance062449 (05-29-2022), STF (05-29-2022)
-
05-29-2022, 02:56 AM #29Senior Member
- Join Date
- Dec 2018
- Location
- Gainesville, FL
- Posts
- 6,767
Thanked: 676
Congratulations on Jerry. My wife and we're together for a long time before we got married also. We just celebrated 30 years together.
Iron by iron is sharpened, And a man sharpens the face of his friend. PR 27:17
-
05-29-2022, 10:28 AM #30Senior Member
- Join Date
- Oct 2019
- Location
- Kingsville On, Canada
- Posts
- 2,435
Thanked: 207
Thank you Mike, you must either be a mind reader or I must be really obvious. That is exactly what I was about to ask Originally Posted by outback

That drum sander looks like a fantastic idea, I can feel an Amazon search coming on.
Drawing the scales free hand is going to be a challenge, art is not my strong point but at least its just on paper so I can keep trying until it looks good eh.
I'm assuming that you will thin those scales and maybe thin the end even more (taper them)?
Making templates from paint sticks is a great idea too, after I make a few I guess I just choose from my collection and don't need to draw freehand any more.
Can I use the same method for bone, horn or even plastic scales?
Can I thin bone, horn or plastic scales on sandpaper or will that hurt them?
Thanks again for the tutorial Mike, any more tips or tutorials you have to offer me will be gratefully received. I think I'm going to need them - - Steve
You never realize what you have until it's gone -- Toilet paper is a good example


 Reply With Quote