
Results 1 to 10 of 17
Thread: 1st Resto- WB Celebrated
 LinkBack URL
 About LinkBacks
-
01-20-2009, 07:44 AM #1Senior Member


- Join Date
- Dec 2008
- Location
- Redondo Beach, CA
- Posts
- 403
Thanked: 82 1st Resto- WB Celebrated
Getting in to the fray on restorations. For my first endeavor- a WB The celebrated I bought off of Hi_Bug_GL here in the classifieds (many thanks!). The razor came as promised, with the blade in pretty good shape (nearly shave ready) and the original horn handles sadly cracked and beyond use.
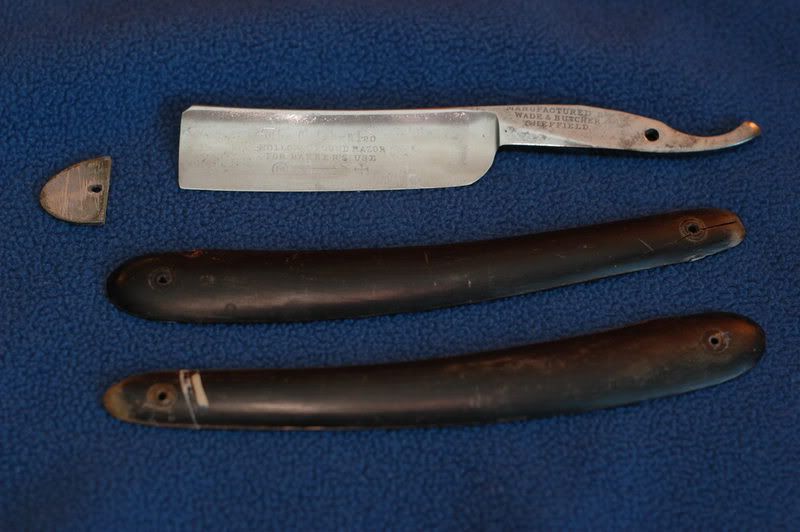
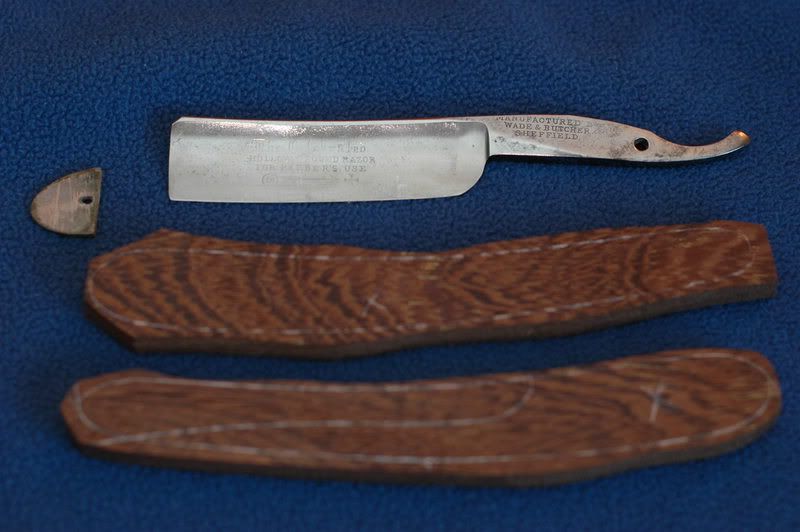
Found a really nice piece of Wenge (is that "wenj" or "wen-gay"?) at my local Rockler wood suppy and spent several minutes tracing out the scales in different spots until I was happy with the grain. Then rough cut them out on our little Ryobi band saw at work (not the finest piece of equipment).
Project will be on hold until the work schedule lightens up a bit and I can get in to our proper shop to start the sanding and shaping process.
I'm planning on trying to clean up the original metal spacer- think that'll be a nice touch against the busy grain in the wood and provide some nice contrast.
Happy to hear comments and suggestions as this goes forward! Especially interested in any history that anyone can provide me on the blade- year of make, etc. Thanks a lot
-
01-20-2009, 07:51 AM #2Senior Member
- Join Date
- Dec 2008
- Location
- Redondo Beach, CA
- Posts
- 403
Thanked: 82
Found some polishing compound at my local Pep Boys - Blue Magic Metal Polish (stinky stuff!) and went at it with the dremel polishing wheel. Only did one application, but so far not overly impressed with the clean up.
I've got no problem spending some serious hours cleaning this blade up, but I'm really worried about taking out the lettering on the blade if I go at it with some sandpaper. It's not terribly deep as it is. Anyone have some experience with that? Should I just leave it as is and be happy with the weathered look (fine by me)?
-
01-20-2009, 02:18 PM #3Cream Huffer

- Join Date
- Aug 2008
- Location
- Edmonton, Alberta
- Posts
- 573
Thanked: 74
The lettering on the blade is one of those things that you often have to either choose to keep or have a shiny blade. That's just the way it normally goes. You'll have to make a decision about what you want from the blade and then go with that.
If you want to keep the lettering, maybe it is tidy enough and ready for the hones. There is something genuine about a historical blade that looks old.
If you want to try and clean it up a little, get your self some high grit sand paper (1000?) and start there. See what you can get away with.
Otherwise, start lower and remove everything that you need to get the blade shiny.
Since it is your first restore, I would suggest either leaving the blade or just gently cleaning it up. There is a lot to learn just around the scale making and pinning process. That should keep you busy for a while.
-
The Following User Says Thank You to dnjrboy For This Useful Post:
kenneyty (01-21-2009)
-
01-20-2009, 09:20 PM #4Hones & Honing


- Join Date
- May 2005
- Location
- Saint Paul, Minnesota, United States
- Posts
- 8,023
- Blog Entries
- 1
Thanked: 2209
Keep the etching on the blade. You will appreciate it later. I have done it both ways and frankly, a very shiny W&B just does not look right to me. They are over 100 years old and I like to see some character in the old blades. I would just clean the blade and then HAND POLISH with MAAS or similar metal polish to get the grime off.
Just my $.02, Randolph Tuttle, a SRP Mentor for residents of Minnesota & western Wisconsin
-
The Following User Says Thank You to randydance062449 For This Useful Post:
kenneyty (01-21-2009)
-
01-21-2009, 03:55 AM #5Super Shaver


- Join Date
- May 2005
- Location
- Lotus Land, eh
- Posts
- 8,194
Thanked: 622
Nice start.

My W&B has no printing on it, but the blade itself was in very good good shape so only polished. Since I started using it over three years ago the patina has built back up and it once again is starting to look its age. I'm with Randy in that appreciation.
XLast edited by xman; 01-21-2009 at 08:41 AM.
-
02-05-2009, 12:30 AM #6Senior Member
- Join Date
- Dec 2008
- Location
- Redondo Beach, CA
- Posts
- 403
Thanked: 82 "Pinless" razor?
Glen was nice enough to take on honing this baby up and it'll take a spin in the tumbler for a few days. In the mean time, it occurred to me that I might be able to make a "pinless" razor. Not that there aren't pins, just that they are not visible from the outside. Has anyone ever tried either of these methods?
Option 1- drill the pin holes from the inside only- not going all the way through. Put threaded inserts on the inside of each hole on the pivot end, then assemble the razor with a set screw as a pin (that's a screw with no head on it on either end- just a threaded shaft). For the wedge end, cut a small length of brass rod to reinforce the joint and glue it together.
That option would be truly invisible from the outside, but you could never tighten it if something got loose on ya.
Option 2- Switch the set screw to the wedge end. Do that side first. Wedge end is "pinless". For the pivot pin, drill out from the back side of the scales, not going all the way through the display scale. pit a threaded insert in the display side, then assemble with a countersunk allen head machine screw.
That way you could tighten the one allen screw, and there would only be one small blemish on the back side of the razor. Everything else would look just like polished wood from the outside.
Thoughts? I think I'm going to try option 2 when the blade comes home.
-
02-05-2009, 12:53 AM #7Senior Member

- Join Date
- Jan 2009
- Location
- PA & MD
- Posts
- 158
Thanked: 8
Cool. I just picked up a W&B recently, a 7/8 barber's notched. It's quite scratched up, but has the etching like yours. Post finished pics when you get it back from Glen if you don't mind, I'd like to see the tumbler results....(I think I'm going to start my own thread now.... Originally Posted by kenneyty
 )
)
-
02-27-2009, 06:32 AM #8Senior Member
- Join Date
- Dec 2008
- Location
- Redondo Beach, CA
- Posts
- 403
Thanked: 82
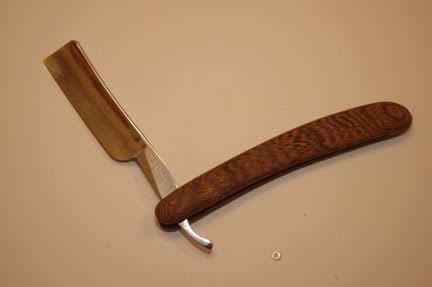
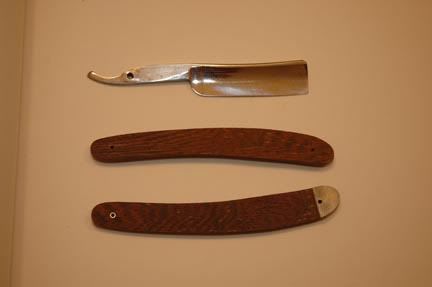
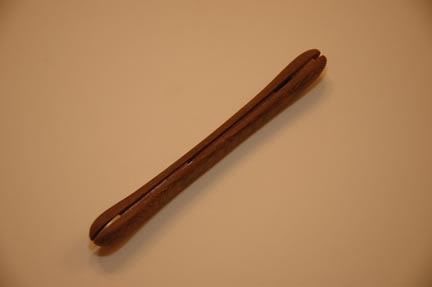
Finally got these bad boys shaped and sanded. You can see here the not-quite-finished results of my "pinless scales". When finished there will only be one visible hole on the back side of the pivot pin. I'll post pics of my hardware rig soon. The only downside to this setup so far is that you have to start with thicker scale stock, and the finished scales will have to be roughly 3/16 thick at the pivot pin. Gives you some nice room to play with contour though.
Now to finish- a few coats of CA.
-
02-27-2009, 07:55 AM #9Super Shaver
- Join Date
- May 2005
- Location
- Lotus Land, eh
- Posts
- 8,194
Thanked: 622
I like the shaped scales actually. Is that to help keep the weight down or was it a purely artistic decision?
X
-
02-28-2009, 02:37 AM #10Senior Member
- Join Date
- Dec 2008
- Location
- Redondo Beach, CA
- Posts
- 403
Thanked: 82
Yeah- didn't want em super thick, and I thought throwing some contour in there might bring out some interesting grain. They feel nice that way too.


 Reply With Quote