
Results 1 to 10 of 18
 LinkBack URL
 About LinkBacks
-
07-11-2009, 10:01 PM #1Freakin' Ladies Man


- Join Date
- Apr 2009
- Location
- Bay Area
- Posts
- 351
Thanked: 47 Lo and behold: The pseudo-Redneck import-Viking razor holder!
Well, inspired by Jockeys' redneck scuttles and what not, I decided that paying well over $20 for a simple razor holder is mmmmyeah, not really my thing. I appreciate quality, and will likely buy one since this experience told me what I knew before: Counting my hours, and a $100 holder would be good as well.
 On the other hand, I am a proud owner of a schwarzweisskeramik scuttle. So there you go.
So, pseudo-redneck since I'm not what one would call a redneck and an import-viking since I'm a Dutch guy living in Sweden. Which brings us to the main subject of the el-cheaperino razor holder: Of course an Ikea tootbrush holder. I paid, if I remember correctly, 59 SEK (swedish kronor) for it, around $8. And after typing that I go to the American Ikea site and find the thing for $7.99: Ikea's Lillholmen toothbrush holder.
Let's start:
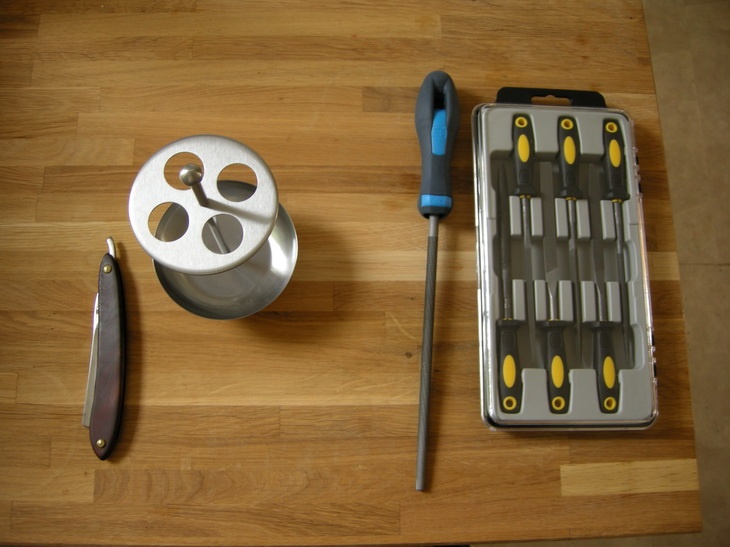
What you see here is from left to right: My pretty Wostenholm almost-wedge. Super comfi shave, nicely restored by Steve at The Invisible Edge. Followed by the Ikea holder, my "bulky" file to remove the initial steel bulk, followed by a little file set for the detail work. Later on I'll also use some wet sandpaper, grit 1000, to clean up some stuff.
Let's start with a few images to show you the thing. I picked the holder that I liked, both looks and quality (Ikea has both decent quality next to the flimsy stuff, so always keep an eye on what you pick there), and fortunately this one had the biggest holes. When I came home, I found that even my smallest razor wouldn't fit in, hence this project.
The pics. I seem to have a tendency to ramble on and on and on, so here they come:


Purrreetttteeeeeyy. Well, for the money, it's a nice looking thing. Scroll down to witness the slaughter I perform.
You see you can easily take it apart:

Onto post 2Last edited by Hillie; 07-11-2009 at 10:24 PM.
-
07-11-2009, 10:01 PM #2Freakin' Ladies Man
- Join Date
- Apr 2009
- Location
- Bay Area
- Posts
- 351
Thanked: 47
So, I decided to extend the holes to a "drop"-like shape, by filing out some metal. I am not overly handy with tools, but am stubborn enough to challenge myself to do this stuff. So some of you will laugh at the results. So be it.
Let's start by filing away:

And the final depth:

Now onto the next step, making the drop shape. Let's bring out the flat file to remove some metal:

That's more like it:

And one side done!

And there's the other side:

You see there's some rough metal left, that'll be sanded out later. I use full manual labour, as I don't have a Dremel tool available. I did look at one at the shop, but decided that whipping out $100 for a Dremel set to work on an $8 holder might be a bit over the top.
You can also see my limited skill set, there are some scratches in the metal. However, the Wostenholm (biggest razor in my collection) now fits very comfortable, so I moved on with the remaining holes. Due to fatigue/boredom, I became a bit sloppy. This resulted in uneven holes as you can see, and quite some surface damage. Yet, the result came out nice:

And onto post 3Last edited by Hillie; 07-11-2009 at 10:24 PM.
-
07-11-2009, 10:02 PM #3Freakin' Ladies Man
- Join Date
- Apr 2009
- Location
- Bay Area
- Posts
- 351
Thanked: 47


On the last one you can see part of the kitchen, which is also my shaving den. I have a stampsized bathroom with no room to store soaps and all the shaving kit. Plus having the micronuke plus water heater in the kitchen allows for all the shaving necessities to be close by.
Small addition: As you can see, the metal has some rough surface. I sanded it quickly to try to get the 'brushed' look back and cover up some scratches I made. I also sanded all the holes, to make sure they feel smooth and have no edges to cut into the wood or scratch the razors' metal. Thanks Mac for the reminder.
So, lessons learned:
1) Draw more, don't try to rush to a finish.
2) Get a Dremel.
3) It's fun
I hope I can inspire more people, and otherwise, it was fun to post anyway, after a little bit of handwork.
And now:
Cheers!Last edited by Hillie; 07-11-2009 at 10:22 PM.
-
-
07-11-2009, 10:14 PM #4Senior Member
- Join Date
- Apr 2009
- Posts
- 786
Thanked: 132
Very cool idea and work. Seems like diping the lid in something like this...http://www.caswellplating.com/aids/plastidip.html... would protect the razors, from the sharp edges?
Thanks,
MacLast edited by McWolf1969; 07-11-2009 at 10:18 PM.
-
The Following User Says Thank You to McWolf1969 For This Useful Post:
Hillie (07-11-2009)
-
07-11-2009, 10:18 PM #5Freakin' Ladies Man
- Join Date
- Apr 2009
- Location
- Bay Area
- Posts
- 351
Thanked: 47
Hi Mac,
Thanks! That's actually what I forgot to mention. I sanded everything with 1000 grit paper, to remove all the roughness and leave a smooth area. I also made sure to file the edges clean. I thought of using some sort of electric wire melt stuff to get a soft edge, but so far this seems to work quite OK. I think some people would feel more at ease with some soft stuff around the edge.
-
07-11-2009, 10:20 PM #6Senior Member
- Join Date
- Apr 2009
- Posts
- 786
Thanked: 132
Yeah, the plastic dip, does add to the expense of the whole project...
Definately a fun, project to see...especially with the photos.
Thanks,
Mac
-
07-11-2009, 10:24 PM #7Freakin' Ladies Man
- Join Date
- Apr 2009
- Location
- Bay Area
- Posts
- 351
Thanked: 47
I wonder if I can even get it here. I think the electrical wire shrink wrap can be bought at a few places. I thought of making pics because of posting it here.
-
The Following User Says Thank You to Hillie For This Useful Post:
McWolf1969 (07-11-2009)
-
07-12-2009, 03:42 AM #8Junior Member
- Join Date
- May 2009
- Posts
- 6
Thanked: 2
I would think some small round "c-strip" molding would be perfect for padding the inside of those edges. It would also hide any stray cuts in the metal
") . Just cut to size, put a little glue around the edges, slide it on, and viola! A razor holder worthy of Lynn himself =D
. Just cut to size, put a little glue around the edges, slide it on, and viola! A razor holder worthy of Lynn himself =D
Petra's Tech Shop
This kinda stuff. .99c a foot, can't beat that. Lowes probably has some too.
-
-
07-12-2009, 09:44 AM #9Freakin' Ladies Man
- Join Date
- Apr 2009
- Location
- Bay Area
- Posts
- 351
Thanked: 47
Thanks, that's indeed the stuff I'd need. I'll see if our local shops have something like it.
-
07-12-2009, 11:11 AM #10Senior Member


- Join Date
- Jun 2008
- Location
- Upstate NY
- Posts
- 5,003
Thanked: 1827
That is very clever! If you are concerned with the edges may I suggest that you replace the top metal part of the holder with a disc of Plexiglas or some other plastic, even a colored piece. Cut into a round disc leaving the paper on. Locate and mark your center. Using a compass draw a circle whehe the center of the large holes would go. Mark an "X" in the paper covering w/ 90 degree angles to mark the center of the holes. Reset your compass to a radius to a distance that would locate the center of the smaller radius in your tear drop shape. Drill the center hole for the stand, the large and small holes. Use a coping saw or just file the angles in your tear drop shapes and file/sand the edges to round off. Remove the protective paper at the end. If my stands came apart like your's that is what I would do. The color options are endless and can even go to tortoise if you can get it.
I have to look at my stands and see if they come apart. Thanks for sharing your idea and good luck.If you always do what you always did, you will always get what you always got. (A. Einstein)
-
The Following User Says Thank You to Joed For This Useful Post:
Hillie (07-12-2009)


 Reply With Quote